Overview
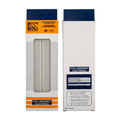
This kit puts 140 pieces of black heat-shrink tubing in nine sizes into one compartmented box, from thin 1.5 mm tubes for single signal wires up to 13 mm tubes for bundles and connectors. Slide a piece over a joint, warm it with a heat gun, and it shrinks into a snug insulating sleeve that covers bare metal, supports the wire, and makes a build look finished.
The sizes are listed by the supplier as tube size × cut length. The smaller sizes come as short 30 mm and 65 mm pieces for individual splices, while the largest four come as 100 mm lengths that you can cut down as needed. Black is also the practical choice for anything that will see sunlight, because it resists UV better than colored tubing.
The supplier does not publish a shrink ratio or a temperature or voltage rating for this kit. Most general-purpose tubing is polyolefin with a 2:1 ratio, meaning it shrinks to about half its supplied diameter, and this manual uses that as a working assumption — shrink one spare piece of each size first so you know exactly what your kit does.
At a Glance
Specifications
| Parameter | Value |
| Kit contents | 140 pieces of black heat-shrink tubing in a compartmented box |
| 1.5 mm × 30 mm | 60 pieces |
| 3.0 mm × 65 mm | 20 pieces |
| 4.0 mm × 65 mm | 16 pieces |
| 5.0 mm × 65 mm | 12 pieces |
| 6.0 mm × 65 mm | 8 pieces |
| 8.0 mm × 100 mm | 6 pieces |
| 10.0 mm × 100 mm | 6 pieces |
| 12.0 mm × 100 mm | 6 pieces |
| 13.0 mm × 100 mm | 6 pieces |
| Size notation | Supplier-stated tube size × cut length |
| Shrink ratio, material, ratings | Not published — test a piece of each size before relying on it |
How to Use
Good heat-shrink work is mostly planning: choose a size that slides over the joint but shrinks tight onto the wire, and get the tube onto the wire before you make the joint.
Choosing a Size
These are guide values that assume a 2:1 shrink ratio. The working range is the thickness a tube can both slide over and still grip once shrunk — from about half its supplied size to a little under it. Confirm with a test piece.
| Tube Size | Working Range | Typical Use |
|---|---|---|
| 1.5 mm | ≈ 0.8–1.2 mm | Bare component legs, thin 26–30 AWG wire |
| 3.0 mm | ≈ 1.5–2.5 mm | Single 22 AWG wire splices |
| 4.0 mm | ≈ 2.0–3.3 mm | 20–18 AWG wire, small solder joints |
| 5.0 mm | ≈ 2.5–4.2 mm | Two-wire joints, crimp barrels |
| 6.0 mm | ≈ 3.0–5.0 mm | Small wire bundles, switch tabs |
| 8.0 mm | ≈ 4.0–6.7 mm | Cable ends, small plugs |
| 10–13 mm | ≈ 5.0–11 mm | Bundles, cable jackets, larger plugs |
Applying and Shrinking
| Step | What To Do | Notes |
|---|---|---|
| 1. Slide it on first | Thread the tube onto the wire before making the joint | Park it well away from the soldering heat so it does not shrink early |
| 2. Make the joint | Solder or crimp, then let it cool | Trim any sharp strand ends that could poke through |
| 3. Position | Center the tube with a few millimeters over the insulation on each side | Tubing also shortens by about 5% as it shrinks, so cut it slightly long |
| 4. Heat | Move a hot-air gun around the tube, working from the middle outward | Stop when it is snug and the shape of the joint shows through |
| 5. Cool | Leave it alone for a few seconds | It sets as it cools |
Common Jobs
| Job | Size and Notes |
|---|---|
| Soldered wire splice | 3.0 mm for 22 AWG. The classic use: it covers the bare joint completely. |
| Crimp terminal or solder tab | 4.0–6.0 mm. Adds insulation and strain relief where the wire meets the terminal. |
| Component leg | 1.5 mm. Stops long resistor or LED legs from touching. |
| Wire loom | 6.0–13.0 mm. Short bands every few centimeters keep a harness tidy. |
| Nicked insulation | One size above the wire, if a tube can still be slid over the damaged spot. |
| Cable end | 5.0–8.0 mm. A band of tubing stiffens the cable where it bends. |
Limits and Safe Use
| Topic | Guidance |
|---|---|
| Heat source | Use a hot-air gun. Lighters and soldering irons work, but they heat unevenly and can scorch the tube. |
| Hair dryers | Usually not hot enough: polyolefin tubing needs well over 100 °C to shrink fully. |
| Sealing | Do not rely on it to keep water out. This kit is not described as adhesive-lined, so the ends are not sealed. |
| Voltage | Low-voltage electronics only. No voltage or temperature rating is published for this kit. |
| Batteries | Never aim a heat gun at lithium cells or packs. Heat damages cells and can make them dangerous. |