Sending SMS messages with microcontrollers, in this case, the Raspberry Pi Pico W can be essential, especially in IoT applications. One of the most popular packages to send messages in MicroPython is the Twilio package, which is initially free and easy to use! However, the package cannot fit on the Pico itself since the storage is so minimal, thus we need another means to use the Twilio package. Thankfully the Pico W has wifi capability which allows you to access the internet and thus use the Twilio API to send the message. I will show you how to do this in this tutorial.
Step 1-) Install Thonny on your Raspberry Pi Pico W
Thonny is a very IDE used to develop MicroPython applications on the Pico. However, if you already have another IDE ready to go you do not have to do this step.
- https://thonny.org/
Step 2-) Create your Twilio Account
- https://www.twilio.com/
Creating a Twilio account is initially free, and no need for credit cards which is nice! You get 15 dollars of credit, which is enough to send a few thousand SMS messages (great for development). When creating an account they will give you a Twilio phone number along with an account id and a token that you will need to start sending messages. Overall it is really easy, just click through the above link to set this up.
Step 3-) Connect to your Raspberry Pi and run the function from the script:
I am going to assume you already made a connection to your Raspberry Pi Pico in Thonny or whatever IDE you are using.
The script itself is located on my GitHub page:
- https://github.com/shillehbean/youtube-channel/blob/main/sms-micro-python.py
The function takes the following parameters:

The logic in the function is split into two parts:
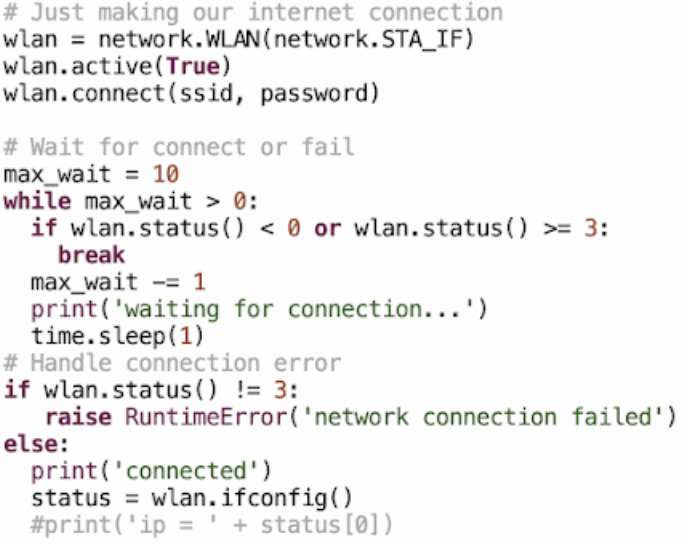
1-) Making the internet connection:

Here we simply use the internet and password for whatever wifi network you are using and we wait 10 seconds for the connection to be made, otherwise, we throw an error.
2-) Hit the Twilio API with the SMS you want to send:

This code uses the requests library, which is built into MicroPython, to hit the Twilio API. You need to pass in the headers or else the API will be unable to parse the information you send in the payload. More details of their API can be found here:
- https://www.twilio.com/docs/usage/api
As you can see the format of the post request in the code mimics the curl command seen on their website, just make sure you have the proper information when calling the function. You also need to be aware that you need to pass in the information from your Twilio account to authenticate, or else you will get an auth error. If you run the function and see a status code in the 200s, your recipient probably got the message! Good job!
Conclusion:
As you can see it is relatively easy to send an SMS, the main takeaway is that you cannot download the package onto your Pico, the hardware is not built to hold large amounts of storage since this is a minimalistic microcontroller. Also note that this architecture I just showed you probably can be applied to other microcontrollers, because as long as you have internet connectivity you can take advantage of using API requests (which are much more lightweight), rather than downloading any sort of library. Hope I helped you develop your IoT applications. Please let me know if you have any questions in the comments.
