
Video Tutorial (Optional)
Watch first if you want to see the full process of setting up a Reddit app and posting to a subreddit with Python.
Project Overview
In this tutorial, you will use Python with the PRAW module (Reddit API wrapper) to authenticate and post to a subreddit automatically with a script.
This is designed for beginners who want to interact with Reddit’s API programmatically for personal use, bot creation, or automating social media workflows.
- Time: 15 to 30 minutes
- Skill level: Beginner
- What you will build: A Python script that authenticates to Reddit and submits a text post to a subreddit
Parts List
From ShillehTek
- None required for this software tutorial - N/A
External
- Python - used to run the automation script
- praw - Python library for interacting with the Reddit API
- Reddit Developer Console (reddit.com/prefs/apps) - create an app to get API credentials
- A Reddit account - used for authentication and posting
Note: The username/password approach shown here will not work if your Reddit account requires two-factor authentication. You may need to disable 2FA for this method.
Step-by-Step Guide
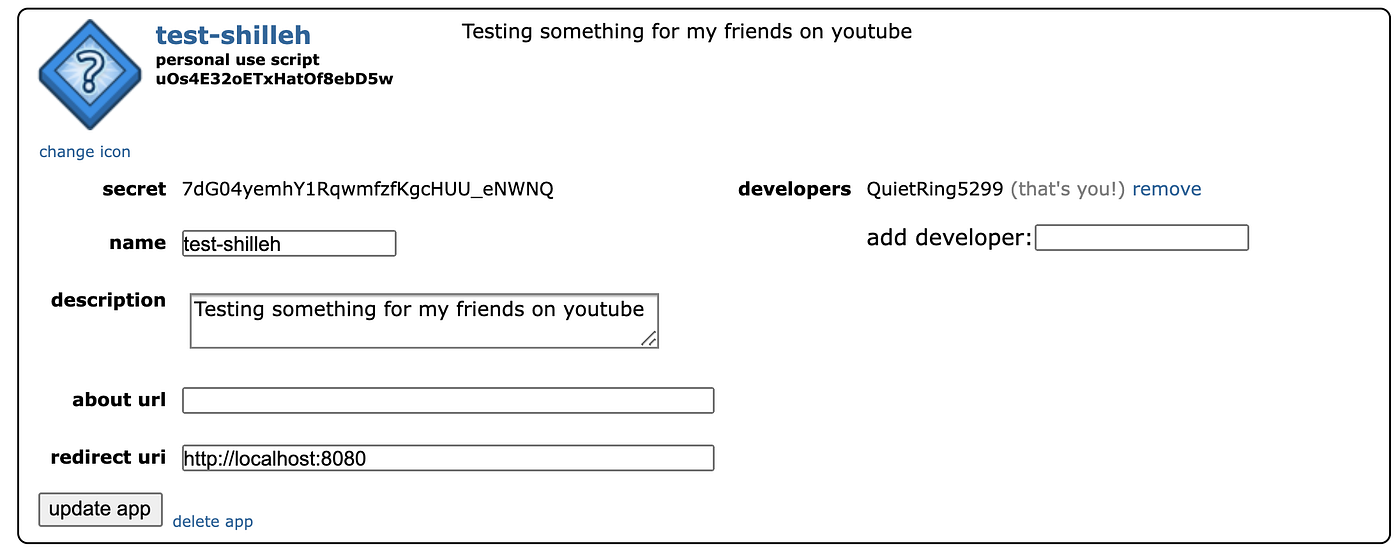
Step 1 - Create a Reddit app and collect credentials
Goal: Register an app so you can authenticate to Reddit’s API and get a client ID and secret.
What to do:
- Go to the Reddit Developer Console: Head to reddit.com/prefs/apps.
- Click “Create App”: At the bottom of the page, find the “Create App” button.
-
Fill in the app details:
- Name: Choose a descriptive name.
- App Type: Select script since this is for a single user.
- Description: Optional, you can leave it blank.
-
Redirect URI: Set this to
http://localhost:8080(or any placeholder). You do not need it for this method, but it is required later if you move to OAuth flows that use redirects. - Personal Use Script (Client ID) and Secret: After creating the app, save these values.
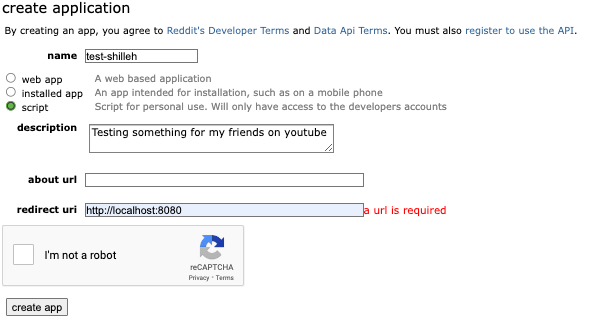
Expected result: You have a Client ID (Personal Use Script) and Secret saved, plus your Reddit username, password, and a user agent string (your app name is fine).
Step 2 - Install the required Python library
Goal: Install PRAW so your script can talk to Reddit’s API.
What to do: In your Python environment, install praw using pip:
Code:
pip install prawExpected result: PRAW is installed and available to import in Python.
Step 3 - Write the Python script to authenticate and post
Goal: Create a script that logs in and submits a text post to a subreddit.
What to do: Create a file named post_to_reddit.py and paste the following code. Replace the placeholder credentials with your own.
Code:
import praw

# Reddit API credentials
reddit = praw.Reddit(
    client_id='your_client_id',
    client_secret='your_client_secret',
    user_agent='your_app_name',
    username='your_reddit_username',
    password='your_reddit_password'
)

# Subreddit to post to
subreddit_name = "test"  # Change to your desired subreddit

# Title and content of the post
title = "My first automated post using Python!"
selftext = "Hello Reddit! This post was made using a Python script."

# Submit the post
subreddit = reddit.subreddit(subreddit_name)
subreddit.submit(title=title, selftext=selftext)

print(f"Posted to Reddit: {title}")
Expected result: You have a ready-to-run script that authenticates using PRAW and submits a text post to your chosen subreddit.
Step 4 - Understand what each part does
Goal: Know what to change safely when you customize the script.
What to do:
- praw: The Python library that simplifies Reddit API interactions.
- Reddit API credentials: Replace placeholders with your app’s Client ID, Client Secret, user agent, and your Reddit username/password.
-
Subreddit: Set the community you want to post to. For practice, you can use a test subreddit like
r/test. -
Submit the post:
submit()creates the post using a title and body (selftext). For link posts, passurlinstead ofselftext.
Expected result: You understand what values must be changed (credentials, subreddit, title, and body) and what the script is doing.
Step 5 - Run the script
Goal: Execute the script and confirm the post is created.
What to do: Run the Python file from your terminal:
Code:
python post_to_reddit.pyExpected result: The terminal prints a confirmation message, and you can see the post in the subreddit you specified.
Conclusion
You built a simple Reddit posting automation using Python, the PRAW library, and a registered Reddit app, so your script can authenticate and submit posts to a subreddit programmatically.
Want to support more builds and tutorials? Check out parts and kits at ShillehTek.com. If you want help turning a script like this into a more complete automation workflow, reach out through our consulting services.


.png?v=25000753014097803521767701813)

.png?v=68677308723310773341767701813)


