
Video Tutorial (Optional)
Watch first if you want to follow along with the KY-037 sound sensor wiring and the Python test script on a Raspberry Pi.
Project Overview
In this tutorial, you will connect a Raspberry Pi to a KY-037 sound sensor and use Python to read the sensor’s digital output so you can detect when sound crosses a threshold.
The KY-037 includes both a digital output (simple 0/1 sound trigger) and an analog output (sound intensity). This guide focuses only on the digital output for basic sound detection.
If you want to support this content and follow future builds, here are the original links from the project:
- YouTube - Shilleh.
- Buy Me A Coffee
- UpWork
- ShillehTek Website (Exclusive Discounts)
- ShillehTek Amazon Store - US
- ShillehTek Amazon Store - Canada
- ShillehTek Amazon Store - Japan
- Time: 20 to 40 minutes
- Skill level: Beginner
- What you will build: A Raspberry Pi script that prints “Sound detected!” or “No sound detected.” based on the KY-037 digital output
Parts List
From ShillehTek
- ShillehTek parts store - source the parts used in this build
External
- ShillehTek KY-037 Sound Sensor - sound sensor module used for digital sound detection
- Raspberry Pi (any model with GPIO pins; Raspberry Pi 4B used in the original build)
- 3 Jumper Wires (Male-to-Female) - connect VCC, GND, and D0 to the Pi
- A thin screwdriver or blade - used to adjust the KY-037 potentiometer (sensitivity)
Note: This tutorial uses the KY-037 digital output (D0) connected to GPIO 4 (BCM numbering). The sensor sensitivity is adjusted using the on-board potentiometer while the script is running.
Step-by-Step Guide
Step 1 - Wire the KY-037 to the Raspberry Pi
Goal: Connect power and the KY-037 digital output (D0) to a Raspberry Pi GPIO pin.
What to do: Make the following connections:
- KY-037 VCC to Raspberry Pi 5V (pin 4 in the original text)
- KY-037 GND to Raspberry Pi GND (pin 6)
- KY-037 D0 (Digital Output) to Raspberry Pi GPIO 4 (physical pin 7)
Reference mapping (as written in the original project):
KY-037          Raspberry Pi
-----------------------------
VCC  ---->  5V
GND  ---->  GND
D0   ---->  GPIO 4

Expected result: The KY-037 is powered and its D0 pin is connected to GPIO 4 so the Pi can read an on/off sound trigger.
Step 2 - Prepare to tune the KY-037 sensitivity
Goal: Be ready to adjust the on-board potentiometer to get stable 0/1 readings.
What to do: Locate the potentiometer (the small screw-like adjuster) on the KY-037. Keep a thin screwdriver or blade nearby so you can rotate it while the Python script is running.
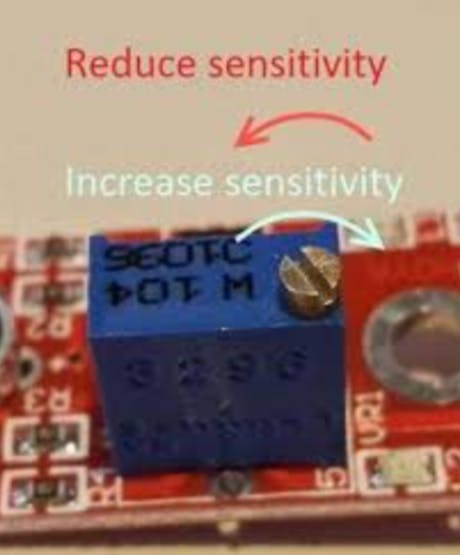
Expected result: You know where the potentiometer is and can adjust it in small increments during testing.
Step 3 - Run the Python script to read the digital output
Goal: Read GPIO 4 in a loop and print whether sound is detected in real time.
What to do: Copy the following script into a Python file on your Raspberry Pi and run it. It uses BCM numbering and reads GPIO 4.
Code:
import RPi.GPIO as GPIO
import time
# Set up GPIO pin numbering mode and the sound sensor pin
GPIO.setmode(GPIO.BCM)
SOUND_SENSOR_PIN = 4 # GPIO pin number (adjust as needed)
GPIO.setup(SOUND_SENSOR_PIN, GPIO.IN, pull_up_down=GPIO.PUD_DOWN)
# Function to check and print sound detection status
def detect_sound():
sound_detected = GPIO.input(SOUND_SENSOR_PIN) # Read the digital signal
# The KY-037 module has a potentiometer (small screw-like component) that adjusts the sensitivity.
# Tuning this potentiometer is crucial to get accurate readings. Turning it clockwise increases sensitivity,
# which means the sensor will detect lower sound levels and produce more "1" (sound detected) outputs.
# Turning it counter-clockwise decreases sensitivity, making it less likely to detect sound (producing more "0" outputs).
# If the sensor is only showing "1" (sound detected) values, rotate the potentiometer counter-clockwise
# (you may need to rotate it up to 100 times) until you start seeing "0" values. This adjustment sets the sensitivity threshold
# so that it can correctly detect and respond to sound changes.
if sound_detected == 1:
print("Sound detected!") # Sound detected
else:
print("No sound detected.") # No sound detected
# Main program loop
try:
print("Tuning your KY-037 sound sensor: Adjust the potentiometer to get accurate 0/1 readings.")
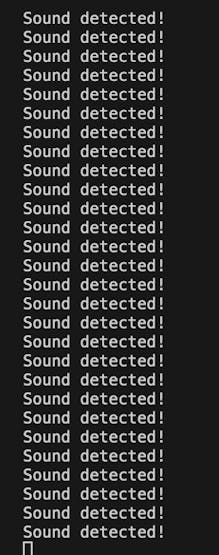
print("If you see only 'Sound detected!' messages, reduce sensitivity by rotating the screw counter-clockwise.")
while True:
detect_sound() # Check sound sensor status
except KeyboardInterrupt:
print("Program interrupted. Cleaning up GPIO settings.")
GPIO.cleanup() # Clean up all GPIO settingsIf RPi.GPIO is not installed on your Raspberry Pi OS image, install it with:
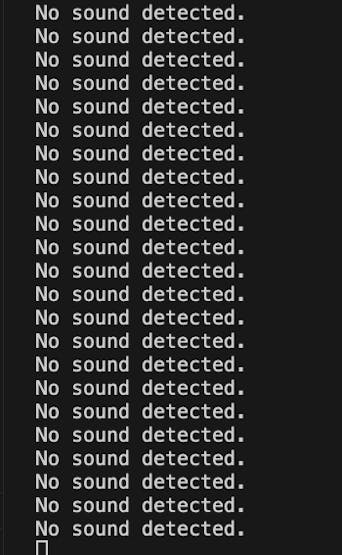
sudo apt-get install python3-rpi.gpioExpected result: The terminal continuously prints “Sound detected!” or “No sound detected.” based on the KY-037 D0 output.
Step 4 - Tune the sensor while the script is running
Goal: Adjust the potentiometer so the digital output behaves correctly for your environment.
What to do: While the script is printing output, rotate the potentiometer slowly:
- If the output constantly shows Sound detected!, reduce sensitivity by rotating the screw counter-clockwise.
- Aim for a “sweet spot” where normal ambient noise can produce No sound detected., and a clear noise (talking or a snap) briefly produces Sound detected!.
It can take dozens of rotations, and in the original build it took about 100 counter-clockwise turns to move away from maximum sensitivity.
Expected result: The printed output changes predictably with sound changes in the room, making the digital trigger usable for future projects (for example, snapping to toggle an LED).
Conclusion
You connected a Raspberry Pi to a KY-037 sound sensor, read the KY-037 digital output with Python, and tuned the potentiometer so sound detection behaves correctly for your environment. With this working, you can use the D0 pin as a simple trigger for sound-activated projects.
Want the exact parts used in this build? Grab them from ShillehTek.com. If you want help customizing this project or building something similar for your product, check out our consulting: https://shillehtek.com/pages/iot-consulting.


.png?v=25000753014097803521767701813)

.png?v=68677308723310773341767701813)


