
Video Tutorial (Optional)
Watch first if you want to follow the full Gmail App Password setup and Nodemailer transporter configuration step by step.
Project Overview
Node.js + Nodemailer: You will configure Gmail authentication using an App Password so Nodemailer can send emails without password or "Less Secure Apps" issues.
Using a plain Gmail password often fails now, and Google no longer supports the older "Less Secure App Access" approach. The workaround is to enable two-factor authentication and generate an App Password for your Node app.
- Time: 10 to 20 minutes
- Skill level: Beginner
- What you will build: A working Nodemailer transporter that authenticates to Gmail using an App Password
Parts List
From ShillehTek
- None
External
- Gmail account with access to Google Account Security settings
- Two-factor authentication enabled on the Gmail account
- App Password generated for Gmail (used as Nodemailer password)
- Node.js project
- nodemailer package
- dotenv package (optional, for environment variables)
Note: Google no longer supports signing in to Gmail SMTP using only your normal account password for many setups, and "Less Secure Apps" is no longer available. Use an App Password instead.
Step-by-Step Guide
Step 1 - Enable two-factor authentication on your Gmail account
Goal: Turn on 2-step verification so Google will allow you to generate an App Password.
What to do: Go to your Google account security settings and enable two-factor authentication for the Gmail account you want to use with Nodemailer:
https://myaccount.google.com/security
After completing setup, it should look similar to the screenshot below.
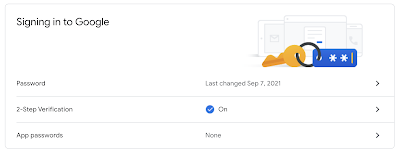
Expected result: Two-factor authentication is enabled for the Gmail account.
Step 2 - Generate a Gmail App Password
Goal: Create an App Password that Nodemailer can use to authenticate.
What to do: In the same security settings area, open the App Passwords option:
https://myaccount.google.com/security
Follow the prompts to generate an App Password. The device selection (for example, Mac) does not necessarily matter.
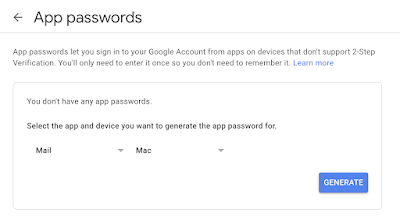
Expected result: You have an App Password to use as the SMTP password in Nodemailer.
Step 3 - Create your Nodemailer transporter using the App Password
Goal: Configure a Nodemailer transporter that can authenticate to Gmail SMTP.
What to do: Create a JavaScript file and add the transporter configuration below. This example uses environment variables for the Gmail address and App Password.
Code:
var dotenv = require("dotenv")
dotenv.config()

const nodemailer = require("nodemailer");
let transporter = nodemailer.createTransport({
    service: 'Gmail',
    host: 'smtp.gmail.com',
    secure: false,
    auth: {
        user: process.env.EMAIL_TEST,
        pass: process.env.EMAIL_TEST_APP_PSWD
    },
})
You can place this file wherever you prefer (for example, in a services directory). If you do not want to use a .env file, you can hardcode the values instead.
Expected result: Your project has a configured transporter that is ready to send mail through Gmail using an App Password.
Step 4 - Use the transporter to send an email (optional)
Goal: Send an email using your transporter to confirm Gmail authentication is working.
What to do: Use the transporter to send email in your application. The example below shows a function that sends a verification email when users sign up.
Code:
module.exports = {
    verifyUserEmail: async function verifyUserEmail(name, userEmail, username, token) {
        try {
            let info = await transporter.sendMail({
                from: process.env.EMAIL_TEST,
                to: userEmail,
                subject: "Hello " + name + " please verify your email by clicking the link",
                html: process.env.homepageDev + "/verifyUserEmail/" + username + "/" + token,
            })
        } catch (err) {
            console.log(err)
        }
    }
}
In this exported function (verifyUserEmail) it takes in:
- name: Name of the user
- userEmail: The email we are sending to
- username: The username of the user in the application
- token: A JWT token linked to the user
Import the function where you need it:
Code:
const emails = require('../services/Email');Then call it from your route handler:
Code:
router.post('/signup', async (req, res) => {
    const signedUpUser = new Schemas.SignUp({
        fullName: req.body.fullName,
        username: req.body.username,
        email: req.body.email,
        password: req.body.password,
        role: req.body.role
    })
    const emailToken = jwt.sign({
        username: req.body.username
    }, 'secret1234', { expiresIn: '1h' })
    emails.verifyUserEmail(req.body.fullName, req.body.email, req.body.username, emailToken)
    signedUpUser.save()
        .then(data => {
            res.json(data)
        })
        .catch(error => {
            res.json(error)
        })
})
Expected result: You can send email using your Gmail account through Nodemailer without authentication failures caused by plain-password sign-in.
Conclusion
You configured Gmail authentication for a Node.js Nodemailer transporter by enabling two-factor authentication and generating a Gmail App Password. This avoids the older plain-password and "Less Secure Apps" approaches that no longer work for many accounts.
Want to support ShillehTek? Shop our parts and projects at ShillehTek.com. If you want help integrating email flows into an IoT dashboard, backend, or product launch, check out our IoT consulting services.


.png?v=25000753014097803521767701813)

.png?v=68677308723310773341767701813)


