How to Use Black Args in VS Code

Sometimes when working with large projects in python we would prefer to format the file per Python styling standards, now although this can seem like a tediously manual task, there are tools out there that can help us automate part of this process. In my case, I used it to auto-format long lines in Python to be a certain length. I used black-args in Visual Studio code to do this. 

Step 1-) Pip install Black Args

> pip install black

Step 2-) Modify your settings.json file

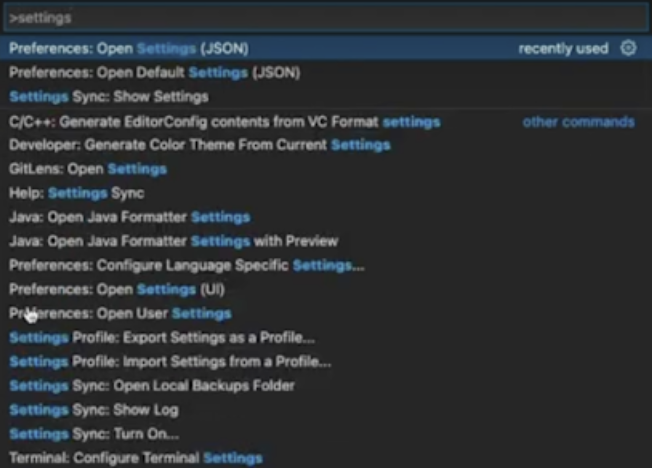
Access your settings.json file in VS Code. To do this I just type in Command + Shift + P (Mac), Control + Shift + P (Windows). Type in "settings" in the prompt and select Preferences: Open Settings (JSON) shown below:
Step 3-) Add the arguments to the settings.json file

You can add many arguments to the settings.json file, in this case, I am adding a rule for line length per PEP 8:

https://peps.python.org/pep-0008/

PEP 8 is the standard for styling Python files and I highly recommend reading it and going over it if you are tasked with this challenge. I added the following code to the settings.json file:

{
    "python.formatting.provider": "black",
    "python.formatting.blackArgs": [
        "--line-length=79"
    ],
    "python.linting.enabled": true,
    "editor.formatOnSave": true,
}

Notice there is the "editor.formatOnSave". This setting allows us to auto-format existing files after hitting the save button, which can be convenient if you are working with a large legacy project that needs to be refactored. Once this is done you should be able to go to any Python file you have in the project and hit save to see the results. If you have very long lines this will save you a significant amount of time. 

Conclusion

Black Args in VS Code is a great way to save you time in refactoring Python files. This came in handy for me in one of my own projects and I hope it helps others out there as well. It was not necessarily straightforward at first, hence why I came up with this tutorial. Thanks for reading everyone!

Create a free account to access full content.

All access to code and resources on ShillehTek.

Signup Now

Already a member? Sign In

Explore More on Our Blog

How to Create a Time-Lapse Video with a Raspberry Pi Camera

How to Create a Time-Lapse Video with a Raspberry Pi Camera

Learn how to make a timelapse with your Raspberry Pi in Python.

How to Integrate the MPU6050 with the STM32 Blue Pill

How to Integrate the MPU6050 with the STM32 Blue Pill

Learn how to measure acceleration with the STM32 and the MPU6050 in the Arduino IDE.

Getting Started with STM32 Blue Pill in Arduino IDE Using a USB to TTL Converter — Write Your First Program

Getting Started with STM32 Blue Pill in Arduino IDE Using a USB to TTL Converter — Write Your First Program

This comprehensive tutorial will guide you through the process of setting up and programming the STM32 Blue Pill...

Automate Task Scheduling in AWS with Lambda, Step Functions, and CloudWatch

Automate Task Scheduling in AWS with Lambda, Step Functions, and CloudWatch

In this tutorial, I'll show you how to automatically schedule tasks in AWS at regular intervals using AWS...

Implementing Google reCAPTCHA in a Simple React and Node.js App

Implementing Google reCAPTCHA in a Simple React and Node.js App

Learn how to protect your React applications from bots and spam with Google reCAPTCHA integration! This step-by-step tutorial...

AWS Lambda Tutorial: Using Selenium with Chromedriver in Python

AWS Lambda Tutorial: Using Selenium with Chromedriver in Python

In this tutorial, I will guide you through the process of running Selenium with ChromeDriver inside an AWS...

How to Connect MLX90614 Infrared Thermometer to Raspberry Pi Pico W: MicroPython Tutorial!

How to Connect MLX90614 Infrared Thermometer to Raspberry Pi Pico W: MicroPython Tutorial!

Learn how to use the MLX90614 with the Raspberry Pi Pico W and get infrared values in MicroPython.

Raspberry Pi Pico/Pico W Free Simulator

Raspberry Pi Pico/Pico W Free Simulator

Discover how to simulate Raspberry Pi Pico projects using Wokwi, a free online simulator for Arduino and MicroPython....

Interfacing the MPU6050 with Raspberry Pi Pico W in C++

Interfacing the MPU6050 with Raspberry Pi Pico W in C++

Interface with the MPU6050 using the Raspberry Pi Pico W in C++.

How to Write your First C++ Program on the Raspberry Pi Pico W

How to Write your First C++ Program on the Raspberry Pi Pico W

Write your first C++ Program on the Pico W in a few simple steps.

Back to blog

Leave a comment

Please note, comments need to be approved before they are published.