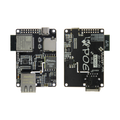
Overview
The TTGO T-Beam is a self-contained wireless node: an ESP32 (Wi-Fi + Bluetooth), a 915 MHz LoRa radio, a NEO-6M GPS receiver, and an 18650 battery holder with onboard charging, all on one board. It is the classic platform for GPS asset trackers, Meshtastic mesh nodes, field telemetry, and any project that needs to report location or sensor data over kilometers without cellular service.
Development happens over USB in the Arduino IDE, PlatformIO, or MicroPython, and the board also runs ready-made firmware like Meshtastic if you'd rather not write code at all. A power-management chip (AXP192 on v1.1 boards, AXP2101 on v1.2) handles battery charging and switches power to the GPS and LoRa sections — which matters in code, as shown below.
As a host board, the T-Beam needs no wiring to get started: attach the LoRa antenna, insert an 18650 cell or connect USB, and upload a sketch.
At a Glance
Specifications
| Parameter | Value |
| Main Controller | ESP32 dual-core Xtensa LX6 @ 240 MHz |
| Wireless (onboard) | Wi-Fi 802.11 b/g/n + Bluetooth (Classic/BLE) |
| LoRa Radio | 915 MHz band (Semtech SX1276 or SX1262, revision-dependent), SMA antenna connector |
| GPS Module | u-blox NEO-6M with backup battery and ceramic/IPEX antenna |
| Power Management | AXP192 (v1.1) / AXP2101 (v1.2) — charging + power rail control |
| Battery | Single 18650 Li-ion holder, charged onboard from USB |
| USB | CH9102F USB-serial bridge (connector varies by revision) |
| Logic Level | 3.3V |
| Typical Deep Sleep Current | Low-mA range with radios off (revision-dependent) |
| Supported Firmware | Arduino IDE, PlatformIO, ESP-IDF, MicroPython, Meshtastic |
Getting Started
Nothing external needs wiring — the radios, GPS, and battery circuit are already routed. What you do need is the internal pin map, because the GPS and LoRa radio occupy fixed ESP32 pins:
| Function | ESP32 GPIO |
|---|---|
| GPS UART RX (ESP32 receives) | GPIO 34 |
| GPS UART TX (ESP32 transmits) | GPIO 12 |
| LoRa SPI — SCK / MISO / MOSI | GPIO 5 / 19 / 27 |
| LoRa NSS (CS) / RST / DIO0 | GPIO 18 / 23 / 26 |
| PMU + OLED I2C (SDA / SCL) | GPIO 21 / 22 |
| Onboard button (usable in sketches) | GPIO 38 |
IDE setup: install the ESP32 board package, select T-Beam (or "ESP32 Dev Module"), and pick the board's COM port. For battery use, insert a quality 18650 observing the polarity marking — the board charges it whenever USB is connected.
Code Examples
Read GPS position (Arduino, TinyGPS++)
// T-Beam v1.1 - read NEO-6M GPS and print position
// Libraries: TinyGPSPlus, XPowersLib (both in Library Manager)

#include <TinyGPSPlus.h>
#include <Wire.h>
#include <XPowersLib.h>

TinyGPSPlus gps;
XPowersAXP192 pmu;   // v1.2 boards: use XPowersAXP2101 instead

void setup() {
  Serial.begin(115200);

  // 1) Wake the PMU and switch on the GPS power rail (LDO3, 3.3V)
  Wire.begin(21, 22);
  pmu.begin(Wire, AXP192_SLAVE_ADDRESS, 21, 22);
  pmu.setLDO3Voltage(3300);
  pmu.enableLDO3();

  // 2) GPS UART: RX=34, TX=12, 9600 baud
  Serial1.begin(9600, SERIAL_8N1, 34, 12);
  Serial.println("Waiting for GPS fix (go outdoors)...");
}

void loop() {
  while (Serial1.available()) {
    gps.encode(Serial1.read());
  }
  if (gps.location.isUpdated()) {
    Serial.print("Lat: ");  Serial.print(gps.location.lat(), 6);
    Serial.print("  Lng: "); Serial.print(gps.location.lng(), 6);
    Serial.print("  Sats: "); Serial.println(gps.satellites.value());
  }
}
LoRa beacon transmit (Arduino, SX1276 boards)
// T-Beam (SX1276 revision) - send a LoRa packet every 5 seconds
// Library: "LoRa" by Sandeep Mistry. SX1262 boards: use RadioLib instead.
// ANTENNA MUST BE ATTACHED BEFORE POWERING THE BOARD.

#include <SPI.h>
#include <LoRa.h>

const long FREQ = 915E6;   // 915 MHz (US band)
int counter = 0;

void setup() {
  Serial.begin(115200);

  SPI.begin(5, 19, 27, 18);        // SCK, MISO, MOSI, NSS
  LoRa.setPins(18, 23, 26);        // NSS, RST, DIO0

  if (!LoRa.begin(FREQ)) {
    Serial.println("LoRa init failed - check antenna and revision");
    while (true) delay(1000);
  }
  Serial.println("LoRa ready");
}

void loop() {
  LoRa.beginPacket();
  LoRa.print("T-Beam beacon #");
  LoRa.print(counter++);
  LoRa.endPacket();

  Serial.println("Packet sent");
  delay(5000);
}