

Project Overview
Arduino Uno + 16x2 LCD (HD44780 with PCF8574 I2C backpack): In this build you will load custom 5x8 glyphs into the LCDs eight programmable character slots to display your own icons, create a smooth pixel progress bar, and animate a walking figure by redefining a character in place.
You will learn the 8-byte bitmap format, use a free online editor to generate byte arrays, and upload two Arduino sketches: one for custom icons and one that combines animation with an 80-step progress bar.
- Time: ~30 minutes
- Skill level: Beginner
- What you will build: An I2C LCD demo with custom icons, a smooth 80-step progress bar and a walking animation, plus the know-how to make any glyph you want.

Parts List
From ShillehTek
- Arduino Uno R3 Super Starter Kit - the microcontroller board that runs the sketches and drives the display.
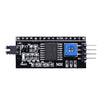
- LCD1602 16x2 Display + PCF8574 I2C Adapter - HD44780-compatible character LCD plus I2C backpack for a simple 4-wire connection.
- Dupont Jumper Wires - to connect SDA, SCL, 5V, and GND between the Uno and the I2C backpack.
External
- None
Note: the original used the LCD's parallel pins with the plain LiquidCrystal library; this version uses the I2C backpack and LiquidCrystal_I2C. The createChar() and write() calls are identical in both, so everything here works on either wiring and on a 20x4 display too.
Step-by-Step Guide
Step 1 - Wire the LCD
Goal: Connect the I2C LCD with four wires and prepare the Arduino library.
What to do: Connect the I2C backpack to the Uno: SDA to A4, SCL to A5, VCC to 5V, and GND to GND.
Install LiquidCrystal_I2C from the Arduino Library Manager. If the screen shows nothing later, try address 0x3F and adjust the backpack's contrast potentiometer.
Expected result: Backlight on.
Step 2 - Understand the Bitmap Format
Goal: Read and write custom glyphs as 5x8 pixel bitmaps.
What to do: A custom character is an array of eight bytes, one per row from top to bottom. Only the five low bits of each byte matter: they are the five pixel columns, left to right. Writing them in binary makes the picture visible in the code:
byte heart[8] = {
  B00000,
  B01010,   //  .#.#.
  B11111,   //  #####
  B11111,   //  #####
  B01110,   //  .###.
  B00100,   //  ..#..
  B00000,
  B00000
};
Draw glyphs without counting bits using the online editor screenduino, which produces the array for you.

Expected result: You can look at eight bytes and see the picture.
Step 3 - Icons: Load a Slot, Print It
Goal: Load multiple custom glyphs into slots 0 to 7 and print them like normal characters.
What to do: Upload the sketch below.
#include <LiquidCrystal_I2C.h>
LiquidCrystal_I2C lcd(0x27, 16, 2);

byte heart[8]  = {B00000, B01010, B11111, B11111, B01110, B00100, B00000, B00000};
byte smiley[8] = {B00000, B01010, B01010, B00000, B10001, B01110, B00000, B00000};
byte bell[8]   = {B00100, B01110, B01110, B01110, B11111, B00000, B00100, B00000};
byte degree[8] = {B01100, B10010, B10010, B01100, B00000, B00000, B00000, B00000};

void setup() {
  lcd.init(); lcd.backlight();
  lcd.createChar(0, heart);          // slots 0..7 are yours
  lcd.createChar(1, smiley);
  lcd.createChar(2, bell);
  lcd.createChar(3, degree);
  lcd.setCursor(0, 0);               // always set the cursor after createChar()
  lcd.print("I "); lcd.write(byte(0)); lcd.print(" Arduino "); lcd.write(byte(1));
  lcd.setCursor(0, 1);
  lcd.write(byte(2)); lcd.print(" 23.5"); lcd.write(byte(3)); lcd.print("C");
}

void loop() {}
Expected result: "I", a heart, "Arduino" and a smiley on the top line; a bell and "23.5" with a proper degree sign and "C" on the bottom. (Note lcd.write(byte(0)): plain write(0) is ambiguous to the compiler.)
Step 4 - Animation: Redefine a Slot in Place, Plus a Pixel Progress Bar
Goal: Animate a character by redefining it in place, and build a progress bar with 80 fill steps across a 16x2 LCD row.
What to do: The character memory is live: if a slot is already on screen and you call createChar() with a new bitmap, the pixels change instantly without reprinting. That is the trick for animation: one cell, redefined every frame.
For the bar, five slots hold glyphs with 1 to 5 columns filled, so each of the 16 cells can show five levels.
Upload the sketch below and watch the top row.
#include <LiquidCrystal_I2C.h>
LiquidCrystal_I2C lcd(0x27, 16, 2);

byte walk[2][8] = {                          // two frames of a walking figure
  {B01110, B01110, B00100, B01110, B10101, B00100, B01010, B10001},   // legs apart
  {B01110, B01110, B00100, B11111, B00100, B00100, B00100, B00110}    // legs together
};

void makeBarChars() {                        // slots 1..5 = 1..5 columns filled
  for (int n = 1; n <= 5; n++) {
    byte row = 0, g[8];
    for (int c = 0; c < n; c++) row |= (B10000 >> c);
    for (int r = 0; r < 8; r++) g[r] = row;
    lcd.createChar(n, g);
  }
}

void bar(int pct) {                          // 0..100 % across the bottom row, 80 pixel columns
  int cols = map(pct, 0, 100, 0, 80);
  lcd.setCursor(0, 1);
  for (int cell = 0; cell < 16; cell++) {
    int fill = constrain(cols - cell * 5, 0, 5);
    if (fill == 0) lcd.print(" "); else lcd.write(byte(fill));
  }
}

void setup() { lcd.init(); lcd.backlight(); makeBarChars(); }

void loop() {
  static int x = 0, frame = 0, pct = 0;
  lcd.createChar(0, walk[frame]);            // redefine slot 0 -> the figure on screen changes instantly
  lcd.setCursor(x, 0); lcd.write(byte(0));   // draw the walker at its current cell
  bar(pct);
  delay(250);
  lcd.setCursor(x, 0); lcd.print(" ");       // erase before moving on
  frame ^= 1;                                // next frame
  x = (x + 1) % 16;                          // next cell
  pct = (pct + 3) % 101;
}
Expected result: A little figure walks across the top line with alternating legs, while a progress bar fills the bottom line in fine pixel steps rather than jumping a whole cell at a time.
Step 5 - Ideas and Limits
Goal: Plan around the eight custom-character slot limit.
What to do: Eight slots is the hard limit, so plan them. A project might use 5 for a bar, 1 for an animated icon, and 2 for units. Big digits for a clock are made by tiling several custom glyphs into 2-row numerals. Signal strength, battery level and Wi-Fi icons all fit in one glyph each. For a spinner, redefine one slot through four frames. On a 20x4 display the same eight slots are shared by all lines.
Expected result: Displays that look designed, not defaulted.
Conclusion
By using the Arduino Uno with a 16x2 HD44780 LCD, you turned a text-only display into a flexible UI that can show custom icons, a smooth multi-step progress bar, and animation by redefining characters in place.
Want the exact parts used in this build? Grab them from ShillehTek.com. If you want help customizing this project or building something for your product, check out our IoT consulting services.
Credit: Photos and the original reference tutorial are by tusindfryd on Hackster.io.





.png?v=25000753014097803521791168436)

.png?v=68677308723310773341791168436)


