AMG8833 Pre-Soldered 8x8 IR Thermal Imaging Camera Sensor for Arduino, Raspberry Pi & ESP32 (Pre-Soldered)Default Title · $27.99 · In stock
Overview
The AMG8833 is Panasonic’s Grid-EYE: a true thermal camera shrunk to a sensor. Behind its small metal can sit 64 thermopile elements in an 8×8 grid, each independently measuring the temperature of whatever lies in its slice of a 60° field of view. Ten times a second you get a complete 64-pixel heat map — enough to see a warm human silhouette move across a room, find a hot component on a PCB, or watch a pan heat up.
Unlike a PIR sensor, which only reports change in infrared, the Grid-EYE reports absolute temperatures from 0 to 80 °C per pixel, so it detects a person who is standing still — the classic PIR blind spot. It reads over plain I2C (0x69 by default, 0x68 with AD0 low), runs from 3.3–5 V on this pre-soldered breakout, and includes an INT pin that fires when any pixel crosses thresholds you set — presence detection with zero polling.
The art of using it is thinking in blobs rather than images: 64 pixels will never read a face, but a warm 4-pixel cluster entering frame left and exiting frame right is a person walking by, unmistakably. This manual covers the pinout, wiring and code for Arduino, ESP32, Raspberry Pi, and Pico (including a no-library raw-register reader), and honest answers about range, resolution, and what it can and cannot see.
At a Glance
Sensor
Panasonic AMG8833 Grid-EYE
Resolution
8 × 8 = 64 thermal pixels
Range
0 – 80 °C, ±2.5 °C
Frame Rate
10 fps (or 1 fps mode)
Interface
I2C — 0x69 / 0x68
Supply
3.3 – 5 V
Specifications
Parameter
Value
Sensor
Panasonic AMG8833 (Grid-EYE, high-gain)
Pixels
64 thermopiles, 8 × 8 grid
Temperature range
0 – 80 °C per pixel
Accuracy
±2.5 °C typical
Resolution
0.25 °C per LSB
Field of view
60° × 60°
Frame rate
10 fps or 1 fps
Human detection
Up to ~5–7 m (blob detection)
Interface
I2C, 0x69 default (AD0 low → 0x68)
Interrupt
INT pin, programmable pixel thresholds
Supply
3.3 – 5 V (on-board regulator)
Header
6-pin: VIN · GND · SCL · SDA · INT · AD0
Pinout Diagram
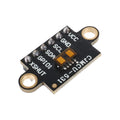
Six pins: VIN and GND for power, SCL and SDA for I2C, INT (the threshold interrupt output, optional), and AD0 (address select — leave it for 0x69, tie to GND for 0x68). The silver can with the dark aperture is the thermopile array; keep its window unobstructed.
Wiring Guide
Arduino Uno Wiring
AMG8833 Pin
Arduino Uno Pin
Notes
VIN
5V
On-board regulator
GND
GND
Common ground
SCL
A5
I2C clock
SDA
A4
I2C data
INT / AD0
Unconnected
Optional
Give it a minute. The thermopiles reference the sensor’s own die temperature, so readings drift for the first ~60 seconds after power-up while everything reaches equilibrium. Let it settle before calibrating thresholds.
ESP32 Wiring
AMG8833 Pin
ESP32 Pin
Notes
VIN
3V3
Power
GND
GND
Common ground
SCL
GPIO 22
Default Wire SCL
SDA
GPIO 21
Default Wire SDA
INT
GPIO 27 (optional)
Presence interrupt
The IoT thermal node. An ESP32 streaming 10 fps of Grid-EYE frames over Wi-Fi (WebSocket or MQTT) makes a live browser heat map with about a page of code — the sensor’s data rate is tiny (64 × 2 bytes per frame).
Raspberry Pi Wiring
AMG8833 Pin
Raspberry Pi Pin
Notes
VIN
3.3V (Pin 1)
Power
GND
GND (Pin 6)
Common ground
SCL
GPIO 3 (Pin 5)
I2C1 clock
SDA
GPIO 2 (Pin 3)
I2C1 data
Enable I2C with sudo raspi-config, then i2cdetect -y 1 should show 69. The Pi is the platform for pretty output: SciPy interpolation upscales the 8×8 grid into the smooth colorful heat maps you see in Grid-EYE demos.
Raspberry Pi Pico Wiring
AMG8833 Pin
Pico Pin
Notes
VIN
3V3(OUT) (Pin 36)
Power
GND
GND (Pin 38)
Common ground
SCL
GP5 (Pin 7)
I2C0 clock
SDA
GP4 (Pin 6)
I2C0 data
No driver needed. The MicroPython example below reads the pixel registers directly — the AMG8833’s register map is simple enough that raw I2C beats hunting for a library.
Code Examples
Arduino — Print the Thermal Grid
amg8833_grid.ino
// Library Manager: install "Adafruit AMG88xx Library"
#include <Adafruit_AMG88xx.h>

Adafruit_AMG88xx amg;
float pixels[AMG88xx_PIXEL_ARRAY_SIZE];

void setup() {
  Serial.begin(115200);
  if (!amg.begin()) {          // 0x69 default
    Serial.println("AMG8833 not found - check wiring");
    while (1);
  }
  delay(100);
}

void loop() {
  amg.readPixels(pixels);
  for (int y = 0; y < 8; y++) {
    for (int x = 0; x < 8; x++) {
      Serial.print(pixels[y * 8 + x], 1);
      Serial.print("\t");
    }
    Serial.println();
  }
  Serial.println("----------");
  delay(500);
}
ESP32 — Hot-Spot Detector
esp32_hotspot.ino
#include <Adafruit_AMG88xx.h>

Adafruit_AMG88xx amg;
float px[64];

void setup() {
  Serial.begin(115200);
  if (!amg.begin()) { Serial.println("Sensor missing"); while (1); }
}

void loop() {
  amg.readPixels(px);
  float maxT = -100;
  int maxI = 0;
  for (int i = 0; i < 64; i++) {
    if (px[i] > maxT) { maxT = px[i]; maxI = i; }
  }
  Serial.printf("Hottest: %.1f C at (%d,%d)  %s\n",
                maxT, maxI % 8, maxI / 8,
                maxT > 28 ? "<- warm body?" : "");
  delay(300);
}
Raspberry Pi — Python Heat Map
amg8833_heatmap.py
import time
import board
import busio
import adafruit_amg88xx

# pip3 install adafruit-circuitpython-amg88xx

i2c = busio.I2C(board.SCL, board.SDA)
amg = adafruit_amg88xx.AMG88XX(i2c)   # addr=0x69

BLOCKS = " .:-=+*#%@"   # coarse ASCII heat map

while True:
    for row in amg.pixels:
        line = ""
        for t in row:
            idx = min(int((t - 18) / 2), len(BLOCKS) - 1)
            line += BLOCKS[max(idx, 0)] * 2
        print(line)
    print("-" * 16)
    time.sleep(0.3)
Raspberry Pi Pico — MicroPython (Raw Registers)
pico_amg8833.py
from machine import I2C, Pin
import time

ADDR = 0x69          # 0x68 if AD0 is tied to GND
i2c = I2C(0, sda=Pin(4), scl=Pin(5), freq=400000)

def read_pixels():
    """64 temperatures in C, row by row (register 0x80+)."""
    data = i2c.readfrom_mem(ADDR, 0x80, 128)
    out = []
    for i in range(64):
        raw = data[2 * i] | (data[2 * i + 1] << 8)
        raw &= 0x0FFF
        if raw & 0x800:          # 12-bit two's complement
            raw -= 0x1000
        out.append(raw * 0.25)
    return out

while True:
    px = read_pixels()
    for y in range(8):
        row = px[y * 8:(y + 1) * 8]
        print(" ".join("{:5.1f}".format(t) for t in row))
    print("max: {:.1f} C".format(max(px)))
    print("-" * 47)
    time.sleep(0.5)
Frequently Asked Questions
Can it recognize faces or read license plates?
No — and that is arguably a feature. 64 pixels resolve warm blobs, not identities: a person is a moving cluster of warm pixels, a stove is a stationary hot one. That makes the Grid-EYE useful for privacy-preserving occupancy sensing where a camera would be unacceptable.
How far away can it detect a person?
Realistically 5–7 m for a human-sized heat source, closer for reliable direction-of-movement tracking. Each pixel covers a ~7.5° cone, so at distance a person shrinks below one pixel and fades into the background average. For room-scale presence it is excellent; for hallway-length reach, mount it where people pass closer.
Why does it beat a PIR sensor for occupancy?
A PIR only sees infrared change — a person who stops moving disappears within a minute. The Grid-EYE measures absolute temperature continuously, so a seated, motionless person remains a visible warm blob indefinitely. It also tells you where in the frame they are, and how many blobs there are.
Can it see through glass or plastic?
No. Ordinary glass and most plastics are opaque to long-wave infrared, so a window in front of the sensor shows you the window’s temperature, not the scene behind it. Enclosure designs must leave the sensor’s aperture physically open (or use exotic IR-transparent materials like silicon or polyethylene film).
How do I get the smooth colorful heat maps I see online?
Interpolation. The raw 8×8 grid is upscaled (bicubic via SciPy on the Pi, or simple bilinear anywhere) to 32×32 or 64×64 and rendered with a thermal colormap. It looks dramatically better and costs nothing but math — just remember the underlying measurement is still 64 real pixels.
What is the INT pin for?
Hardware presence detection. Program an upper (and optionally lower) temperature threshold and the sensor pulls INT low the moment any pixel crosses it — no polling, so your microcontroller can sleep until a warm body enters the view. The Adafruit libraries expose the threshold registers directly.
Which I2C address does my board use?
0x69 unless you tie AD0 to GND, which moves it to 0x68. That choice exists so the sensor can coexist with 0x68 devices (like the MPU6050 IMU — or a second Grid-EYE). An i2cdetect scan settles any doubt in two seconds.
Reference documents for the AMG8833 Pre-Soldered 8x8 IR Thermal Imaging Camera Sensor for Arduino, Raspberry Pi & ESP32 (Pre-Soldered). This manual covers wiring and code; the documents below carry the full electrical specifications.