

Project Overview
W1209 thermostat board + TEC1-12706 Peltier module mini fridge: This project uses a W1209 digital thermostat board to switch a TEC1-12706 thermoelectric Peltier module so a small foam cooler can automatically hold a colder target temperature.
Run current through the Peltier module and one face gets cold while the other gets hot, giving you solid-state refrigeration with zero moving parts. This build sandwiches a TEC1-12706 between two heatsinks in the lid of a foam cooler, adds fans to move heat, and puts the W1209 thermostat in charge so you can dial in a target temperature. Expect a 10-15 C drop below ambient; the original build took its box from 70 F down to 50 F for about eight dollars in parts.
- Time: An afternoon
- Skill level: Beginner-Intermediate (no soldering required if you use connectors)
- What you will build: A thermostat-controlled thermoelectric cooler that holds up to 8 cans.

Parts List
From ShillehTek
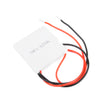
- TEC1-12706 Thermoelectric Peltier Cooler Plate 12V 40x40mm - the thermoelectric module that pumps heat from inside the cooler to the outside heatsink.
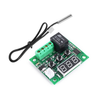
- W1209 12V Digital Temperature Controller Thermostat - switches the Peltier and fans on/off based on the probe temperature.
- Dupont Jumper Wires - for the thermostat's signal connections.
External
- Styrofoam cooler box (~8 x 6.5 x 8"), one large and one small CPU-style heatsink
- 8 cm 12V fan (hot side) and 4 cm fan (cold side; a 24V fan run at 12V spins slower and adds less heat)
- Thermal silicone pad or thermal paste, AWG14 wire, hot glue gun
- 12V supply capable of ~6A; the original uses a recycled ATX PC power supply with a breakout board
Warning: ATX supplies can deliver dangerous current. Treat the 12V rail with respect, keep connections insulated, and never work on the supply while it's plugged in.
Step-by-Step Guide
Step 1 - Collect the Parts
Goal: Gather everything for the Peltier cooling stack and its controller.
What to do: The heart of the build is the TEC1-12706 and the W1209 thermostat; everything else (box, heatsinks, fans) can be salvaged. Old PC towers are a good source for heatsinks, fans, and an ATX power supply.

Expected result: Parts staged and ready to assemble.
Step 2 - Cut the Lid
Goal: Create a tight opening for the cold-side heatsink.
What to do: Trace the smaller heatsink (the one going inside the fridge) onto the styrofoam lid and cut a matching hole. A tight fit reduces leakage of cold air.

Expected result: The lid opening fits the cold-side heatsink snugly.
Step 3 - Build the Peltier Sandwich
Goal: Mount the TEC1-12706 between heatsinks with the correct hot/cold orientation.
What to do: Identify the sides: touch the module to a 1.5V battery for a few seconds and feel which face warms. The hot side gets the large heatsink (it must dump the module's heat plus the pumped heat); the cold side gets the small one. Couple both faces with thermal pad or paste; dry contact wastes most of your cooling. Seat the cold heatsink through the lid.

Expected result: A thermally coupled heatsink stack mounted in the lid.
Step 4 - Mount the Fans
Goal: Add airflow to both heatsinks for better heat transfer.
What to do: Hot-glue the 8 cm fan onto the hot-side heatsink and mount the small fan over the cold-side heatsink inside the box. In the original build, the inner fan is a 24V unit run at 12V, so it spins slower and adds less motor heat inside the insulated box.


Expected result: Airflow across both heatsinks.
Step 5 - Wire the W1209 Thermostat
Goal: Use the W1209 relay output to switch the Peltier module and fans.
What to do: Use heavy AWG14 wire to carry 12V from the supply to the W1209's K1 relay contact. Tie grounds together. The W1209's +12V power input also feeds from K1 so the board itself is powered. Connect the Peltier and fans to K0 and GND as the switched output. Double-check against the diagram before power-up.


Expected result: Thermostat-switched power to the Peltier and fans.
Step 6 - Set the Temperature and Run the Cooler
Goal: Configure the setpoint so the mini fridge regulates itself.
What to do: Power up, press SET on the W1209, and dial your target with +/-. Hold SET to reach the advanced menu for hysteresis, calibration offset, and delay options from the W1209 manual. Place the probe inside the box, load your cans, and watch the display drop toward your setpoint.


Expected result: A regulated 10-15 C drop below room temperature.
Conclusion
You built a thermoelectric mini fridge using a TEC1-12706 Peltier module, heatsinks and fans for heat transfer, and a W1209 thermostat board to hold a target temperature automatically. This same approach can be adapted to other small cooling projects that need simple on/off temperature control.
Want the exact parts used in this build? Grab them from ShillehTek.com. If you want help customizing this project or building something for your product, check out our IoT consulting services.



.png?v=25000753014097803521791168436)

.png?v=68677308723310773341791168436)


