

Video Tutorial (Optional)
Watch first if you want to see the full STM32 Blue Pill setup in Arduino IDE using a USB to TTL converter.
Project Overview
In this tutorial, you set up the STM32 Blue Pill (STM32F103C8T6) with a USB to TTL converter (e.g. ShillehTek CP2102) in the Arduino IDE, then upload your first program for a successful serial output and basic verification.
The STM32 Blue Pill is a low-cost 32-bit ARM Cortex-M3 board with strong performance and lots of peripherals (SPI, I2C, USART, ADC). Since it does not include an onboard USB-to-serial chip, a USB to TTL adapter is used to upload code and view serial output over UART.
- Time: 30 to 60 minutes
- Skill level: Beginner
- What you will build: A working Arduino IDE setup that can upload a first sketch to the STM32 Blue Pill over UART
Parts List
From ShillehTek
- ShillehTek Pre-Soldered STM32F103C8T6 Blue Pill ARM Development Board Kit - the STM32 Blue Pill board used in this tutorial (no soldering needed)
- ShillehTek CP2102 USB to TTL UART Serial Converter Module - USB to UART bridge for uploading and serial monitoring
External
- STM32 Arduino core Board Manager URL - installs STM32 support in Arduino IDE
- STM32CubeProgrammer - required upload tool for serial method
Note: This tutorial uses UART upload (USB to TTL). You must set BOOT0 to 1 for UART bootloader mode during upload, and your USB to TTL adapter should be set for 3.3V logic.
Step-by-Step Guide
Step 1 - Wire the Blue Pill to the USB to TTL converter
Goal: Create a working UART connection between your computer and the STM32 Blue Pill for uploading code and serial output.
What to do: Connect the STM32 Blue Pill to the DSD TECH SH-U09C5 USB to TTL converter using UART pins.
- RXD (SH-U09C5) to PA9 (RX on Blue Pill)
- TXD (SH-U09C5) to PA10 (TX on Blue Pill)
- GND (SH-U09C5) to GND (Blue Pill)
- VCC (SH-U09C5) to 3.3V (Blue Pill)
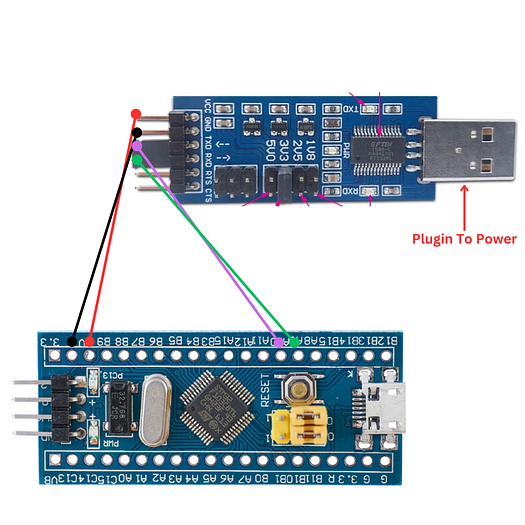
What to do: Set the Blue Pill BOOT0 jumper to 1 (UART bootloader mode). Then plug the TTL converter into your computer USB port for power and connectivity.
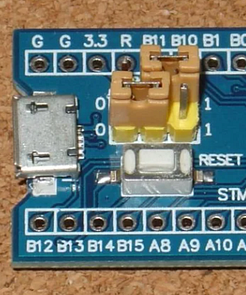
Expected result: The Blue Pill is powered and ready for UART flashing via the USB to TTL converter.
Step 2 - Install STM32 board support in Arduino IDE
Goal: Add STM32 board definitions so Arduino IDE can compile for the Blue Pill.
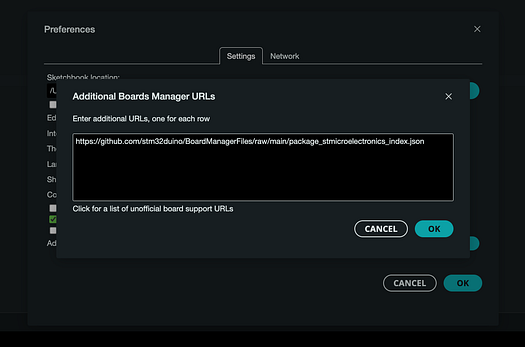
What to do: In Arduino IDE, open File > Preferences, then add this URL to Additional Boards Manager URLs:
https://github.com/stm32duino/BoardManagerFiles/raw/main/package_stmicroelectronics_index.json
Click OK. Then go to Tools > Board > Boards Manager, search for STM32, and install STM32 MCU based boards.
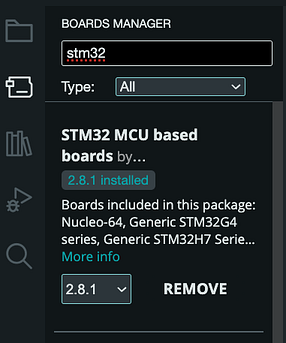
Expected result: STM32 boards appear in the Arduino IDE board selection menus.
Step 3 - Select the correct Blue Pill settings in Arduino IDE
Goal: Configure Arduino IDE to target the right STM32F1 board variant and use serial upload.
What to do: In Arduino IDE:
- Go to Tools > Board > STM32 Boards and select Generic STM32F1 series.
- Under Tools > Board Part Number, select BluePill F103C8 (or BluePill F103CB if you have the 128KB flash version).
- Set Upload Method to STM32CubeProgrammer (Serial).
- Set Port to the port associated with your USB to TTL adapter.
Expected result: The IDE is ready to upload to the Blue Pill over UART.
Step 4 - Install STM32CubeProgrammer and set STM32_PRG_PATH
Goal: Install the upload tool required by the Arduino upload method and ensure Arduino can find it.
What to do: Download and install STM32CubeProgrammer from STMicroelectronics (you may need to create a free account): https://www.st.com/en/development-tools/stm32cubeprog.html.
Then set the STM32_PRG_PATH environment variable to the STM32CubeProgrammer bin folder.
macOS: Add this line to ~/.zshrc or ~/.bash_profile:
export STM32_PRG_PATH=/Applications/STMicroelectronics/STM32Cube/STM32CubeProgrammer/STM32CubeProgrammer.app/Contents/MacOs/binApply it:
source ~/.zshrcor:
source ~/.bash_profileWindows: Create a new system environment variable:
-
Variable Name:
STM32_PRG_PATH -
Variable Value: the path to the STM32CubeProgrammer
bindirectory, for example:
C:\Program Files\STMicroelectronics\STM32Cube\STM32CubeProgrammer\binExpected result: Arduino IDE can invoke STM32CubeProgrammer for serial uploads.
Step 5 - Upload your first program
Goal: Upload a simple sketch and confirm communication using Serial Monitor.
What to do: Create a new Arduino sketch and use this example:
Code:
void setup() {
  // Start the Serial communication at 9600 baud
  Serial.begin(9600);

  // Wait for the serial port to connect (necessary for some boards)
  while (!Serial) {
    ; // Wait
  }
}

void loop() {
  // Print a message to the Serial Monitor
  Serial.println("Hello, Blue Pill!");

  // Wait for 1 second
  delay(1000);
}
Before clicking Upload, press the Reset button on the Blue Pill to ensure it is ready to receive the program. Then click Upload in Arduino IDE.
Note: If the upload does not start, double-check the selected port, your wiring, BOOT0 position, and that STM32_PRG_PATH is set correctly.
Expected result: The upload completes, you see the onboard LED blink at intervals, and the Serial Monitor prints the message once per second.
Conclusion
You just set up the STM32 Blue Pill (STM32F103) in the Arduino IDE using a USB to TTL converter, installed STM32 support, configured serial upload with STM32CubeProgrammer, and uploaded your first working sketch.
Want the exact parts used in this build? Grab them from ShillehTek.com. If you want help customizing this setup for a product, fixture, or production workflow, check out our consulting: https://shillehtek.com/pages/iot-consulting.
If you want more tutorials like this, subscribe here: https://www.youtube.com/@mmshilleh and browse videos: https://www.youtube.com/@mmshilleh/videos. You can also support the channel at https://www.buymeacoffee.com/mmshilleh.


.png?v=25000753014097803521779072085)

.png?v=68677308723310773341779072085)


