The BME280 is one of the most popular sensors for DIY projects in the Arduino and Raspberry Pi space. Made by Bosch, it can measure Pressure, Humidity, and Temperature, all to within a very accurate degree; it can even be used as an accurate altimeter after proper calibration.
The question is, how are we retrieving such values?
How does the BME280 work on a micro level to convert information from the environment to information we can see on our computer screen?
These are interesting questions and we will be going over those topics at a high level in this post. Due note, that the exact operating mechanisms of the BME280 are not disclosed by Bosch due to intellectual property reasons, so in some cases we have to assume the mechanisms they use to retrieve such values.
Let’s jump into it!
Before you get started, do not forget to subscribe, and even better, support the content!
Subscribe:
Support:
https://www.buymeacoffee.com/mmshilleh
Pressure
The information we know about the operating mechanism of the pressure sensor on the BME280 is shared by Bosch here. They have a corresponding Youtube video for that as well.
They explain that the main mechanism is a piezoresistive Wheatstone bridge sitting atop a flexible membrane. Distortion in the membrane induces a change in the Wheatstone bridge electrical voltage which can in turn be measured and deduced to a certain pressure reading, that is, knowing the other properties of the system.
So what is a Wheatstone bridge and why do they use it?
A Wheatstone bridge is a type of electrical circuit used to measure unknown electrical resistances, that consists of four resistive elements arranged in a diamond-like configuration. It was invented by Samuel Hunter Christie in 1833 and later popularized by Sir Charles Wheatstone, hence the name "Wheatstone bridge". Also, a Wheatstone bridge circuit is relatively simple and consists of only a few resistors. This simplicity makes it easy to implement in various applications without the need for complex circuitry, making it perfect for micro-level electronics such as the BME280.
Unfortunately, as of writing, this is all we know of the operating mechanism of how we obtain pressure from the BME280. The exact material and other mechanisms are not known and probably will not be unless released by Bosch in the future!
Humidity
It is speculated that the humidity values from the BME280 are retrieved through “capacitive humidity technology”. Exact details are not shared due to IP reasons once more.

Capacitive humidity technology works on the concept of capacitance, the ratio of the change in an electric charge in a system to the corresponding change in its electric potential. A material without any change in its environment has a stagnant capacitance. However, in capacitive humidity technology, the material used has a variable capacitance by design. The more water molecules in the air, the more of them get lodged into the porous sections of the material between the two electrodes. The material between the two electrodes is purposefully designed to be porous and have other attributes that attract water. As the water content of the material changes, so does its capacitance, which can be measured by the two electrodes and extrapolated to a measurable capacitance value, which can in turn be attributed to a specific humidity level that can be measured. A heating element is used to increase the response time of such a sensor. Designs like this can measure humidity between 0 - 100% at low power, making them ideal for MEMS applications.

https://www.intechopen.com/chapters/77296
This type of humidity technology is well known in MEMS, however, the layer thickness, pore size, area, etc for this specific sensor are not known. Additionally, the sensor itself could potentially use a mechanism much different than pore-based capacitive technology, although that is not likely.
Temperature
All we know from Bosch is that they use a diode mechanism in the BME280 to measure temperature, which is confirmed by their sources. Thankfully diode mechanisms are incredibly common, cheap, reliable, and easy to understand.
What is a diode?
A diode is a two-terminal electronic component that allows current to flow in one direction while blocking it in the opposite direction.


https://www.build-electronic-circuits.com/what-is-a-diode/
We can see in this simple set of diagrams that when a diode is placed in proper orientation it allows current to flow through, otherwise, it inhibits the flow of current.
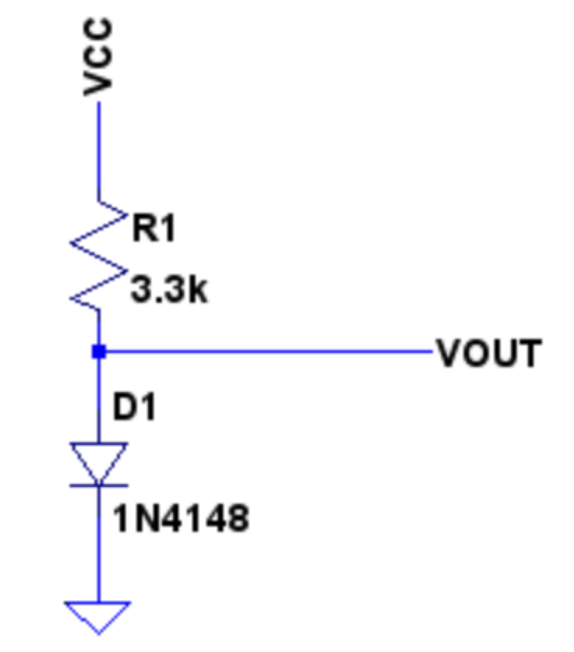
Another well-known property of diodes is that when a diode is subject to a temperature change its forward voltage drops. A simple illustration is shown here in this simple circuit.

https://www.openimpulse.com/blog/2012/07/low-cost-diode-temperature-sensor/
The voltage across the diode is measured, when subject to a temperature change (what we want to measure), the voltage drops based on the amount of temperature. Knowing the properties of the system, this voltage change can be extrapolated to a temperature reading. Resistors in the system are used to create a stable current, essential for accurate readings. Overall, diodes are super low power, well-studied, and easy to implement in such a system.
Conclusion
Hope you understood at a high level how we are able to retrieve accurate values of temperature, pressure, and humidity at the micro-level. Some fascinating engineering goes behind the BME280 and it should be more appreciated in our communities. You can buy it at our Amazon store in the link above if you are interested. Do not forget to follow us on Youtube and stay tuned, thanks!
