

Project Overview
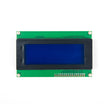
Arduino LCD2004 20x4 I2C Display: In this project, you will connect an Arduino (such as an Arduino Nano) to an LCD2004 20x4 character display with a PCF8574 I2C backpack and print “Hello, World!” on all four lines using only four wires. The I2C backpack reduces the LCD interface to two shared data lines (SDA and SCL), while still giving you backlight and contrast control, making it a clean foundation for menus, dashboards, and sensor readouts.
- Time: 20-30 minutes
- Skill level: Beginner
- What you will build: A four-line text display driven over I2C.


Parts List
From ShillehTek
- LCD2004 20x4 Character LCD Display with a PCF8574 I2C backpack - provides a 20x4 character screen over I2C.
- Arduino Nano V3 - or any Arduino UNO-compatible board.
- 120pcs 20cm Dupont Jumper Wires - four male-to-female jumpers for VCC, GND, SDA, and SCL.
External
- USB cable for the Arduino - used to power the board and upload the sketch.
Note: On Arduino Uno and Nano, I2C is on SDA/SCL (or A4/A5 on classic boards). Most backpacks use I2C address 0x27, but some use 0x3F.

Step-by-Step Guide
Step 1 - Find the Four Pins
Goal: Locate the backpack's interface.
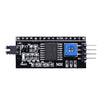
What to do: Flip the display over. The I2C backpack exposes VCC, GND, SDA, and SCL. That is the entire interface: the backpack's PCF8574 expander translates I2C into the LCD's parallel signals, and its blue trimmer sets contrast.

Expected result: You know where the four wires go.
Step 2 - Wire It Up
Goal: Connect the display to the Arduino.
What to do: Use four jumper wires to connect power and I2C. On classic Arduino Uno/Nano pinouts, SDA is A4 and SCL is A5.
LCD VCC -> Arduino 5V
LCD GND -> Arduino GND
LCD SDA -> Arduino A4
LCD SCL -> Arduino A5
Expected result: The backlight turns on when USB is connected.
Step 3 - Install the LiquidCrystal_I2C Library
Goal: Add the LCD driver library to the Arduino IDE.
What to do: Install LiquidCrystal_I2C. The easiest method is Arduino IDE Library Manager (search the name). You can also add it manually to your Arduino libraries folder.

Expected result: #include <LiquidCrystal_I2C.h> compiles without errors.
Step 4 - Upload Hello World
Goal: Print text on all four lines of the LCD2004.
What to do: Upload this sketch. The constructor takes the I2C address (usually 0x27, sometimes 0x3F) plus the geometry (20 columns, 4 rows).
#include <Wire.h>
#include <LiquidCrystal_I2C.h>

LiquidCrystal_I2C lcd(0x27, 20, 4); // address, columns, rows

void setup() {
  lcd.init();
  lcd.backlight();

  lcd.setCursor(0, 0);
  lcd.print("Hello, World!");
  lcd.setCursor(0, 1);
  lcd.print("LCD2004 over I2C");
  lcd.setCursor(0, 2);
  lcd.print("4 lines x 20 chars");
  lcd.setCursor(0, 3);
  lcd.print("Only 4 wires needed");
}

void loop() {
}
Expected result: A clean upload. If the screen stays blank, tune the contrast trimmer and try address 0x3F.
Step 5 - Enjoy Four Lines of Real Estate
Goal: Confirm the LCD works and understand what to build next.
What to do: Verify your text shows across all four 20-character lines. From here, you can feed the display sensor data. A 20x4 fits a full weather station readout, a scale display, or a three-item menu with a status line.

Expected result: A working 20x4 display ready for your next project's UI.
Conclusion
You connected an LCD2004 through its I2C backpack using four wires, installed LiquidCrystal_I2C, and printed to all four lines from an Arduino. Because it is I2C, the display can share the same bus with other sensors on the same two pins.
Want the exact parts used in this build? Grab them from ShillehTek.com. If you want help customizing this project or building something for your product, check out our IoT consulting services.




.png?v=25000753014097803521791168436)

.png?v=68677308723310773341791168436)


