

Video Tutorial (Optional)
Watch first if you want to follow the full walkthrough for uploading a file from a Raspberry Pi Pico W to AWS S3 using a Node.js proxy hosted on Google Cloud.
Project Overview
Raspberry Pi Pico W + AWS S3 upload: In this project, you send a file over the internet from a Raspberry Pi Pico W to an AWS S3 bucket by posting to a Node.js (Express) API hosted on Google Cloud that performs the S3 operations.
This approach uses an intermediate Node.js layer to keep AWS SDK and S3 logic off the Pico W, while still letting the Pico W upload data through a simple HTTP request.
Subscribe: Youtube
Support: https://www.buymeacoffee.com/mmshilleh
YouTube membership (Level 1) for code access: https://www.youtube.com/channel/UCD13UWk3lJtjka7BoA0KZ5w/join
- Time: 60 to 120 minutes (depends on AWS and GCP setup)
- Skill level: Intermediate
- What you will build: A Pico W script that base64-encodes a local file and uploads it via HTTP POST to a cloud Node.js service that saves it into S3
Parts List
From ShillehTek
- Raspberry Pi Pico 2W - the WiFi microcontroller board used in this build
External
- AWS account and an S3 bucket (aws.amazon.com)
- An AWS IAM user with Access Key ID and Secret Access Key for S3 access
- Node.js + npm: https://nodejs.org/
- Node dependencies: Express, body-parser, AWS SDK v3 for S3
- Google Cloud account + App Engine (or equivalent) deployment target
- Google Cloud SDK (gcloud): Installing Google Cloud SDK.
Note: Keep your AWS access key and secret key private. Anyone with these can potentially access your S3 bucket, which is a security risk.
Step-by-Step Guide
Step 1 - Create an S3 bucket and IAM credentials
Goal: Prepare S3 and the credentials your Node.js service will use to upload objects.
What to do: Create an AWS account at aws.amazon.com, open the AWS Console, search for S3, and create a bucket using the default settings. Name the bucket however you like.
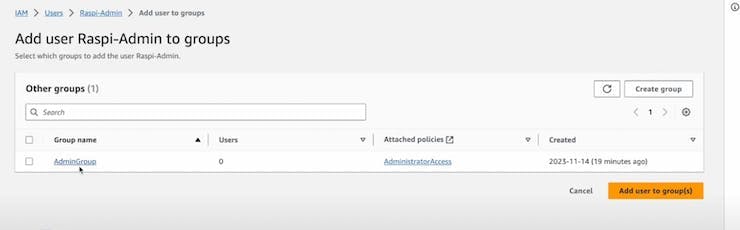
Next, create an IAM user and make sure it has permissions that allow uploading objects to the bucket. The original tutorial suggests creating a group with administrative privileges to avoid permissions errors when putting objects into the bucket.
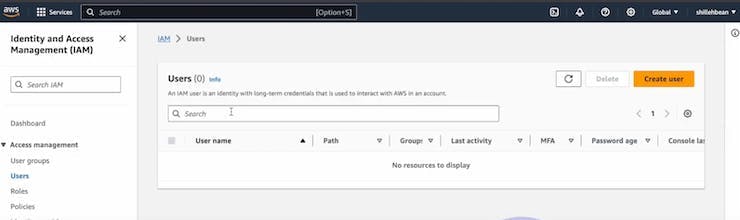


Expected result: You have an S3 bucket name, an IAM user, and a saved Access Key ID and Secret Access Key for use in your Node.js server.
Step 2 - Create the Node.js Express service for S3 uploads
Goal: Build a lightweight HTTP API that receives file data from the Pico W and uploads it into S3.
What to do: Install Node.js and npm from https://nodejs.org/. Create a new project folder and install the dependencies.
Code:
npm init -y
npm install express body-parser
Install the AWS SDK for JavaScript (S3 client):
npm install @aws-sdk/client-s3Implement the server so it:
- Creates an S3 client using your bucket name, region, access key ID, and secret access key.
- Exposes a /test endpoint to confirm the server is running.
- Exposes an /upload endpoint that accepts HTTP POST JSON, validates the body, generates a unique filename, and uploads the data to S3.
Save your code as server.js and run it locally:
node server.jsTest your endpoints:
-
http://localhost:3000/testin a browser -
http://localhost:3000/uploadby sending a POST request with JSON (the Pico W will use this endpoint later)
Expected result: Your Node.js service runs locally and responds on /test. You are ready to deploy it to Google Cloud so the Pico W can reach it from the internet.
Step 3 - Deploy the Node.js service to Google Cloud (App Engine)
Goal: Host the upload API on the public internet so the Pico W can call it from any Wi-Fi connection.
What to do: Install the Google Cloud SDK (gcloud) using: Installing Google Cloud SDK.
Create a Google Cloud project at https://console.cloud.google.com/, then initialize in your project directory:
gcloud initCreate an app.yaml file in the project root with the following configuration:
runtime: nodejs18
env: standard
runtime_config:
  operating_system: ubuntu22
# This sample incurs costs to run on the App Engine flexible environment.
# The settings below are to reduce costs during testing and are not appropriate
# for production use. For more information, see:
# https://cloud.google.com/appengine/docs/flexible/nodejs/configuring-your-app-with-app-yaml
instance_class: F1
automatic_scaling:
  max_instances: 1
  min_instances: 0
resources:
  cpu: 1
  memory_gb: 0.5
  disk_size_gb: 10
Deploy the app:
gcloud app deploy --project=<project name> --version=1After deployment, find the app URL in the console output or by navigating to App Engine in GCP and checking Versions.
You can also review App Engine documentation here: Google Cloud App Engine documentation.
Expected result: Your Node.js API is accessible via a public URL, and the /test endpoint confirms the service is running.
Step 4 - Configure the Raspberry Pi Pico W uploader script
Goal: Run a Pico W script that connects to Wi-Fi, reads a local file, base64-encodes it, and uploads it to the deployed Node.js /upload endpoint.
What to do: On the Pico W (MicroPython), prepare a script that:
- Uses
networkto connect to Wi-Fi withSSIDandWIFI_PASSWORD(either from aconfigmodule or hardcoded). - Reads a local file in binary mode (example mentioned:
sample.txtcontainingHello, World). - Uses
ubinasciito base64-encode the file bytes. - Sends an HTTP POST request using
urequests.postto your deployed Node URL (from Step 3), with JSON containing atextDatafield. - Prints the server response and disconnects from Wi-Fi.
Expected result: The Pico W prints a successful server response, and you can verify the uploaded object exists in your S3 bucket.
Conclusion
You set up an AWS S3 bucket, built a Node.js (Express) upload API using the AWS SDK, deployed it to Google Cloud, and used a Raspberry Pi Pico W script to send a base64-encoded file over HTTP so it can be saved to S3.
Want parts and modules for your next Pico W build? Browse ShillehTek.com. If you want help customizing this pipeline for your product or designing a secure IoT backend, check out our IoT consulting services.


.png?v=25000753014097803521779072085)

.png?v=68677308723310773341779072085)


