

Video Tutorial (Optional)
Watch first if you want to follow the full wiring and code walkthrough in real time.
Project Overview
In this project, you connect a Raspberry Pi Pico W to an MLX90614 infrared temperature sensor and use MicroPython to print ambient and object temperature readings to the console for non-contact temperature measurement.
The MLX90614 is useful when you need contactless temperature readings for experiments and embedded projects.
- Time: 20 to 30 minutes
- Skill level: Beginner
- What you will build: A Pico W + MLX90614 setup that prints ambient and object temperatures every second
Parts List
From ShillehTek
- ShillehTek parts collection - source common essentials like breadboards and jumper wires
- ShillehTek Amazon Store (US) - MLX90614 pre-soldered options
- ShillehTek Amazon Store (Canada) - MLX90614 pre-soldered options
- ShillehTek Amazon Store (Japan) - MLX90614 pre-soldered options
- Raspberry Pi Pico 2W - the WiFi microcontroller board used in this build
External
- MLX90614 infrared temperature sensor - I2C non-contact temperature sensor
- Breadboard (optional) - for solderless prototyping
- 4 jumper wires - for VIN, GND, SDA, SCL
Note: This guide powers the MLX90614 from the Pico W 3.3V rail and uses I2C on GP0 (SDA) and GP1 (SCL).
Step-by-Step Guide
Step 1 - Get the library and example script
Goal: Download the MLX90614 MicroPython library and the example main.py you will run on the Pico W.
What to do: Open these links and download the files:
- Library: https://github.com/shillehbean/youtube-p2/blob/main/mlx90614.py
- Example main: https://github.com/shillehbean/youtube-p2/blob/main/mlx_main.py
Expected result: You have mlx90614.py and the example script ready to copy to your Pico W.
Step 2 - Wire the MLX90614 to the Pico W (I2C)
Goal: Connect power and I2C so the Pico W can communicate with the MLX90614.
What to do: Make these connections:
- MLX90614 VIN to Pico W 3.3V
- MLX90614 GND to Pico W GND
- MLX90614 SCL to Pico W GP1 (SCL)
- MLX90614 SDA to Pico W GP0 (SDA)
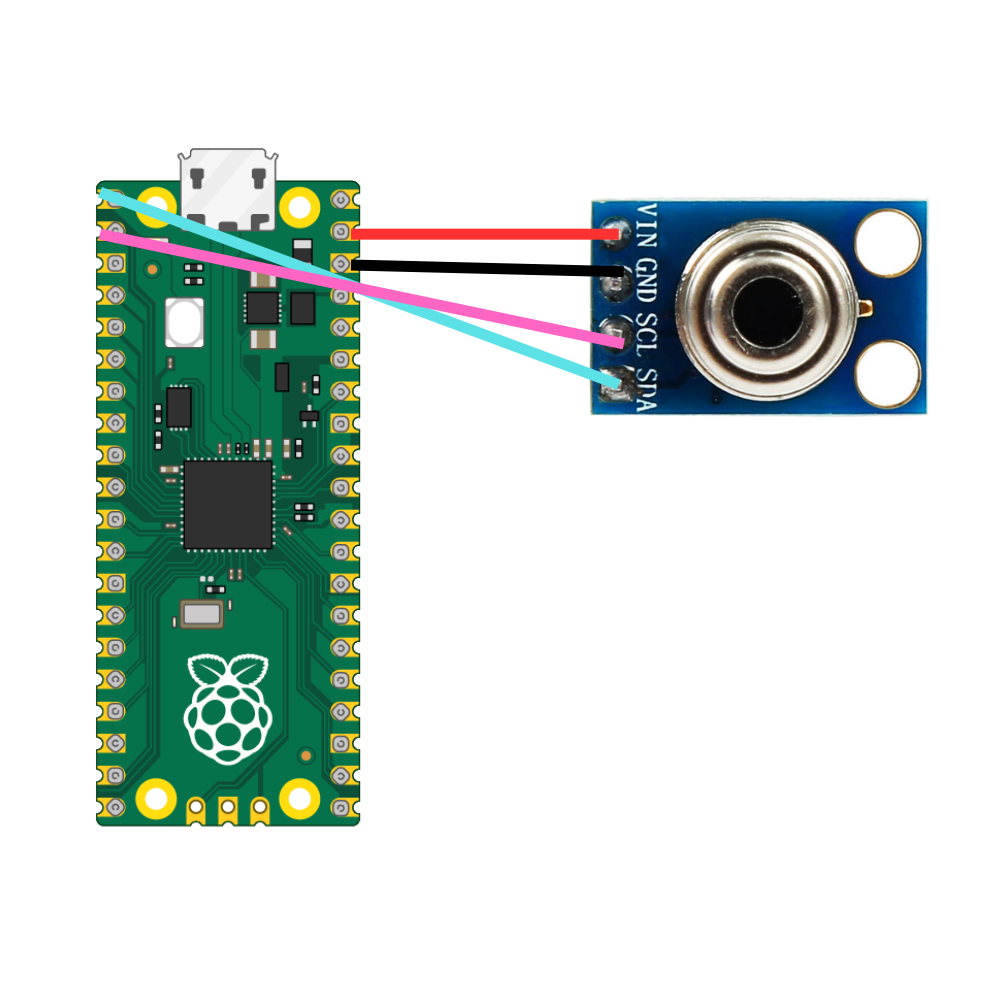
Expected result: The MLX90614 is powered from 3.3V and connected to the Pico W I2C pins (GP0/GP1).
Step 3 - Upload the files to the Pico W
Goal: Put the library and the main script onto the Pico W so MicroPython can import the driver and run it.
What to do: Using Thonny IDE (or another MicroPython tool), upload both mlx90614.py and main.py to the Raspberry Pi Pico W.
Expected result: Both files are present on the Pico W filesystem.
Step 4 - Run the script in MicroPython
Goal: Execute the program and start reading temperatures from the sensor.
What to do: Run main.py from Thonny IDE or your preferred MicroPython environment.
Expected result: The program starts without errors and begins printing temperature readings.
Step 5 - Verify the printed temperature readings
Goal: Confirm the MLX90614 is working and reporting realistic values.
What to do: Watch the console output. You should see ambient and object temperatures printed every second. Check that values are realistic, and try pointing the sensor close to your skin to see the object temperature change.
Expected result: Ambient and object temperature readings update once per second in the console.
Conclusion
You connected an MLX90614 infrared thermometer to a Raspberry Pi Pico W and used MicroPython to read non-contact ambient and object temperatures in the console. This setup is a simple starting point for contactless temperature projects using I2C.
Want the exact parts used in this build? Grab them from ShillehTek.com. For help customizing your IoT project, you can hire expert services on UpWork, and you can support new tutorials at Buy Me A Coffee or subscribe at YouTube - Shilleh.


.png?v=25000753014097803521779072085)

.png?v=68677308723310773341779072085)


