How to Connect BMP-180 to Raspberry Pi Pico W: Get Pressure, Temperature, and Altitude Values

The BMP180 is a popular sensor for measuring temperature and pressure (which can be translated to altitude). It is cheap, reliable, and very easy to use with Arduino, Raspberry Pi, and other microcontrollers.

Where to buy BMP180:

Amazon Link

Also, be sure to subscribe and support the channel if you have not!

Subscribe:

Youtube

Support:

https://www.buymeacoffee.com/mmshilleh

1-) Physical Connection
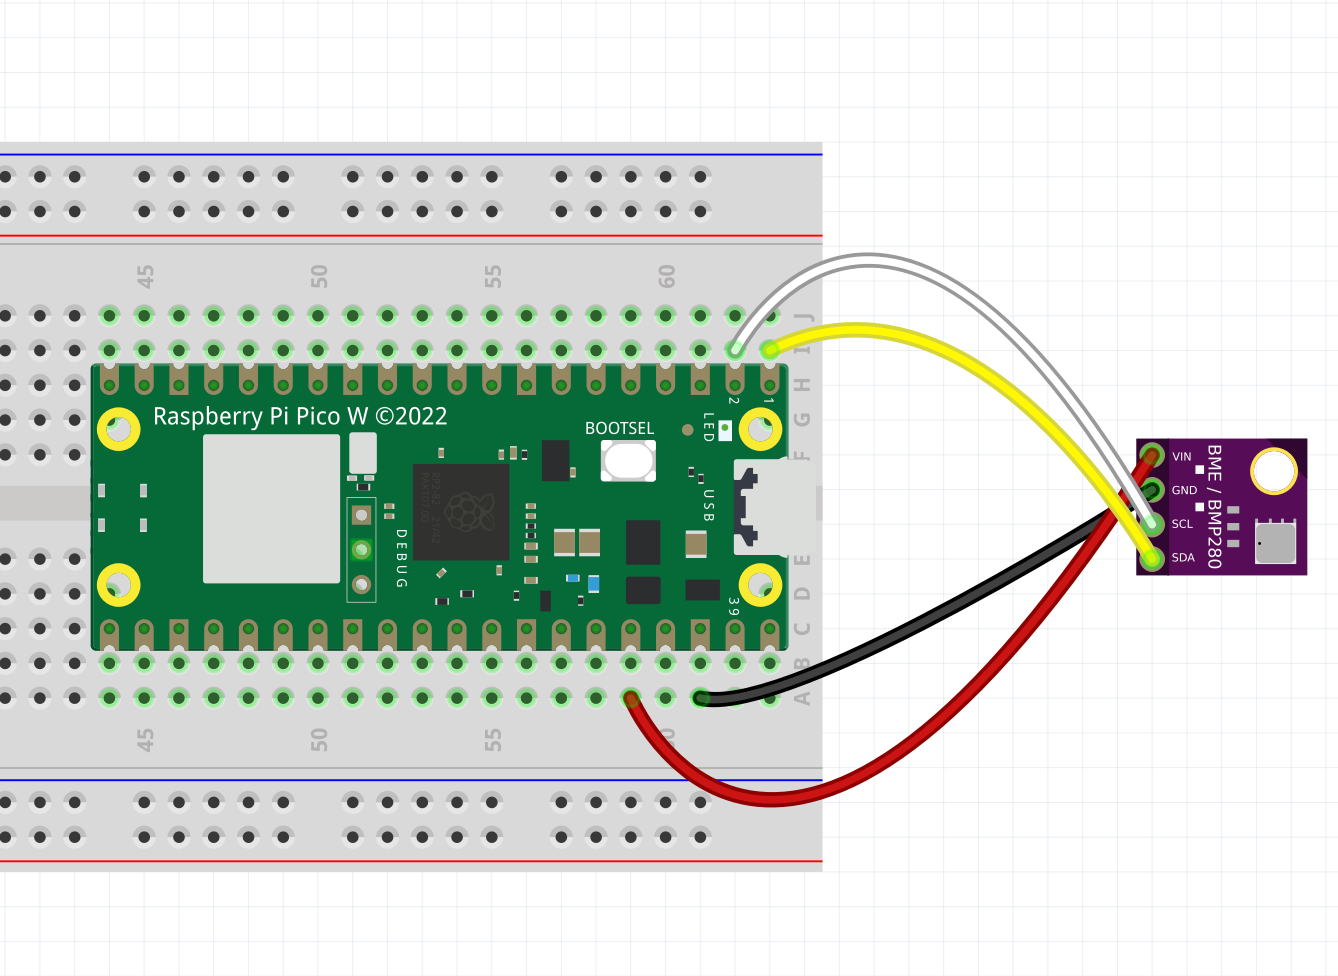
Make sure your sensor and Raspberry Pi have soldered pins, you can use a breadboard as well but you don’t have to do that. Simply connect 4 jumper wires as shown and you are ready to go with the physical setup. Of course, plug it into power ;)'

2-) Code Setup

Add the following code to your lib folder in your Raspberry Pi Pico or Pico W. This is the library you will need.

https://github.com/robert-hh/BMP085_BMP180/blob/master/bmp085.py

If you are confused on how to add that code, watch the video briefly (above) where I go over this!

Once you have the library you can create a file in the home directory of your device and run the following code:

from machine import Pin, I2C
from bmp085 import BMP180
import time

i2c = I2C(0, sda = Pin(0), scl = Pin(1), freq = 40000) 

bmp = BMP180(i2c)
bmp.oversample = 2
bmp.sealevel = 1010.5

while True: 
  tempC = bmp.temperature    #get the temperature in degree celsius
  pres_hPa = bmp.pressure    #get the pressure in hpa
  altitude = bmp.altitude    #get the altitude
  temp_f = (tempC * (9/5) + 32)  #convert the temperature value in fahrenheit
  print(str(tempC) + "°C " + str(temp_f) + "°F " + str(pres_hPa) + "hPa "+ str(altitude))
  time.sleep_ms(100)  #delay of 100 milliseconds

Notes about the code.

  • It should be runnable right away if you plug in the device properly and you have a functioning device.
  • You may have to change the frequency to 1000 instead of 40000, depending on your device.
  • You will need to change the seal level pressure (measured in millibar) to the sea level pressure in your area. You can find the sea level pressure near you with a quick Google search.

Conclusion

Pretty quick setup with this sensor and code. Hope you got going right away. If you did, do not forget to like, comment, and subscribe to the channel. Let me know if you have any questions. Thanks, everyone.

Create a free account to access full content.

All access to code and resources on ShillehTek.

Signup Now

Already a member? Sign In

Explore More on Our Blog

Controlling a 5V Laser Diode with Raspberry Pi Pico W

Controlling a 5V Laser Diode with Raspberry Pi Pico W

Learn how to safely control high-power components like a ShillehTek 5V laser diode using the Raspberry Pi Pico W and...

How to Connect and Use the HCSR501 PIR Sensor with a Raspberry Pi Pico/Pico W

How to Connect and Use the HCSR501 PIR Sensor with a Raspberry Pi Pico/Pico W

Learn how to set up the HCSR501 PIR sensor with a Raspberry Pi Pico to detect motion and trigger...

Powering the Raspberry Pi Pico W with the MB102 Power Supply

Powering the Raspberry Pi Pico W with the MB102 Power Supply

Learn how to power your Raspberry Pi Pico W projects easily and flexibly with the MB102 Power Supply Module...

How to Use L298N Motor Driver with Pico W

How to Use L298N Motor Driver with Pico W

Learn how to use the L298N motor driver to control DC motors with the Raspberry Pi Pico W in MicroPython.

Controlling an LED with a Snap Using the KY-037 Sound Sensor and Raspberry Pi

Controlling an LED with a Snap Using the KY-037 Sound Sensor and Raspberry Pi

Discover how to set up, code, and activate the LED based on detected sound with the Raspberry Pi...

Getting Started with the KY-037 Sound Sensor and Raspberry Pi: Detecting Sound Using Python

Getting Started with the KY-037 Sound Sensor and Raspberry Pi: Detecting Sound Using Python

In this tutorial, I’ll guide you through setting up the KY-037 sound sensor with a Raspberry Pi using...

How to Post to Reddit Using Python

How to Post to Reddit Using Python

Post to reddit automatically using a Python script.

How to Create a Time-Lapse Video with a Raspberry Pi Camera

How to Create a Time-Lapse Video with a Raspberry Pi Camera

Learn how to make a timelapse with your Raspberry Pi in Python.

How to Integrate the MPU6050 with the STM32 Blue Pill

How to Integrate the MPU6050 with the STM32 Blue Pill

Learn how to measure acceleration with the STM32 and the MPU6050 in the Arduino IDE.

Getting Started with STM32 Blue Pill in Arduino IDE Using a USB to TTL Converter — Write Your First Program

Getting Started with STM32 Blue Pill in Arduino IDE Using a USB to TTL Converter — Write Your First Program

This comprehensive tutorial will guide you through the process of setting up and programming the STM32 Blue Pill...

Back to blog

Leave a comment

Please note, comments need to be approved before they are published.