Video Tutorial (Optional)
Watch first if you want to see the full ADXL345 to Raspberry Pi Pico wiring and MicroPython output in real time.
Project Overview
In this tutorial, you connect an ADXL345 accelerometer to a Raspberry Pi Pico over I2C and print real X, Y, Z acceleration values in MicroPython.
- Time: 15 to 30 minutes
- Skill level: Beginner
- What you will build: An I2C accelerometer readout that prints X, Y, and Z values (and values scaled to g) from the ADXL345
Parts List
From ShillehTek
- None linked in the original project
External
- ADXL345 - the I2C accelerometer sensor module
- Raspberry Pi Pico - microcontroller board running the MicroPython code
- 4 jumper wires - for the I2C connection
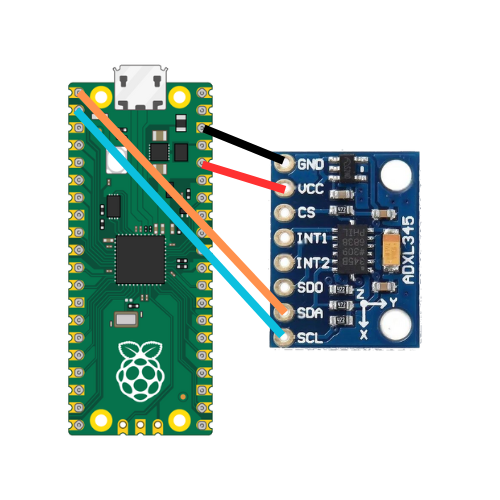
Note: This guide uses I2C and the MicroPython I2C(0) bus with SDA on GP0 and SCL on GP1, as shown in the code.
Step-by-Step Guide
Step 1 - Physical connection (I2C wiring)
Goal: Wire the ADXL345 to the Raspberry Pi Pico so MicroPython can read acceleration over I2C.
What to do: Set up the pins as shown for an I2C connection. You only need 4 jumper wires.

Expected result: The ADXL345 is powered and connected to the Pico via I2C, ready for the MicroPython code.
Step 2 - Run the MicroPython code
Goal: Initialize the ADXL345 and continuously print X, Y, and Z acceleration values.
What to do: Run the following code in MicroPython.
Code:
from machine import Pin, I2C
import time
import ustruct

# Constants
ADXL345_ADDRESS = 0x53 # address for accelerometer
ADXL345_POWER_CTL = 0x2D # address for power control
ADXL345_DATA_FORMAT = 0x31 # configure data format
ADXL345_DATAX0 = 0x32 # where the x-axis data starts

# Initialize I2C
i2c = I2C(0, sda=Pin(0), scl=Pin(1), freq=400000)

# Initialize ADXL345
def init_adxl345():
    i2c.writeto_mem(ADXL345_ADDRESS, ADXL345_POWER_CTL, bytearray([0x08]))  # Set bit 3 to 1 to enable measurement mode
    i2c.writeto_mem(ADXL345_ADDRESS, ADXL345_DATA_FORMAT, bytearray([0x0B]))  # Set data format to full resolution, +/- 16g

# Read acceleration data
def read_accel_data():
    data = i2c.readfrom_mem(ADXL345_ADDRESS, ADXL345_DATAX0, 6)
    x, y, z = ustruct.unpack('<3h', data)
    return x, y, z

# Main loop
init_adxl345()
while True:
    x, y, z = read_accel_data()
    print('--------------------')
    print(x, y, z)
    print("X: {}, Y: {}, Z: {}".format(x*0.0039, y*0.0039, z*0.0039))
    time.sleep(0.5)


# if you do get OSError: [Errno 5] EIO, try unplug and plug
# if you do set different resolution 0.0039 may not be the constant (check data sheet)
Expected result: You should start seeing changing X, Y, and Z values printed, including values scaled in units of g (9.81 m/s^2).
Sensor calibration may be needed to produce more accurate values.
Conclusion
You now have an ADXL345 accelerometer wired to a Raspberry Pi Pico over I2C, printing real-time acceleration values in MicroPython.
Please consider subscribing to the channel if this helped you in any way.
Want the parts for your next build? Grab sensors, wires, and prototyping gear from ShillehTek.com. If you want help customizing this project or building something for your product, check out our consulting: https://shillehtek.com/pages/iot-consulting.


.png?v=25000753014097803521767701813)

.png?v=68677308723310773341767701813)


