

Project Overview
Arduino Bathroom Scale with HX711 and 50kg Load Cells: Commercial bathroom scales use four 50 kg half-bridge load cells in the corners, wired into one Wheatstone bridge and read by a precision ADC. In this project you build the same architecture with an HX711 amplifier module and an Arduino to create a scale that can measure up to 200 kg, while learning how half-bridge sensors combine.
- Time: 2-3 hours
- Skill level: Intermediate (the bridge wiring is the interesting part)
- What you will build: A four-corner platform scale with calibrated serial output.


Parts List
From ShillehTek
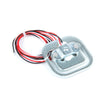
- 50kg Half-Bridge Load Cell - you need four (one per corner)
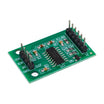
- HX711 Pre-Soldered Load Cell Amplifier Module - reads the Wheatstone bridge with high resolution
- Arduino Nano V3 - or any UNO-compatible board
- 120pcs 20cm Dupont Jumper Wires - for HX711-to-Arduino and bridge connections
External
- A sturdy, flat platform (hardwood or metal)
- Epoxy for mounting the corner cells
- Power supply or USB cable for the Arduino
Note: Each 50 kg cell is a half bridge (two strain gauges); wiring four of them together forms the full Wheatstone bridge the HX711 expects.
Step-by-Step Guide
Step 1 - Mount the Four Load Cells
Goal: Put one cell in each corner, oriented correctly.
What to do: Epoxy the four cells to the underside of your platform, one per corner. Each cell has a specific side that mounts to the base and a raised button surface that touches the floor. Follow the mounting diagram so the strain gauges flex when weight is applied.


Expected result: A rigid platform resting on four half-bridge sensors.
Step 2 - Verify Each Cell's Internal Wiring
Goal: Identify the terminals before bridging the cells together.
What to do: Half-bridge cells have three wires: two ends of the gauge pair and a center tap. With a multimeter, find the two terminals with the highest resistance between them (for example black and white). Those are the outer ends; the remaining wire (often red) is the center tap. This check matters because wire colors vary between batches.

Expected result: You know each cell's outer terminals and center tap regardless of wire color.
Step 3 - Wire the Wheatstone Bridge and HX711
Goal: Combine four half-bridges into one full bridge the HX711 can read.
What to do: Wire the outer terminals of the four cells in a color-matching loop around the scale (black-to-black, white-to-white: B-B W-W B-B W-W). That leaves the four center taps: connect two opposite corners' center taps to the HX711's excitation pins (E+ and E-) and the other two opposite corners to the sense pins (A+ and A-). Then wire the HX711 to the Arduino:
HX711 VCC -> 5V    HX711 GND -> GND
HX711 DOUT -> D3   HX711 SCK -> D2


Expected result: Loads on any corner, or all four, sum into a single differential signal at the HX711.
Step 4 - Install the HX711 Library
Goal: Compile support for the amplifier.
What to do: Install bogde's HX711 library from the Arduino IDE Library Manager (or from github.com/bogde/HX711 as a ZIP).
Expected result: #include "HX711.h" compiles.
Step 5 - Calibrate, Then Weigh
Goal: Dial in the calibration factor and run the scale.
What to do: Upload SparkFun's public-domain calibration sketch (by Nathan Seidle), start with the platform empty, then stand a known weight on it and tap + / - until the serial reading matches:
#include "HX711.h"

#define LOADCELL_DOUT_PIN 3
#define LOADCELL_SCK_PIN 2

HX711 scale;
float calibration_factor = -7050; // a 440lb setup's value; yours will differ

void setup() {
  Serial.begin(9600);
  Serial.println("HX711 calibration sketch");
  Serial.println("Remove all weight from scale");
  Serial.println("After readings begin, place known weight on scale");
  Serial.println("Press + or a to increase calibration factor");
  Serial.println("Press - or z to decrease calibration factor");

  scale.begin(LOADCELL_DOUT_PIN, LOADCELL_SCK_PIN);
  scale.set_scale();
  scale.tare();

  long zero_factor = scale.read_average();
  Serial.print("Zero factor: ");
  Serial.println(zero_factor);
}

void loop() {
  scale.set_scale(calibration_factor);
  Serial.print("Reading: ");
  Serial.print(scale.get_units(), 1);
  Serial.print(" lbs");
  Serial.print(" calibration_factor: ");
  Serial.print(calibration_factor);
  Serial.println();

  if (Serial.available()) {
    char temp = Serial.read();
    if (temp == '+' || temp == 'a')
      calibration_factor += 10;
    else if (temp == '-' || temp == 'z')
      calibration_factor -= 10;
  }
}
Then hard-code your factor into the demo sketch for day-to-day weighing:
#include "HX711.h"

#define calibration_factor -7050.0 // from the calibration sketch
#define LOADCELL_DOUT_PIN 3
#define LOADCELL_SCK_PIN 2

HX711 scale;

void setup() {
  Serial.begin(9600);
  Serial.println("HX711 scale demo");
  scale.begin(LOADCELL_DOUT_PIN, LOADCELL_SCK_PIN);
  scale.set_scale(calibration_factor);
  scale.tare();
  Serial.println("Readings:");
}

void loop() {
  Serial.print("Reading: ");
  Serial.print(scale.get_units(), 1);
  Serial.print(" lbs");
  Serial.println();
}
Expected result: Step on the platform and read your weight in the serial monitor, a genuine 200 kg capacity scale.
Conclusion
You combined four 50 kg half-bridge load cells into a full Wheatstone bridge, read it with the HX711, and calibrated a working bathroom scale on an Arduino. This is the same sensing architecture used inside commercial scales, and it is a solid foundation for any weighing project.
Want the exact parts used in this build? Grab them from ShillehTek.com. If you want help customizing this project or building something for your product, check out our IoT consulting services.




.png?v=25000753014097803521791168436)

.png?v=68677308723310773341791168436)


