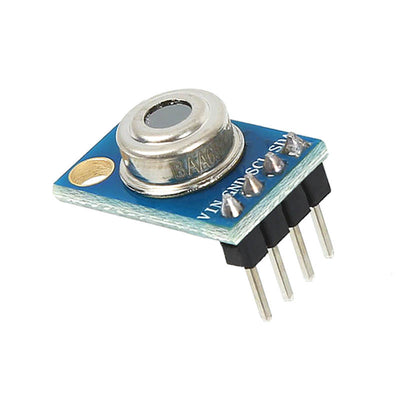
The ShillehTek MLX90614 IR Temperature Sensor measures temperature without contact by reading infrared energy, making it perfect for Arduino and Raspberry Pi projects where you cannot or do not want to touch the object. It communicates over I2C, so it is easy to wire and widely supported with libraries. Use it for contactless surface temperature checks, human presence and skin-temperature style demos, electronics temperature monitoring, moving object measurements, and automation projects where you want fast temperature readings without a probe.


The ShillehTek MLX90614 IR Temperature Sensor measures temperature without contact by reading infrared energy, making it perfect for Arduino and Raspberry Pi projects where you cannot or do not want to touch the object. It communicates over I2C, so it is easy to wire and widely supported with libraries. Use it for contactless surface temperature checks, human presence and skin-temperature style demos, electronics temperature monitoring, moving object measurements, and automation projects where you want fast temperature readings without a probe.
No additional feature info available.
No documents available. Please contact us for more information.
Product Overview
Product Overview
The ShillehTek MLX90614 IR Temperature Sensor measures temperature without contact by reading infrared energy, making it perfect for Arduino and Raspberry Pi projects where you cannot or do not want to touch the object. It communicates over I2C, so it is easy to wire and widely supported with libraries. Use it for contactless surface temperature checks, human presence and skin-temperature style demos, electronics temperature monitoring, moving object measurements, and automation projects where you want fast temperature readings without a probe.
Features & Specs
Features & Specs
Documents
Documents
Related Videos
Related Videos
Customer Reviews
Based on 9 reviews
67%
(6)
22%
(2)
0%
(0)
0%
(0)
11%
(1)
R
I used this for my Raspberry Pi Pico W, super seamless to setup.
T
I've been using this in an indoor grow tent with pleasing results. While I have ambient temperature and humidity sensors as well, I use this to monitor the temperature of the leaves on my plants. I was expecting a more point-like measurement, but after scoping the documentation for this, it's much wider than anticipated -- but not a huge issue for me. I did have to calibrate it in my code with a 2 degree offset, it seems to be a common problem that these read slightly higher than actual temp, but they're pretty consistent within their range.
R
I am using this with a Raspberry PI Pico WH, 4, and 5 with no issues.
C
I have some experience with these kind of sensors as well as IT background - however to make it work you don't need to be an expert in software engineering. A simple installation guide found on many websites will make this work. Excellent little project for kids too!The actual temperature readings are somewhat wonky. While the company claims tolerance to be 0.5c, the ambient temperature readings were abnormally high to the tune of 4 degree c. The temperature readings of objects close to sensor are more accurate. I am using it with Raspberry Pi 4.
S
The media could not be loaded.
The narrative: I hooked this up to my raspberry pi and was happy when I got it hooked up and outputting Celsius. I waved it around, tried it on my skin and could tell it was adjusting to temps as I would expect, but, as an American that is used to imperial, didn't really know what temps should be reading. So I went into my application and did a temp conversion `(cel) => cel * 9 / 5 + 32`. Running the program again I realized when I put the sensor up to my forehead for a second I was reading in the 80's. Looking at my program I realized I was flooring Celsius before putting it into my conversion, but it didn't account for more than 10 degrees. "Ok I have an idea": I have a temp probe that I've found to be very accurate, I will let the temp probe acclimate to the room temp and point the IR sensor at it. That is what my video shows, and you will see it doesn't quite line up. The second part of the clip I heated up the probe sensor and tried to let the IR sensor read it as it cooled down, but it was a good bit off. After I recorded the video I tried to collect my temperature again with the highest reading being at 35.5, but averaging closer to 34.8, I dropped that into google, 35.5c = 95.9f.

S
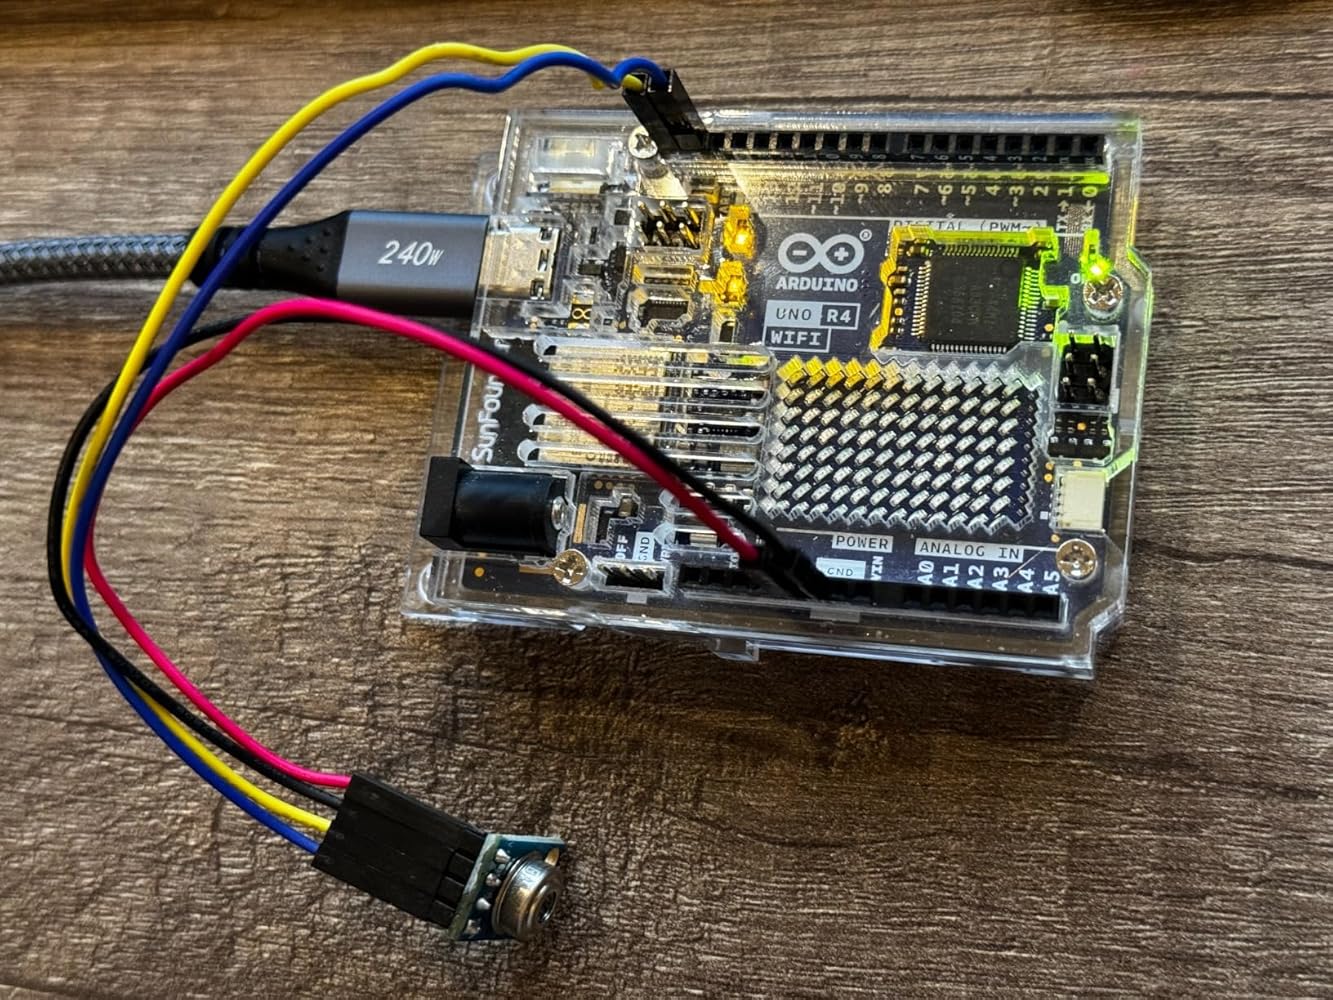
Great sensor; operation couldn't be much simpler! It is trivial to hook up to an Arduino R4 Wifi board and quite accurate in my tests. I compared it with the laser-guided IR temp gauge and consistently saw measurements within about 0.2dg F of the same. The size is nicely compact as shown compared to a standard Sharpie marker in my included photo. The pin size and layout make connecting with standard breadboard jumper wires effortless, which makes this ideal for tinkering and projects.To get started and quickly see what you're in for to use this, I've included a simple Arduino sketch based on the examples for the MLX90614 that works with this component. Install the Adafruit-MLX90614 Library from the Arduino Library Manager to use this sketch. This sensor ticked the right boxes for me, quick, simple, and effective!#include Adafruit_MLX90614 mlx = Adafruit_MLX90614();void setup() { Serial.begin(9600); while (!Serial); pinMode(LED_BUILTIN, OUTPUT); digitalWrite(LED_BUILTIN, LOW); Serial.println("SHILLEHTEK Pre-Soldered GY-906 MLX90614"); if (!mlx.begin()) { Serial.println("Error connecting to temp sensor. Check wiring."); while (1); }; digitalWrite(LED_BUILTIN, HIGH); Serial.print("Emissivity = "); Serial.println(mlx.readEmissivity()); Serial.println("================================================");}void loop() { Serial.print("Ambient = "); Serial.print(mlx.readAmbientTempC()); Serial.print("*C\tObject = "); Serial.print(mlx.readObjectTempC()); Serial.println("*C"); Serial.print("Ambient = "); Serial.print(mlx.readAmbientTempF()); Serial.print("*F\tObject = "); Serial.print(mlx.readObjectTempF()); Serial.println("*F"); Serial.println(); delay(500);}


M
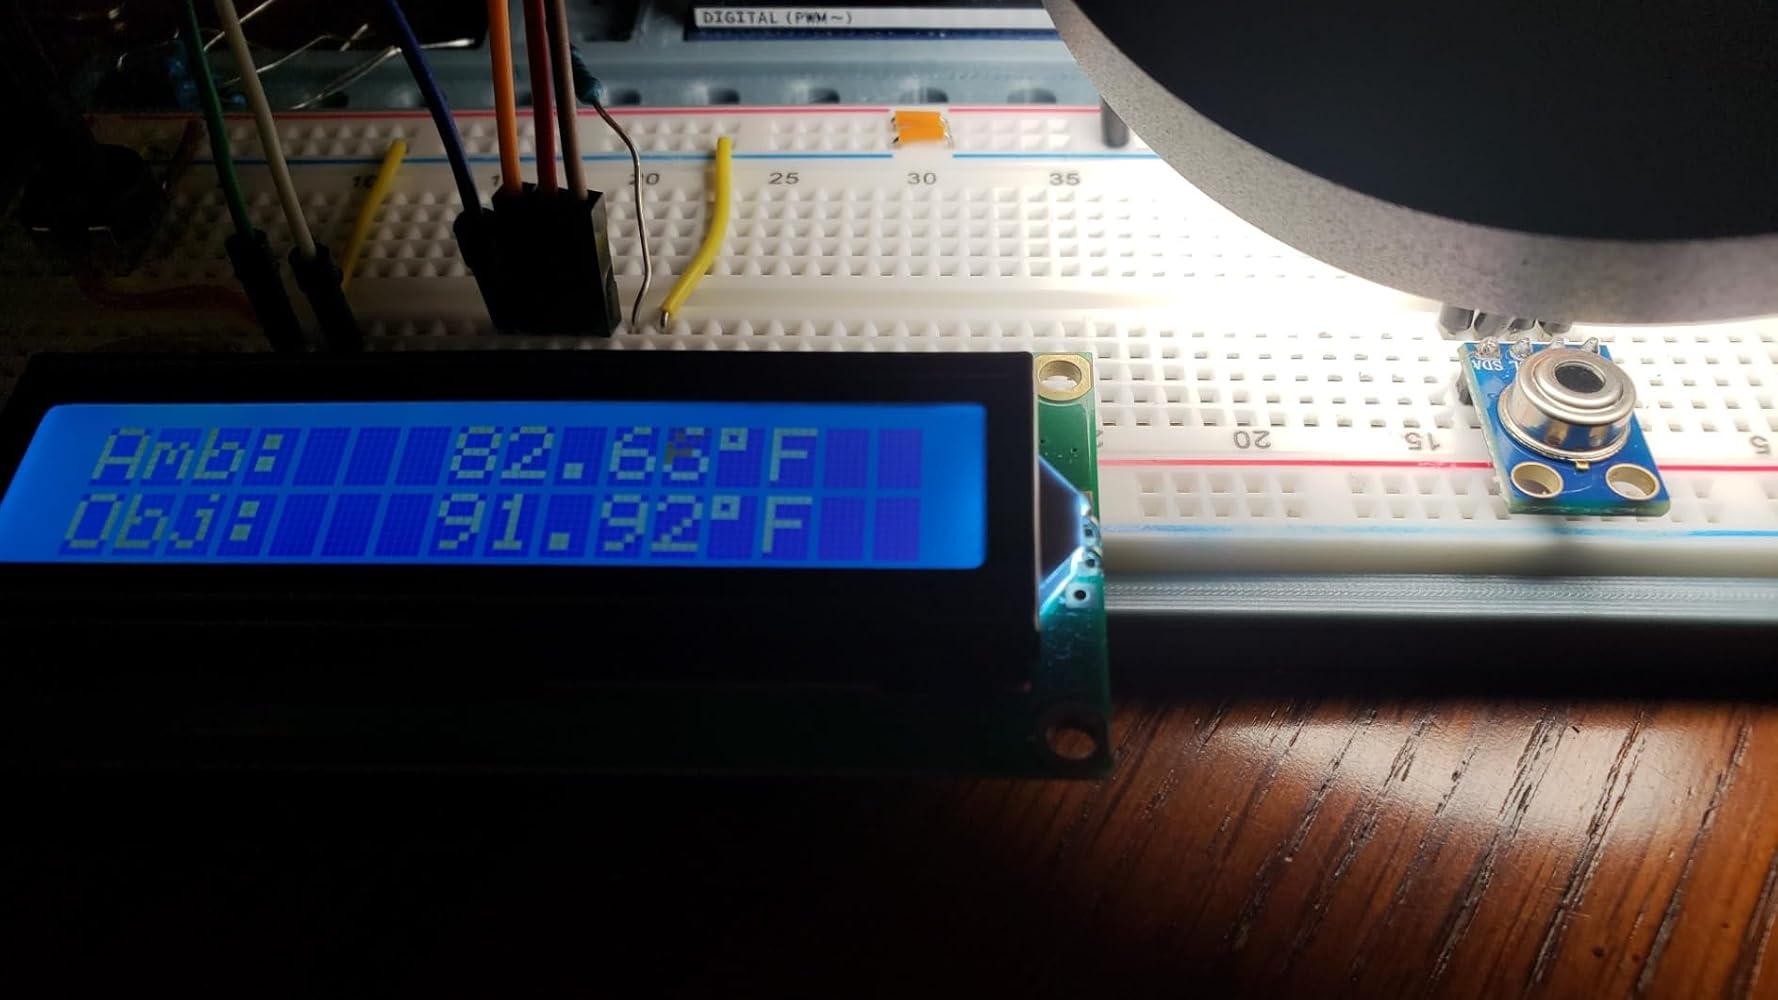
What a nice little IR temp sensor on a fantastic little easy-to-use, multi-voltage I2C module. I tested it on an Uno (pins A4, A5) with both the DFRobot and Adafruit libraries. You're able to set emissivity, and it'll tell you both the ambient temp and target object's temp. Both libraries provide a more convenient celsius reading, but the Adafruit library also has celsius->fahrenheit convenience functions built-in, if that's important to you. I didn't take a deep dive into how to interface with it beyond briefly looking at sources of those two libraries, so I can't comment on further capabilities not exposed by those libraries.When I tested mine, it appeared to be high by a good 3-5 degrees F (accuracy is supposedly within 0.5C, or close to 1.0F at body temp). My wrist held up directly in front of it (distance matters) read over 101, and the ambient reading was over 5 degrees higher than a Govee room thermometer I had on my desk. I don't know if the sensor itself has some way to calibrate it directly. It's easy enough to do from my end and it seemed to be fairly consistent over the small range I tested in a very non-scientific way, but I'd want to test over a large range of known temps and I didn't have time for that. Also, the documentation warns against protecting the sensor from possible nearby heat sources because temp differences across the sensor will affect accuracy, so it could've been that. I also let the module and Govee settle next to each other over the course of about a half hour (photos attached were after a half hour), and by then, the difference in ambient temp was only a couple degrees Fahrenheit and the difference was still slowly dropping, so for all I know, waiting another half hour would've made ambient readings even more accurate. I couldn't find how that worked in the documentation I found, so I'm not really sure. I'll also note that when I tried using longer wiring to bring the sensor further away from nearby electronics (that backlit 1602 in particular), it actually increased the temp readings and I'm not sure why, and I took care not to handle it directly with my hands. Perhaps there was a slight voltage drop that impacted the sensor? I didn't check. Anyway, the combined inaccuracy along with not finding some of this important information in documentation was the reason to dock it a star. I'd hope to be within the stated 0.5c accuracy out of the box. Maybe I just got unlucky with a defective unit. I may test this again with a more reliable 5v supply and different setup in the future, so if I do, I'll update this review.The second photo is when I brought a warm table lamp near it. The target object reading was very quick to respond. It does have a wide FOV (sensitivity for distance/size is 1:2), so you'll have to bring smaller target objects very close to get accurate readings. I'm assuming a lens could help if you wanted a different FOV.Considering my unit was a little off, I'd give this module a somewhat hesitant recommendation. It's not the cheapest way to measure temps at $16/module, but it's far from being the most expensive way too. For a contactless solution, it's on the cheaper side, and those libraries along with being able to use it with both 5v and 3.3v supplies/signals make it incredibly easy to use for tinkerers. If my readings were a little closer to target, it'd be a glowing 5 stars.

B
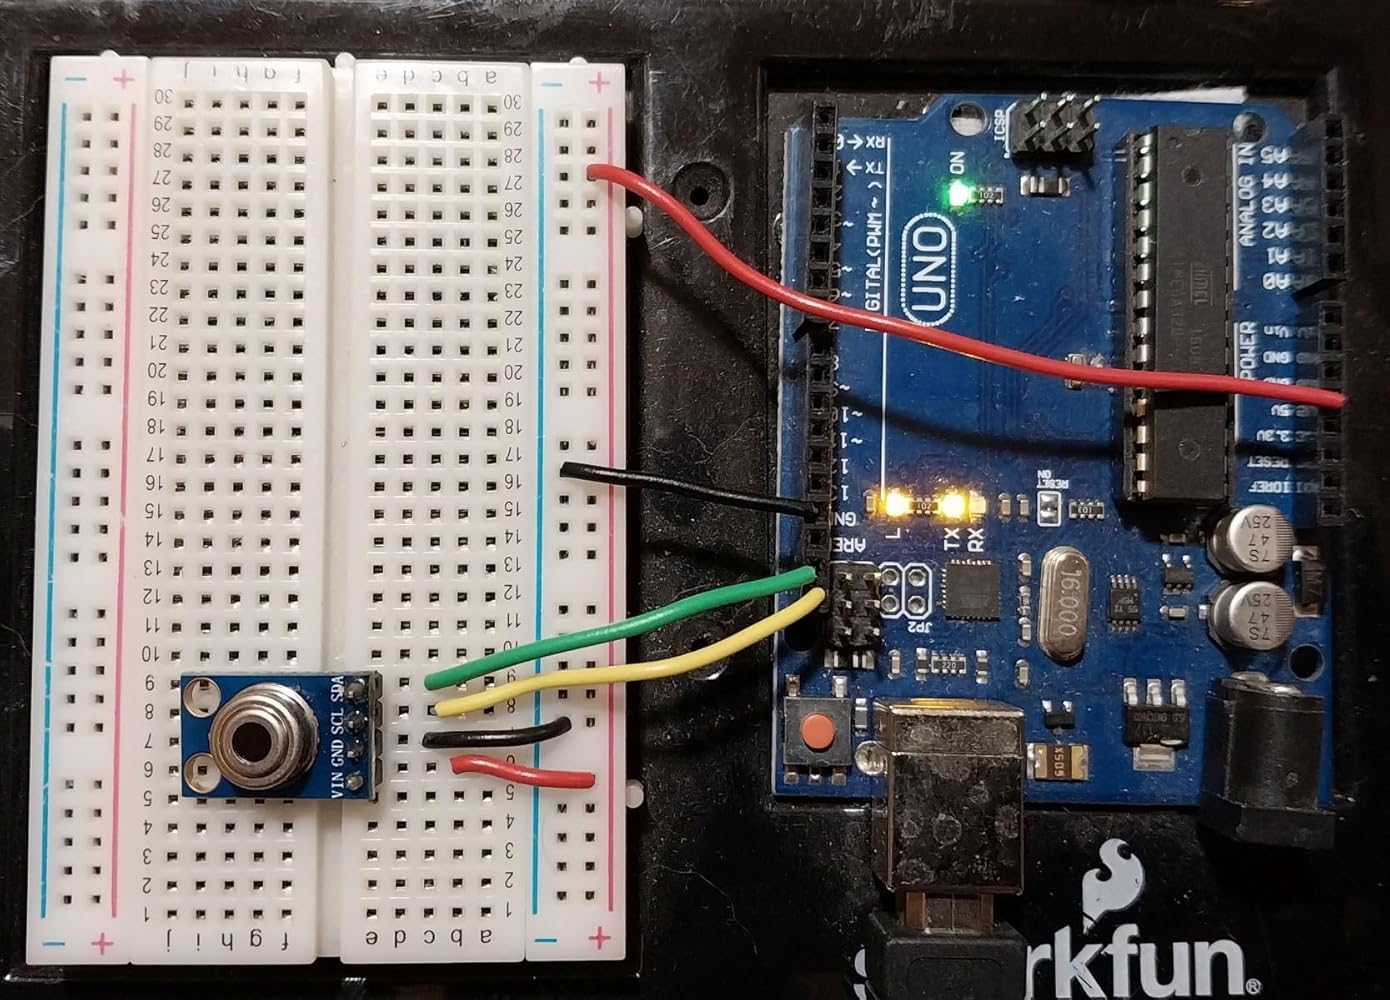
IR temperature sensors use the fact that warm objects radiate infrared light. IR intensity depends on the object’s temperature as well as its emissivity, which can range from 0.0 to 1.0. Many common materials have an emissivity of about 0.95, so this value is usually assumed. Large temperature errors can occur, however, for materials such as aluminum foil or tin (0.04), or brick (0.80), unless the assumed emissivity is changed. Charts of emissivity are easily found online.The internet has lots of good information about the MLX90614 sensor. One of the best sources I saw is at lastminuteengineers dot com, which has useful background and implementation details for using the device with an Arduino.The SHILLEHTEK GY-906 includes a voltage regulator and level shifters so it can be used safely with either 3.3 V or 5.0 V systems. For my application, I wanted to us an Arduino Uno (5 volts). The circuit is extremely simple requiring only four connections: ground, 5V, and two I2C pins (SCL and SCA). (See picture). For the Uno you can also use A5 for SCL and A4 for SDA.I used Arduino IDE V2.x, and adding the required libraries is straightforward: in Library Manager search for “MLX90614”. Currently, seven libraries appear to support this device. I added the Adafruit library. The other libraries may give access to more advanced features of the MLX90614, but I didn’t check.Once the library is added, two example programs become available. One of them is called “mlx_set_emissivity,” which you can use to initialize the device to any desired emissivity. If you don’t use this program, the default value is 0.95. The second example program is mlxtest, which measures the ambient temperature using an onboard sensor and also measures the remote object’s temperature based on detected IR intensity. These values are printed to the Serial Monitor. I don’t have a way to check accuracy, but the temperature estimates seemed reasonable.Note that the device has a 90-degree field of view, which is quite broad. If you want to measure the temperature of a small object, you have to get very close or else surrounding temperatures get averaged in. For example, if the sensor is 1 ft away from a wall, it will measure the average temperature across a 2 ft diameter circle on the wall. This is not a negative; it’s just the way the device works.Bottom line: the GY-906 is easy to use and it works perfectly. No negatives.
D
Super easy to get this connected and working with an ESP32 and the VEGA_MLX90614 or DFRobot's library in Arduino IDE.However, I started by trying to read this in Linux on an x86 SBC with I2C support and it's a bit of work. Firstly, the device address does not appear in i2cdetect and secondly, looking at the datasheet and those Arduino libraries it's a bit more involved than many other I2C devices, such as the MPU6050.As for accuracy- I did not have anything that I would call 'truth', but it compared well one of those IR temperature guns. NOTE: distance is important with this- it has a wide FOV and appears to spatially average over the object in view. I have no hard data, but it appears to be 1:2 ratio. For instance, 1" away from an object is going to read a patch approximately 2x2".Minus 1 Star for lack of any useful integration documentation in the listing.
Customer Reviews
Based on 9 reviews
67%
(6)
22%
(2)
0%
(0)
0%
(0)
11%
(1)
R
I used this for my Raspberry Pi Pico W, super seamless to setup.
T
I've been using this in an indoor grow tent with pleasing results. While I have ambient temperature and humidity sensors as well, I use this to monitor the temperature of the leaves on my plants. I was expecting a more point-like measurement, but after scoping the documentation for this, it's much wider than anticipated -- but not a huge issue for me. I did have to calibrate it in my code with a 2 degree offset, it seems to be a common problem that these read slightly higher than actual temp, but they're pretty consistent within their range.
R
I am using this with a Raspberry PI Pico WH, 4, and 5 with no issues.
C
I have some experience with these kind of sensors as well as IT background - however to make it work you don't need to be an expert in software engineering. A simple installation guide found on many websites will make this work. Excellent little project for kids too!The actual temperature readings are somewhat wonky. While the company claims tolerance to be 0.5c, the ambient temperature readings were abnormally high to the tune of 4 degree c. The temperature readings of objects close to sensor are more accurate. I am using it with Raspberry Pi 4.
S
The media could not be loaded.
The narrative: I hooked this up to my raspberry pi and was happy when I got it hooked up and outputting Celsius. I waved it around, tried it on my skin and could tell it was adjusting to temps as I would expect, but, as an American that is used to imperial, didn't really know what temps should be reading. So I went into my application and did a temp conversion `(cel) => cel * 9 / 5 + 32`. Running the program again I realized when I put the sensor up to my forehead for a second I was reading in the 80's. Looking at my program I realized I was flooring Celsius before putting it into my conversion, but it didn't account for more than 10 degrees. "Ok I have an idea": I have a temp probe that I've found to be very accurate, I will let the temp probe acclimate to the room temp and point the IR sensor at it. That is what my video shows, and you will see it doesn't quite line up. The second part of the clip I heated up the probe sensor and tried to let the IR sensor read it as it cooled down, but it was a good bit off. After I recorded the video I tried to collect my temperature again with the highest reading being at 35.5, but averaging closer to 34.8, I dropped that into google, 35.5c = 95.9f.
S
Great sensor; operation couldn't be much simpler! It is trivial to hook up to an Arduino R4 Wifi board and quite accurate in my tests. I compared it with the laser-guided IR temp gauge and consistently saw measurements within about 0.2dg F of the same. The size is nicely compact as shown compared to a standard Sharpie marker in my included photo. The pin size and layout make connecting with standard breadboard jumper wires effortless, which makes this ideal for tinkering and projects.To get started and quickly see what you're in for to use this, I've included a simple Arduino sketch based on the examples for the MLX90614 that works with this component. Install the Adafruit-MLX90614 Library from the Arduino Library Manager to use this sketch. This sensor ticked the right boxes for me, quick, simple, and effective!#include Adafruit_MLX90614 mlx = Adafruit_MLX90614();void setup() { Serial.begin(9600); while (!Serial); pinMode(LED_BUILTIN, OUTPUT); digitalWrite(LED_BUILTIN, LOW); Serial.println("SHILLEHTEK Pre-Soldered GY-906 MLX90614"); if (!mlx.begin()) { Serial.println("Error connecting to temp sensor. Check wiring."); while (1); }; digitalWrite(LED_BUILTIN, HIGH); Serial.print("Emissivity = "); Serial.println(mlx.readEmissivity()); Serial.println("================================================");}void loop() { Serial.print("Ambient = "); Serial.print(mlx.readAmbientTempC()); Serial.print("*C\tObject = "); Serial.print(mlx.readObjectTempC()); Serial.println("*C"); Serial.print("Ambient = "); Serial.print(mlx.readAmbientTempF()); Serial.print("*F\tObject = "); Serial.print(mlx.readObjectTempF()); Serial.println("*F"); Serial.println(); delay(500);}
M
What a nice little IR temp sensor on a fantastic little easy-to-use, multi-voltage I2C module. I tested it on an Uno (pins A4, A5) with both the DFRobot and Adafruit libraries. You're able to set emissivity, and it'll tell you both the ambient temp and target object's temp. Both libraries provide a more convenient celsius reading, but the Adafruit library also has celsius->fahrenheit convenience functions built-in, if that's important to you. I didn't take a deep dive into how to interface with it beyond briefly looking at sources of those two libraries, so I can't comment on further capabilities not exposed by those libraries.When I tested mine, it appeared to be high by a good 3-5 degrees F (accuracy is supposedly within 0.5C, or close to 1.0F at body temp). My wrist held up directly in front of it (distance matters) read over 101, and the ambient reading was over 5 degrees higher than a Govee room thermometer I had on my desk. I don't know if the sensor itself has some way to calibrate it directly. It's easy enough to do from my end and it seemed to be fairly consistent over the small range I tested in a very non-scientific way, but I'd want to test over a large range of known temps and I didn't have time for that. Also, the documentation warns against protecting the sensor from possible nearby heat sources because temp differences across the sensor will affect accuracy, so it could've been that. I also let the module and Govee settle next to each other over the course of about a half hour (photos attached were after a half hour), and by then, the difference in ambient temp was only a couple degrees Fahrenheit and the difference was still slowly dropping, so for all I know, waiting another half hour would've made ambient readings even more accurate. I couldn't find how that worked in the documentation I found, so I'm not really sure. I'll also note that when I tried using longer wiring to bring the sensor further away from nearby electronics (that backlit 1602 in particular), it actually increased the temp readings and I'm not sure why, and I took care not to handle it directly with my hands. Perhaps there was a slight voltage drop that impacted the sensor? I didn't check. Anyway, the combined inaccuracy along with not finding some of this important information in documentation was the reason to dock it a star. I'd hope to be within the stated 0.5c accuracy out of the box. Maybe I just got unlucky with a defective unit. I may test this again with a more reliable 5v supply and different setup in the future, so if I do, I'll update this review.The second photo is when I brought a warm table lamp near it. The target object reading was very quick to respond. It does have a wide FOV (sensitivity for distance/size is 1:2), so you'll have to bring smaller target objects very close to get accurate readings. I'm assuming a lens could help if you wanted a different FOV.Considering my unit was a little off, I'd give this module a somewhat hesitant recommendation. It's not the cheapest way to measure temps at $16/module, but it's far from being the most expensive way too. For a contactless solution, it's on the cheaper side, and those libraries along with being able to use it with both 5v and 3.3v supplies/signals make it incredibly easy to use for tinkerers. If my readings were a little closer to target, it'd be a glowing 5 stars.
B
IR temperature sensors use the fact that warm objects radiate infrared light. IR intensity depends on the object’s temperature as well as its emissivity, which can range from 0.0 to 1.0. Many common materials have an emissivity of about 0.95, so this value is usually assumed. Large temperature errors can occur, however, for materials such as aluminum foil or tin (0.04), or brick (0.80), unless the assumed emissivity is changed. Charts of emissivity are easily found online.The internet has lots of good information about the MLX90614 sensor. One of the best sources I saw is at lastminuteengineers dot com, which has useful background and implementation details for using the device with an Arduino.The SHILLEHTEK GY-906 includes a voltage regulator and level shifters so it can be used safely with either 3.3 V or 5.0 V systems. For my application, I wanted to us an Arduino Uno (5 volts). The circuit is extremely simple requiring only four connections: ground, 5V, and two I2C pins (SCL and SCA). (See picture). For the Uno you can also use A5 for SCL and A4 for SDA.I used Arduino IDE V2.x, and adding the required libraries is straightforward: in Library Manager search for “MLX90614”. Currently, seven libraries appear to support this device. I added the Adafruit library. The other libraries may give access to more advanced features of the MLX90614, but I didn’t check.Once the library is added, two example programs become available. One of them is called “mlx_set_emissivity,” which you can use to initialize the device to any desired emissivity. If you don’t use this program, the default value is 0.95. The second example program is mlxtest, which measures the ambient temperature using an onboard sensor and also measures the remote object’s temperature based on detected IR intensity. These values are printed to the Serial Monitor. I don’t have a way to check accuracy, but the temperature estimates seemed reasonable.Note that the device has a 90-degree field of view, which is quite broad. If you want to measure the temperature of a small object, you have to get very close or else surrounding temperatures get averaged in. For example, if the sensor is 1 ft away from a wall, it will measure the average temperature across a 2 ft diameter circle on the wall. This is not a negative; it’s just the way the device works.Bottom line: the GY-906 is easy to use and it works perfectly. No negatives.
D
Super easy to get this connected and working with an ESP32 and the VEGA_MLX90614 or DFRobot's library in Arduino IDE.However, I started by trying to read this in Linux on an x86 SBC with I2C support and it's a bit of work. Firstly, the device address does not appear in i2cdetect and secondly, looking at the datasheet and those Arduino libraries it's a bit more involved than many other I2C devices, such as the MPU6050.As for accuracy- I did not have anything that I would call 'truth', but it compared well one of those IR temperature guns. NOTE: distance is important with this- it has a wide FOV and appears to spatially average over the object in view. I have no hard data, but it appears to be 1:2 ratio. For instance, 1" away from an object is going to read a patch approximately 2x2".Minus 1 Star for lack of any useful integration documentation in the listing.