

Video Tutorial (Optional)
Watch first if you want to see the full Google reCAPTCHA (v2) setup for a React frontend and Node.js backend.
Project Overview
React + Node.js + Google reCAPTCHA (v2): In this project, you integrate Google reCAPTCHA into a simple React frontend and Node.js (Express) backend so your login form can block bots and spam by verifying a CAPTCHA token server-side.
CAPTCHA (Completely Automated Public Turing test to tell Computers and Humans Apart) is a challenge-response test used to determine whether a user is human. Google reCAPTCHA is an advanced CAPTCHA that can use behavior analysis, challenges, and machine learning to reduce automated abuse.
A robot could try to click a checkbox, but modern reCAPTCHA systems use multiple techniques to detect automation, including behavior analysis, image/puzzle challenges, and ongoing machine learning improvements.
- Time: 30 to 60 minutes
- Skill level: Beginner to Intermediate
- What you will build: A React login UI with reCAPTCHA v2 that sends a token to a Node.js backend for Google verification before issuing a JWT
Project code: https://github.com/shillehbean/youtube-p2/tree/main/reCAPTCHA-react
Parts List
From ShillehTek
- None required for this software-only build
External
- Node.js + npm - runtime and package manager for both React and the backend
- Google reCAPTCHA Admin Console - create a Site Key and Secret Key
-
create-react-app- scaffolds the React project -
react-google-recaptcha- reCAPTCHA widget for React -
axios- HTTP client (frontend to backend, backend to Google verify endpoint) -
react-toastify- toast notifications on login success/failure -
ajv@^7(dev dependency) - installed to resolve a missing module error in some setups -
express- Node.js web server -
dotenv- environment variable loading -
cors- enables cross-origin requests during local development -
jsonwebtoken- creates a JWT token after successful login -
express-async-handler- wraps async middleware for clean error handling -
nodemon(dev dependency) - auto-restarts the backend during development
Note: This example uses reCAPTCHA v2. Be aware of pricing and quotas. Scaling beyond 10,000 uses per month can incur cost if billing is enabled. If billing is not set up, the CAPTCHA may fail once you hit limits.
Step-by-Step Guide
Step 1 - Set up your React and Node.js environment
Goal: Make sure you have the tooling required to build and run both the frontend and backend.
What to do: Install Node.js and npm if you do not already have them.
Expected result: You can run node -v and npm -v successfully in your terminal.
Step 2 - Create a new React app
Goal: Scaffold a new React project that will host the login form and reCAPTCHA widget.
What to do: Run the following commands.
npx create-react-app recaptcha-demo
cd recaptcha-demo
Expected result: You have a recaptcha-demo folder with a working React app structure.
Step 3 - Install necessary frontend packages
Goal: Add the packages needed for reCAPTCHA, HTTP requests, and UI notifications.
What to do: Install react-google-recaptcha, axios, and react-toastify. If you hit a missing module error, install ajv@^7 as a dev dependency.
npm install --save-dev ajv@^7
npm install react-google-recaptcha axios react-toastify
Expected result: The dependencies appear in your package.json, and installs complete without errors.
Step 4 - Create your Node.js backend
Goal: Set up an Express backend that will verify reCAPTCHA tokens with Google and then issue a JWT for valid logins.
What to do: Create a backend folder next to your React app (one level up), initialize a Node project, and install dependencies.
cd ..
mkdir backend
cd backend
npm init -y
npm install express axios dotenv cors jsonwebtoken express-async-handler
npm install --save-dev nodemon
Expected result: You have a backend folder with its own package.json and installed dependencies.
Step 5 - Set up Google reCAPTCHA
Goal: Create the keys required to render reCAPTCHA in React and verify tokens from the backend.
What to do: Register your site in the Google reCAPTCHA Admin Console and save your Site Key and Secret Key.
https://www.google.com/recaptcha/admin/create
Expected result: You have a reCAPTCHA Site Key (frontend) and Secret Key (backend).
Step 6 - Set up environment variables
Goal: Keep keys out of your source code and load them at runtime.
What to do: In your backend folder, create a .env file and add your Secret Key plus a JWT secret.
CAPTCHA_SECRET_KEY=your-secret-key
JWT_SECRET=anything
In your React project folder, create a .env file and add your Site Key.
REACT_APP_CAPTCHA_SITE_KEY=your-site-keyExpected result: Both apps can access their keys via environment variables.
Step 7 - Create backend middleware for reCAPTCHA verification
Goal: Verify the user-provided reCAPTCHA token server-side before your login route proceeds.
What to do: Create a middleware directory in backend and add recaptchaMiddleware.js.
Code:
// backend/middleware/recaptchaMiddleware.js
const axios = require('axios');
const asyncHandler = require('express-async-handler');

const verifyCaptcha = asyncHandler(async (req, res, next) => {
  const { captcha } = req.body;

  if (!captcha) {
    return res.status(400).json({ message: 'Please complete the CAPTCHA' });
  }

  const secretKey = process.env.CAPTCHA_SECRET_KEY;

  try {
    const response = await axios.post(
      `https://www.google.com/recaptcha/api/siteverify?secret=${secretKey}&response=${captcha}`
    );

    if (response.data.success) {
      next();
    } else {
      return res.status(400).json({ message: 'CAPTCHA verification failed' });
    }
  } catch (error) {
    return res.status(500).json({ message: 'CAPTCHA verification error' });
  }
});

module.exports = { verifyCaptcha };
Expected result: Your backend has a reusable middleware that blocks requests without a valid CAPTCHA token.
Step 8 - Create your Express server
Goal: Add a login endpoint that uses the reCAPTCHA middleware and returns a JWT on valid credentials.
What to do: Create server.js in the backend and wire up the middleware and route.
Code:
// backend/server.js
const express = require('express');
const dotenv = require('dotenv');
const cors = require('cors');
const { verifyCaptcha } = require('./middleware/recaptchaMiddleware');
const jwt = require('jsonwebtoken');

dotenv.config();

const app = express();
app.use(cors());
app.use(express.json());

app.post('/api/login', verifyCaptcha, (req, res) => {
  const { email, password } = req.body;

  if (email === 'test@example.com' && password === 'password') {
    const token = jwt.sign({ id: 1, email }, process.env.JWT_SECRET, { expiresIn: '1h' });
    res.json({ token });
  } else {
    res.status(401).json({ message: 'Invalid credentials' });
  }
});

const PORT = process.env.PORT || 5002;
app.listen(PORT, () => console.log(`Server running on port ${PORT}`));
Expected result: Your backend can receive /api/login requests and will only proceed after reCAPTCHA verification succeeds.
Step 9 - Integrate reCAPTCHA in React
Goal: Build a login UI that captures the reCAPTCHA token and posts it to the backend.
What to do: Create a login form component that includes the react-google-recaptcha widget and submits email, password, and captcha in the request body.
Code (Login component):
// src/Login.js
import React, { useState } from 'react';
import axios from 'axios';
import ReCAPTCHA from 'react-google-recaptcha';
import { ToastContainer, toast } from 'react-toastify';
import 'react-toastify/dist/ReactToastify.css';
import './Login.css'; // Import the CSS file

const Login = () => {
  const [formData, setFormData] = useState({ email: '', password: '', captcha: '' });
  const [isLoggedIn, setIsLoggedIn] = useState(false); // Add state for login status

  const { email, password, captcha } = formData;

  const onChange = (e) => {
    setFormData({ ...formData, [e.target.name]: e.target.value });
  };

  const onCaptchaChange = (value) => {
    setFormData({ ...formData, captcha: value });
  };

  const onSubmit = async (e) => {
    e.preventDefault();

    if (!captcha) {
      toast.error('Please complete the CAPTCHA');
      return;
    }

    try {
      const response = await axios.post('http://localhost:5002/api/login', { email, password, captcha });
      toast.success('Login successful');
      setIsLoggedIn(true); // Set login status to true on success
      console.log(response.data); // Handle the response
    } catch (error) {
      toast.error(error.response.data.message || 'Login failed');
    }
  };

  return (
    <div className="login-container">
      {isLoggedIn ? (
        <div className="success-message">
          <h1>Login Successful</h1>
        </div>
      ) : (
        <form className="login-form" onSubmit={onSubmit}>
          <input
            type="email"
            name="email"
            value={email}
            onChange={onChange}
            placeholder="Email"
            required
          />
          <input
            type="password"
            name="password"
            value={password}
            onChange={onChange}
            placeholder="Password"
            required
          />
          <div className="captcha-container">
            <ReCAPTCHA
              sitekey={process.env.REACT_APP_CAPTCHA_SITE_KEY}
              onChange={onCaptchaChange}
            />
          </div>
          <button type="submit">Login</button>
        </form>
      )}
      <ToastContainer position="top-right" autoClose={5000} />
    </div>
  );
};

export default Login;
Code (Login styles):
/* src/Login.css */
.login-container {
  display: flex;
  justify-content: center;
  align-items: center;
  height: 100vh;
  background-color: #f5f5f5;
}

.login-form {
  background: #fff;
  padding: 2rem;
  border-radius: 8px;
  box-shadow: 0 0 10px rgba(0, 0, 0, 0.1);
  display: flex;
  flex-direction: column;
  width: 300px;
}

.login-form input {
  margin-bottom: 1rem;
  padding: 0.75rem;
  border: 1px solid #ccc;
  border-radius: 4px;
}

.captcha-container {
  display: flex;
  justify-content: center;
  margin-bottom: 1rem;
}

.login-form button {
  padding: 0.75rem;
  background-color: #007bff;
  color: white;
  border: none;
  border-radius: 4px;
  cursor: pointer;
}

.login-form button:hover {
  background-color: #0056b3;
}

.success-message {
  background: #fff;
  padding: 2rem;
  border-radius: 8px;
  box-shadow: 0 0 10px rgba(0, 0, 0, 0.1);
  text-align: center;
}
Expected result: The React UI shows a login form with a reCAPTCHA widget, and it will not submit unless a CAPTCHA token is present.
Step 10 - Modify App.js to render the login
Goal: Load the login component as the main page.
What to do: Update App.js to render the Login component.
Code:
import React from 'react';
import Login from './Login';
import './App.css';  // Optionally, create this file for styling

const App = () => {
  return (
    <div className="App">
      <h1>Login</h1>
      <Login />
    </div>
  );
};

export default App;
Expected result: Visiting the app shows the login page with the form and reCAPTCHA widget.
Step 11 - Run the frontend and backend
Goal: Start both servers and test the reCAPTCHA-protected login flow end-to-end.
What to do: Start the React app from the recaptcha-demo folder.
npm startStart the backend from the backend folder.
nodemon server.js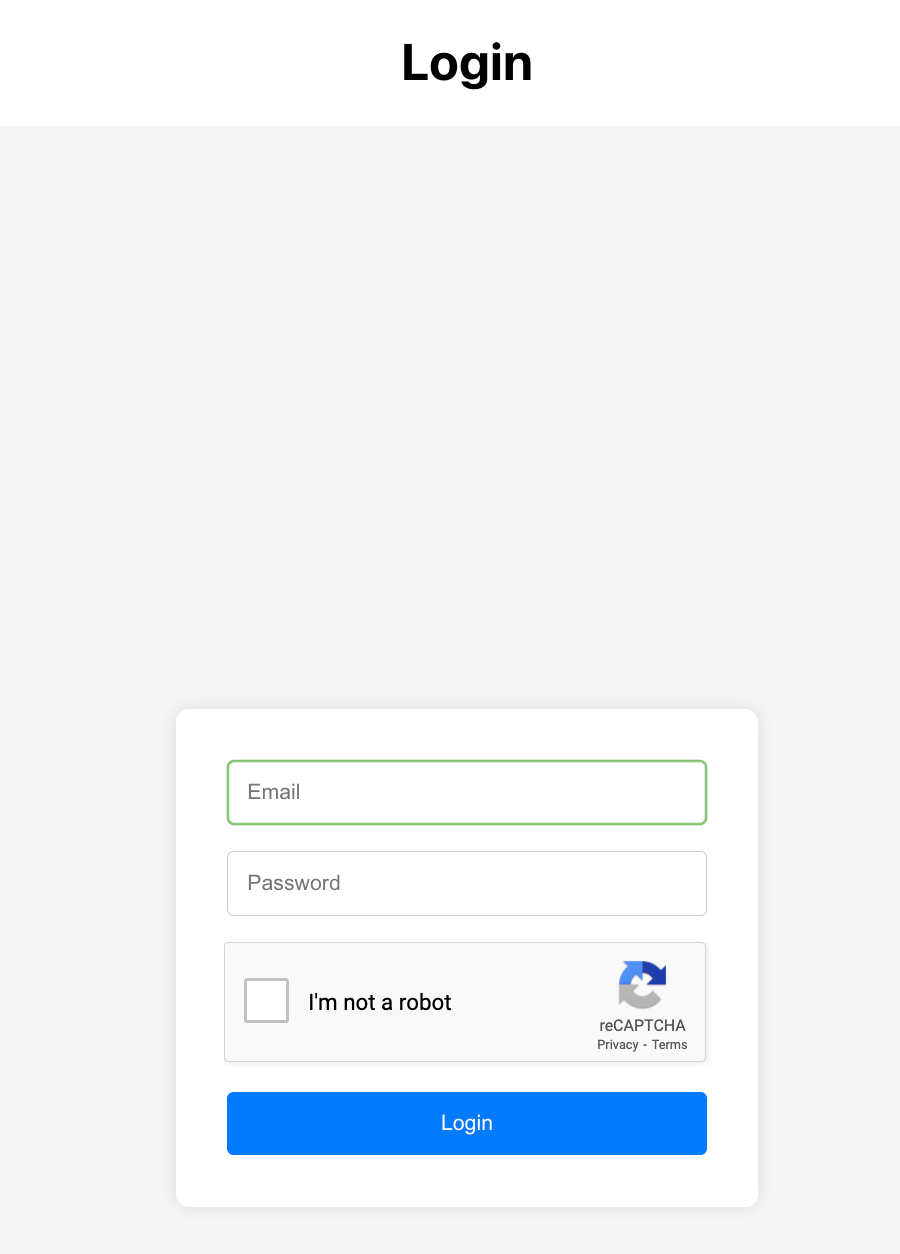
If you log in with the proper credentials and complete the CAPTCHA, you should see a success message.
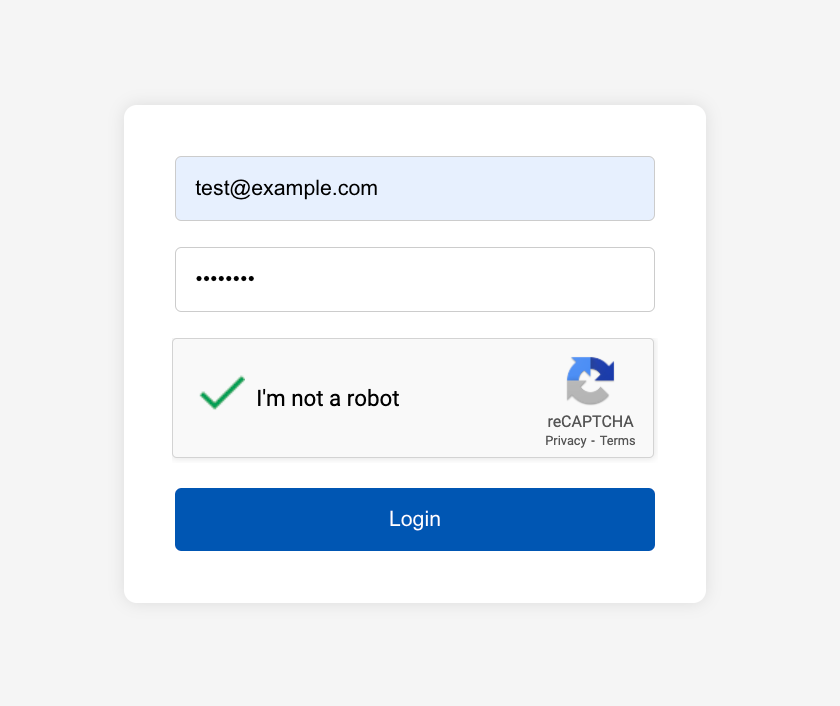

Expected result: With valid credentials and a valid CAPTCHA token, the backend returns success (including a JWT token) and the UI shows a login success message.
Note: This walkthrough uses CAPTCHA v2, but CAPTCHA v3 can be used in a similar way.
Conclusion
You implemented Google reCAPTCHA (v2) in a React frontend and Node.js (Express) backend to protect a login form from automated abuse and spam. The React app collects a CAPTCHA token, and the backend verifies it with Google before returning a JWT on successful login.
Want to support more builds and tutorials? Browse parts and project essentials at https://shillehtek.com/collections/all. If you want help customizing this project or building something similar for your product, check out our consulting: https://shillehtek.com/pages/iot-consulting.


.png?v=25000753014097803521779072085)

.png?v=68677308723310773341779072085)


