

Video Tutorial
Watch first if you want to follow along with the full setup for sending Raspberry Pi Pico W sensor readings to a ThingSpeak dashboard.
If you want a quick BME280-specific setup refresher, this related video focuses on getting the BME280 working first.
Project Overview
Raspberry Pi Pico W + BME280: In this tutorial, you use a Raspberry Pi Pico W with a BME280 sensor to measure temperature, pressure, and humidity, then send the readings to ThingSpeak to visualize them on a real-time dashboard.
ThingSpeak is an open-source IoT platform that lets you collect, store, analyze, visualize, and act on data from sensors or devices. It is popular because it is easy to set up and works well with common hardware platforms.
- Time: 30 to 60 minutes
- Skill level: Beginner
- What you will build: A Pico W weather station feed that updates a ThingSpeak dashboard in real time
Parts List
From ShillehTek
- BME280 sensor from ShillehTek - measures temperature, pressure, and humidity
- Jumper wires - connect the Pico W to the sensor on a breadboard
- Breadboard - solderless prototyping for the build
- Raspberry Pi Pico 2W - the WiFi microcontroller board used in this build
External
- A computer with Thonny IDE installed
- Wi-Fi network credentials
- ThingSpeak account
Note: If you use the common MicroPython BME280 library that returns values with units (for example, C, hPa, and %), you must remove the unit suffixes before sending values to ThingSpeak so the platform can parse them as numbers.
Step-by-Step Guide
Step 1 - Set up your ThingSpeak channel
Goal: Create a ThingSpeak channel and get the Write API Key used by your Pico W to publish readings.
What to do: Create a ThingSpeak account (if needed) at thingspeak.com. Then go to the Channels tab and click New Channel.
Name your channel (for example, Pico W Weather Station). Add three fields: Temperature, Pressure, and Humidity. Save the channel and note your Write API Key from the API Keys tab.
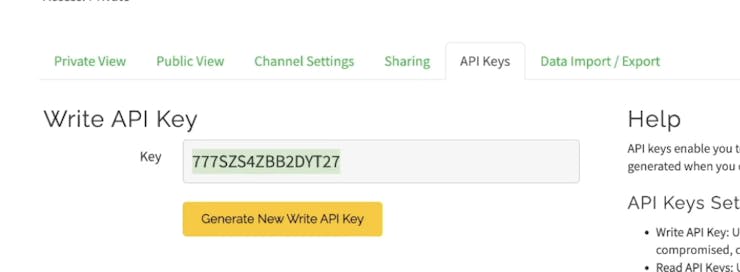
Expected result: You have a saved channel with three fields and you have copied the channel Write API Key.
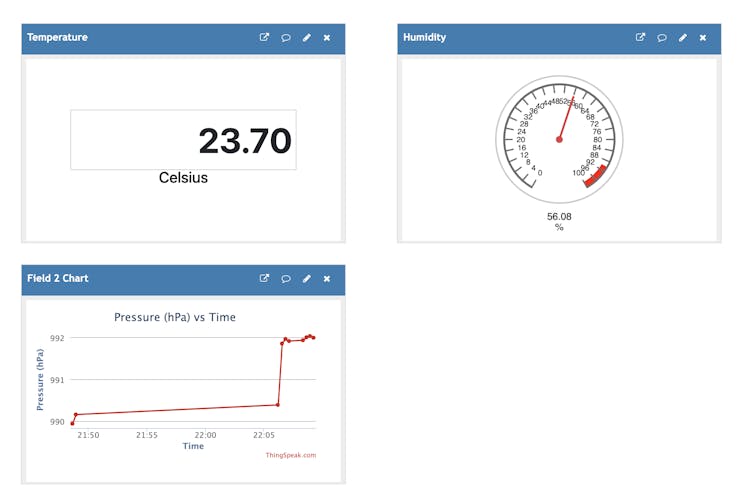
Step 2 - Add dashboard visualizations
Goal: Build a simple dashboard so incoming data is easy to read in real time.
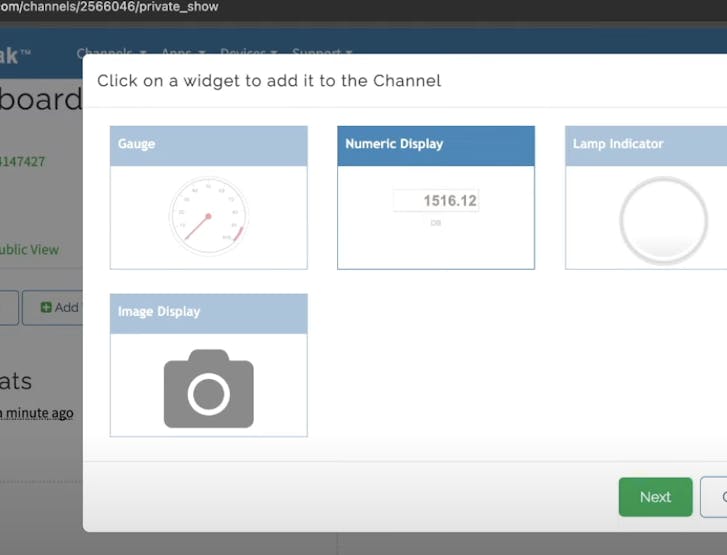
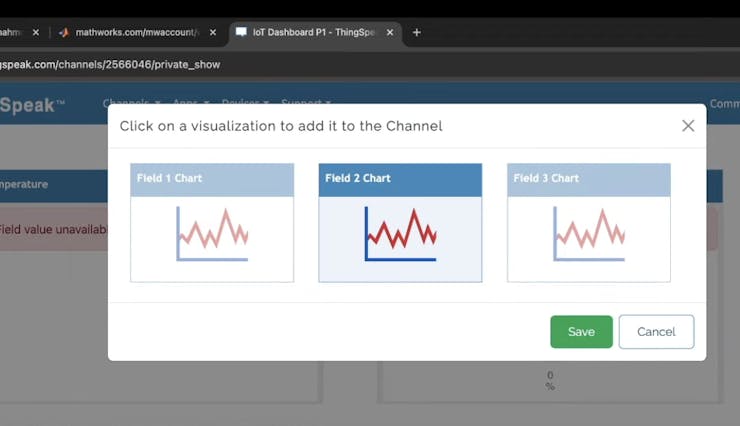
What to do: In your channel view, add widgets such as a numeric display for temperature, a graph for pressure, and a gauge for humidity.
Numeric display for temperature:
- Click Add Widget.
- Select Numeric Display.
- Choose the Temperature field.
- Save.
Graph for pressure:
- Click Add Visualizations.
- Choose the Pressure field.
- Configure the time span and other settings as needed.
- Save.
Gauge for humidity:
- Click Add Widget.
- Select Gauge.
- Choose the Humidity field.
- Set min and max values (for example, 0 to 100%).
- Save.
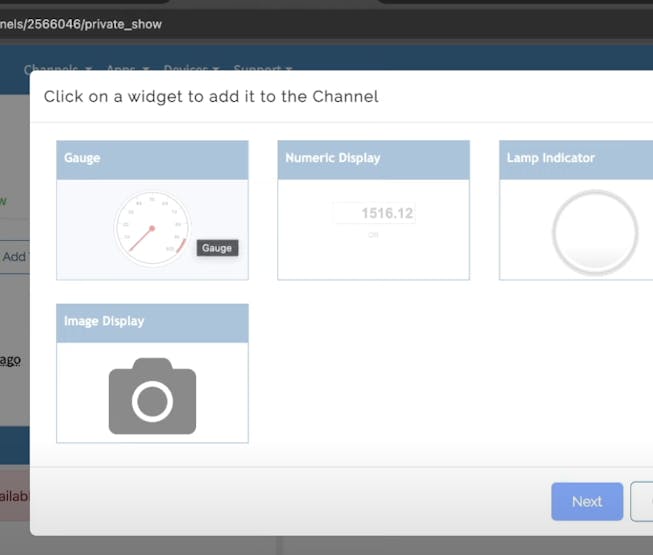
Expected result: Your ThingSpeak channel has widgets ready to display incoming values.
Step 3 - Wire the BME280 and confirm it reads
Goal: Get the BME280 sensor connected and working on the Pico W before sending data to ThingSpeak.
What to do: Wire your BME280 to the Pico W and verify it reads correctly in MicroPython. If you want a quick walkthrough focused specifically on getting the BME280 set up, use the linked video in the Video Tutorial section above.
Expected result: You can read temperature, pressure, and humidity values from the BME280 in MicroPython.
Step 4 - Run the MicroPython script to publish to ThingSpeak
Goal: Connect the Pico W to Wi-Fi, read BME280 values, and post updates to ThingSpeak every 15 seconds.
What to do: Use the full script linked here and run it on your Pico W:
The script imports libraries for Wi-Fi and HTTP requests, initializes I2C for the BME280, connects to Wi-Fi, reads temperature, pressure, and humidity, then sends the values to ThingSpeak in a loop every 15 seconds.
If your BME280 library returns values that include unit suffixes (for example, C, hPa, %), modify the return values so only numbers are sent to ThingSpeak.
If you are using an earlier MicroPython version and urequests is not available, install it first.
You can also hardcode your Wi-Fi credentials directly in the script instead of using a constants file by replacing the placeholders with your actual SSID and password.
Expected result: Your ThingSpeak dashboard begins updating automatically with new temperature, pressure, and humidity readings.
Conclusion
You set up a Raspberry Pi Pico W with a BME280 sensor to send temperature, pressure, and humidity readings to ThingSpeak for real-time visualization. With the channel fields, widgets, and MicroPython script in place, you can monitor environmental conditions from anywhere.
Want the exact parts used in this build? Grab sensors, wires, and prototyping gear from https://shillehtek.com/collections/all. If you want help customizing this project or building an IoT solution for your product, check out our consulting: https://shillehtek.com/pages/iot-consulting.
Subscribe: Youtube
Support: https://www.buymeacoffee.com/mmshilleh
Hire me at UpWork to build your IoT projects: https://www.upwork.com/freelancers/~017060e77e9d8a1157
ShillehTek Amazon Store:


.png?v=25000753014097803521779072085)

.png?v=68677308723310773341779072085)


