

Video Tutorial (Optional)
Watch first if you want to see the full Raspberry Pi time-lapse workflow (capture, preview, and exporting) in real time.
Project Overview
Raspberry Pi 4B + Raspberry Pi Camera Module: In this project, you set up a Raspberry Pi Camera Module on a Raspberry Pi 4B, capture frames automatically with Python (Picamera2 + OpenCV), and stitch them into a time-lapse video with ffmpeg.
For today’s example, the capture is a simple time-lapse of a city skyline, just to show the end-to-end process.

- Time: 30 to 60 minutes setup, plus capture time (example shown is long running)
- Skill level: Beginner to Intermediate
- What you will build: A Python-based time-lapse capture pipeline that exports an MP4 from captured JPEG frames
Parts List
From ShillehTek
- ShillehTek parts collection - source for common Raspberry Pi and maker accessories (exclusive discounts)
External
- Raspberry Pi Model 4B - the computer running Python, Picamera2, and ffmpeg
- Raspberry Pi power supply - stable power for long captures
- MicroSD card - Raspberry Pi OS storage
- Raspberry Pi Camera Module V2–8 - the camera used for capturing frames
- Raspberry Pi camera holder (optional) - helps mount the camera
- Tripod and/or tape (optional) - keep the camera stationary and angled correctly
Note: This guide uses picamera2 (the modern Raspberry Pi camera stack), plus OpenCV for overlays and image writing, and ffmpeg to create the final MP4.
Step-by-Step Guide
Step 1 - Install the required packages
Goal: Install the system packages needed for Picamera2, OpenCV, Flask (optional preview), and ffmpeg.
What to do: Open a terminal on your Raspberry Pi and run:
Code:
sudo apt update
sudo apt install python3-opencv python3-flask python3-picamera2 ffmpeg
Expected result: The required packages install successfully, and you can import picamera2 and cv2 from Python.
Step 2 - Create the time-lapse capture script
Goal: Capture frames on an interval, overlay the current time, and save frames into a timestamped folder.
What to do: Create a Python file (for example, timelapse.py) with the following code. Make sure the camera is stationary during capture to ensure a smooth time-lapse.
Code:
import cv2
from datetime import datetime
import time
import os
from picamera2 import Picamera2

# Initialize the camera
camera = Picamera2()
camera.configure(camera.create_preview_configuration(main={"format": 'XRGB8888', "size": (1920, 1080)}))
camera.start()

# Timelapse settings
capture_interval = 10  # seconds between each frame
duration = 60 * 60 * 25  # duration of the timelapse capture in seconds (25 hours for this example)

# Create a new output directory with a timestamp
timestamp = datetime.now().strftime("%Y%m%d_%H%M%S")
output_dir = f"timelapse_frames_{timestamp}"
os.makedirs(output_dir, exist_ok=True)

start_time = time.time()

while time.time() - start_time < duration:
    frame = camera.capture_array()

    # Get the current time in hour:minute format
    current_time = datetime.now().strftime("%H:%M")

    # Define the position and font for the time overlay
    position = (frame.shape[1] - 200, 50)  # Adjust the position (x, y)
    font = cv2.FONT_HERSHEY_SIMPLEX
    font_scale = 1
    color = (0, 0, 0)  # Black color
    thickness = 3

    # Overlay the time on the frame
    cv2.putText(frame, current_time, position, font, font_scale, color, thickness, cv2.LINE_AA)

    # Save frame to disk
    filename = f"{output_dir}/frame_{int(time.time())}.jpg"
    cv2.imwrite(filename, frame)

    # Wait for the next capture
    time.sleep(capture_interval)

camera.stop()
Expected result: After running the script, you get a folder named like timelapse_frames_YYYYMMDD_HHMMSS filled with .jpg frames.
Step 3 - (Optional) Preview and adjust the camera angle using a Flask stream
Goal: Preview the camera feed in a browser so you can confirm framing before committing to a long capture.
What to do: Create another Python file (for example, preview.py) with the following code and run it.
Code:
from flask import Flask, Response
from picamera2 import Picamera2
import cv2
from datetime import datetime
app = Flask(__name__)
camera = Picamera2()
camera.configure(camera.create_preview_configuration(main={"format": 'XRGB8888', "size": (1920, 1080)}))
camera.start()
def generate_frames():
while True:
frame = camera.capture_array()
# Get the current time in hour:minute format
current_time = datetime.now().strftime("%H:%M")
# Define the position and font for the time overlay
position = (frame.shape[1] - 200, 50) # Adjust the position (x, y)
font = cv2.FONT_HERSHEY_SIMPLEX
font_scale = 1
color = (255, 255, 255) # White color
thickness = 2
# Overlay the time on the frame
cv2.putText(frame, current_time, position, font, font_scale, color, thickness, cv2.LINE_AA)
# Encode the frame as a JPEG image
ret, buffer = cv2.imencode('.jpg', frame)
frame = buffer.tobytes()
# Yield the frame to the response stream
yield (b'--frame\r\n'
b'Content-Type: image/jpeg\r\n\r\n' + frame + b'\r\n')
@app.route('/video_feed')
def video_feed():
return Response(generate_frames(), mimetype='multipart/x-mixed-replace; boundary=frame')
if __name__ == '__main__':
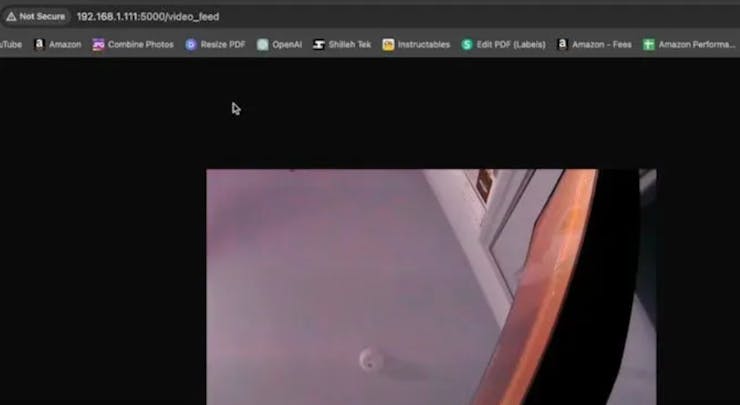
app.run(host='0.0.0.0', port=5000)What to do: If your Raspberry Pi is connected to your local WiFi, open this URL (replace with your Pi’s IP):
http://<Your Raspberry Pi IP>:5000/video_feedWhat to do: To find your Raspberry Pi IP address, run:
ifconfigExpected result: You see a live stream in Chrome, and you can adjust the camera angle before running the long time-lapse capture.
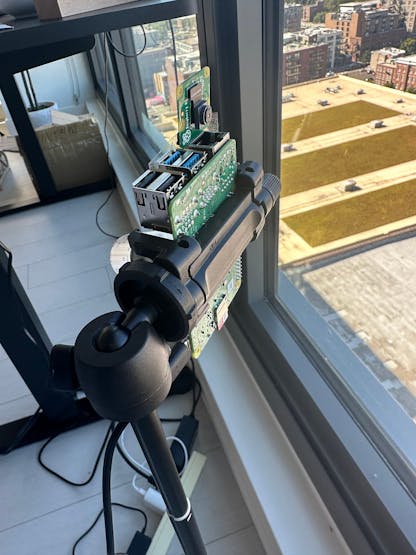
What to do: Mount the camera securely. In this example, the camera was taped to the Raspberry Pi and angled with a tripod. There are more professional mounting options, but stability is what matters most.

Step 4 - Stitch the frames into an MP4 with ffmpeg
Goal: Turn the captured JPEG frame sequence into a single time-lapse MP4.
What to do: After the capture finishes, you will have a directory filled with .jpg frames. Open a terminal, cd into that directory, and run:
Code:
ffmpeg -framerate 30 -pattern_type glob -i 'frame_*.jpg' -c:v libx264 -pix_fmt yuv420p timelapse.mp4Expected result: A timelapse.mp4 file is created. Depending on the number of frames, this can take a while to run.
Step 5 - (Optional) Transfer the MP4 to your local computer with SCP
Goal: Copy the finished timelapse.mp4 from the Raspberry Pi to your computer over the network.
What to do: Make sure SSH is enabled on your Raspberry Pi. One way is to run:
sudo raspi-configWhat to do: Then, from a terminal on your local computer, use scp to copy the file (update the username, host/IP, and path to match your setup):
scp mshilleh@raspberrypi:~/Desktop/timelapse_frames_20240903_040101/timelapse.mp4 ~/Desktop/Expected result: The MP4 appears on your local computer (for example, on your Desktop) and is ready for editing or sharing.
Conclusion
You built a Raspberry Pi time-lapse workflow using a Raspberry Pi 4B and Raspberry Pi Camera Module, capturing frames with Python (Picamera2 + OpenCV) and exporting a finished MP4 using ffmpeg. With the optional Flask preview, you can lock in framing before you start a long capture.
Want the exact parts used in this build? Grab them from ShillehTek.com. If you want help customizing this project or building something for your product, check out our consulting: UpWork. You can also follow along on YouTube - Shilleh. or support the channel at Buy Me A Coffee to help us continue creating tutorials.


.png?v=25000753014097803521779072085)

.png?v=68677308723310773341779072085)


