
In today’s digital landscape, protecting your applications from bots and spam is crucial. One effective way to add an extra layer of security to your forms is by integrating Google reCAPTCHA.
CAPTCHA (Completely Automated Public Turing test to tell Computers and Humans Apart) is a type of challenge-response test used in computing to determine whether the user is human. It helps prevent automated software from performing actions that can degrade the quality of service.
reCAPTCHA is a more advanced form of CAPTCHA developed by Google, which not only protects websites from spam and abuse but also helps digitize text, annotate images, and build machine learning datasets. It often involves identifying objects in images or simply checking a box that says “I’m not a robot.”
A robot or automated script could, in theory, attempt to click a CAPTCHA checkbox, but modern CAPTCHA systems like reCAPTCHA use various techniques to distinguish human behavior from automated scripts. These techniques include:
- Behavior Analysis: reCAPTCHA analyzes user behavior, such as mouse movements, keystrokes, and the time taken to complete tasks, to determine if the user is human.
- Challenges: If the behavior analysis is inconclusive, reCAPTCHA may present additional challenges, such as identifying objects in images or solving puzzles, which are designed to be difficult for bots.
- Machine Learning: reCAPTCHA uses machine learning algorithms to continually improve its ability to differentiate between humans and bots based on data collected from users.
These methods make it challenging for automated scripts to successfully bypass CAPTCHA systems.
This blog post will walk you through the process of implementing Google reCAPTCHA in a simple React and Node.js application. We’ll cover both the frontend and backend, ensuring that reCAPTCHA verification is seamlessly integrated into your login process.
Link to GH Project:
https://github.com/shillehbean/youtube-p2/tree/main/reCAPTCHA-react
— — -
Before we delve into the topic, we invite you to support our ongoing efforts and explore our various platforms dedicated to enhancing your IoT projects:
- Subscribe to our YouTube Channel: Stay updated with our latest tutorials and project insights by subscribing to our channel at YouTube — Shilleh.
- Support Us: Your support is invaluable. Consider buying me a coffee at Buy Me A Coffee to help us continue creating quality content.
- Hire Expert IoT Services: For personalized assistance with your IoT projects, hire me on UpWork.
ShillehTek Website (Exclusive Discounts):
https://shillehtek.com/collections/all
ShillehTekAmazon Store:
ShillehTek Amazon Store — Canada
ShillehTek Amazon Store — Japan
Step 1: Set Up Your React and Node.js Environment
First, ensure you have Node.js and npm installed on your machine. If not, download and install them from https://nodejs.org/.
Step 2: Create a New React App
Create a new React application using Create React App:
npx create-react-app recaptcha-demo
cd recaptcha-demo
Step 3: Install Necessary Packages
We’ll use react-google-recaptcha for integrating reCAPTCHA into our React app:
Installing ajv manually with npm install --save-dev ajv@^7 resolves a missing module error by ensuring the correct version is available for your project dependencies.
npm install --save-dev ajv@^7
npm install react-google-recaptcha axios react-toastify
Step 4: Create Your Node.js Backend
Set up your Node.js backend by creating a new directory and initializing a new Node.js project:
cd ..
mkdir backend
cd backend
npm init -y
npm install express axios dotenv cors jsonwebtoken express-async-handler
npm install --save-dev nodemon

Your directory structure should look like this.
Step 5: Set Up Google reCAPTCHA
Go to the Google reCAPTCHA Admin Console at https://www.google.com/recaptcha/admin/create to register your site. You will receive a Site Key and a Secret Key. Save these keys for use in your application.
Step 6: Set Up Your Environment Variables
Create a .env file in your backend directory and add your Google reCAPTCHA keys:
CAPTCHA_SECRET_KEY=your-secret-key
JWT_SECRET=anything
Create a .env file in your React project directory and add your Google reCAPTCHA site key:
REACT_APP_CAPTCHA_SITE_KEY=your-site-key
Step 7: Create Backend Middleware for reCAPTCHA Verification
Create a middleware directory and add recaptchaMiddleware.js for handling reCAPTCHA verification:
// backend/middleware/recaptchaMiddleware.js
const axios = require('axios');
const asyncHandler = require('express-async-handler');
const verifyCaptcha = asyncHandler(async (req, res, next) => {
  const { captcha } = req.body;
  if (!captcha) {
    return res.status(400).json({ message: 'Please complete the CAPTCHA' });
  }
  const secretKey = process.env.CAPTCHA_SECRET_KEY;
  try {
    const response = await axios.post(
      `https://www.google.com/recaptcha/api/siteverify?secret=${secretKey}&response=${captcha}`
    );
    if (response.data.success) {
      next();
    } else {
      return res.status(400).json({ message: 'CAPTCHA verification failed' });
    }
  } catch (error) {
    return res.status(500).json({ message: 'CAPTCHA verification error' });
  }
});
module.exports = { verifyCaptcha };
Step 8: Create Your Express Server
Set up an Express server and use the middleware for reCAPTCHA verification:
// backend/server.js
const express = require('express');
const dotenv = require('dotenv');
const cors = require('cors');
const { verifyCaptcha } = require('./middleware/recaptchaMiddleware');
const jwt = require('jsonwebtoken');

dotenv.config();
const app = express();
app.use(cors());
app.use(express.json());
app.post('/api/login', verifyCaptcha, (req, res) => {
  const { email, password } = req.body;
  if (email === 'test@example.com' && password === 'password') {
    const token = jwt.sign({ id: 1, email }, process.env.JWT_SECRET, { expiresIn: '1h' });
    res.json({ token });
  } else {
    res.status(401).json({ message: 'Invalid credentials' });
  }
});
const PORT = process.env.PORT || 5002;
app.listen(PORT, () => console.log(`Server running on port ${PORT}`));
Step 9: Integrate reCAPTCHA in React
In your React app, create a login form that includes the reCAPTCHA component:
// src/Login.js
import React, { useState } from 'react';
import axios from 'axios';
import ReCAPTCHA from 'react-google-recaptcha';
import { ToastContainer, toast } from 'react-toastify';
import 'react-toastify/dist/ReactToastify.css';
import './Login.css'; // Import the CSS file

const Login = () => {
  const [formData, setFormData] = useState({ email: '', password: '', captcha: '' });
  const [isLoggedIn, setIsLoggedIn] = useState(false); // Add state for login status
  const { email, password, captcha } = formData;

  const onChange = (e) => {
    setFormData({ ...formData, [e.target.name]: e.target.value });
  };

  const onCaptchaChange = (value) => {
    setFormData({ ...formData, captcha: value });
  };

  const onSubmit = async (e) => {
    e.preventDefault();
    if (!captcha) {
      toast.error('Please complete the CAPTCHA');
      return;
    }
    try {
      const response = await axios.post('http://localhost:5002/api/login', { email, password, captcha });
      toast.success('Login successful');
      setIsLoggedIn(true); // Set login status to true on success
      console.log(response.data); // Handle the response
    } catch (error) {
      toast.error(error.response.data.message || 'Login failed');
    }
  };

  return (
    <div className="login-container">
      {isLoggedIn ? (
        <div className="success-message">
          <h1>Login Successful</h1>
        </div>
      ) : (
        <form className="login-form" onSubmit={onSubmit}>
          <input
            type="email"
            name="email"
            value={email}
            onChange={onChange}
            placeholder="Email"
            required
          />
          <input
            type="password"
            name="password"
            value={password}
            onChange={onChange}
            placeholder="Password"
            required
          />
          <div className="captcha-container">
            <ReCAPTCHA
              sitekey={process.env.REACT_APP_CAPTCHA_SITE_KEY}
              onChange={onCaptchaChange}
            />
          </div>
          <button type="submit">Login</button>
        </form>
      )}
      <ToastContainer position="top-right" autoClose={5000} />
    </div>
  );
};

export default Login;
/* src/Login.css */
.login-container {
    display: flex;
    justify-content: center;
    align-items: center;
    height: 100vh;
    background-color: #f5f5f5;
  }

  .login-form {
    background: #fff;
    padding: 2rem;
    border-radius: 8px;
    box-shadow: 0 0 10px rgba(0, 0, 0, 0.1);
    display: flex;
    flex-direction: column;
    width: 300px;
  }

  .login-form input {
    margin-bottom: 1rem;
    padding: 0.75rem;
    border: 1px solid #ccc;
    border-radius: 4px;
  }

  .captcha-container {
    display: flex;
    justify-content: center;
    margin-bottom: 1rem;
  }

  .login-form button {
    padding: 0.75rem;
    background-color: #007bff;
    color: white;
    border: none;
    border-radius: 4px;
    cursor: pointer;
  }

  .login-form button:hover {
    background-color: #0056b3;
  }

  .success-message {
    background: #fff;
    padding: 2rem;
    border-radius: 8px;
    box-shadow: 0 0 10px rgba(0, 0, 0, 0.1);
    text-align: center;
  }
Step 10: Modify App.js file
import React from 'react';
import Login from './Login';
import './App.css';  // Optionally, create this file for styling

const App = () => {
  return (
    <div className="App">
      <h1>Login</h1>
      <Login />
    </div>
  );
};

export default App;
Run npm start in the recaptcha-demo folder
Run nodemon server.js in the backend folder
You will see the following screen.
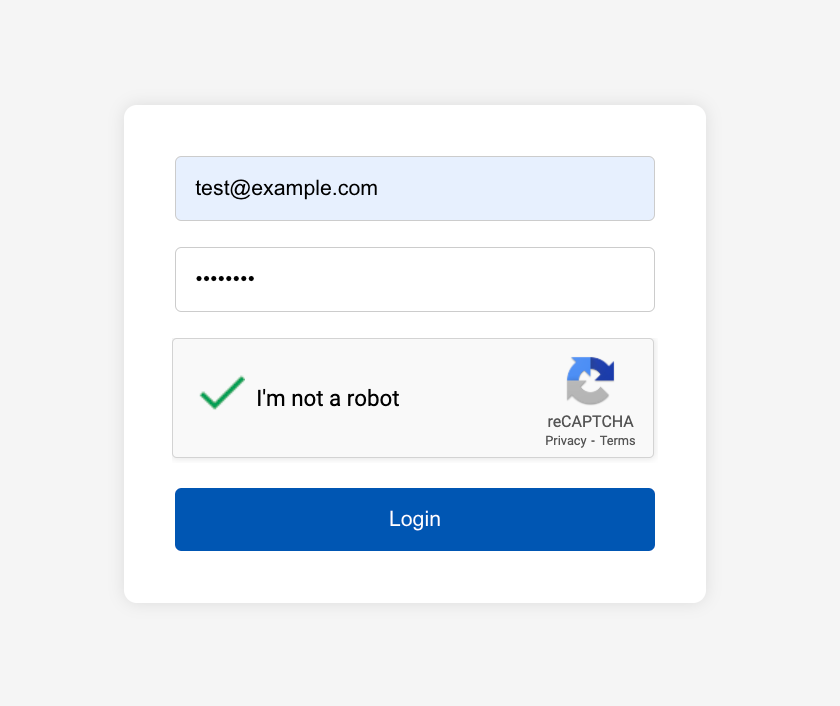
If you login with the proper credentials and check the captcha you will see a success message

It really is that simple thanks to Google’s library implementation! Be careful of the cost as scaling over 10,000 uses per month will begin to accrue a cost in your Google Cloud account if you setup a payment method, otherwise the Captcha will fail to work if you do not have payment setup.
We went over Captcha v2 in this example but really you can use v3 and it will work similarly.
Conclusion
Implementing Google reCAPTCHA in your React and Node.js applications is a straightforward process that can significantly enhance your application’s security. By following the steps outlined in this guide, you can ensure that your forms are protected against automated abuse and spam. Remember to test your implementation thoroughly in both development and production environments to ensure it works as expected.