
Video Tutorial
Watch first if you want to follow along with the full Arduino Nano Every + DHT22 setup in real time.
Subscribe: Youtube
Support: https://www.buymeacoffee.com/mmshilleh
Hire me at UpWork to build your IoT projects: https://www.upwork.com/freelancers/~017060e77e9d8a1157
Project Overview
In this tutorial, you connect a DHT22 temperature and humidity sensor to an Arduino Nano Every so you can read accurate environmental values in the Serial Monitor.
The DHT22 is a powerful environmental sensor used in DIY projects for the Raspberry Pi, Arduino, and various other microcontrollers. It measures humidity and temperature accurately at a low price.
You can use other Arduino models too, but make sure the pins match because pin arrangements differ between boards.
- Time: 15 to 30 minutes
- Skill level: Beginner
- What you will build: A DHT22 sensor hookup on an Arduino Nano Every that prints temperature and humidity to the Serial Monitor
Parts List
From ShillehTek
- DHT22 sensor (ShillehTek on Amazon) - the temperature and humidity sensor used for readings
External
- Arduino Nano Every (or another Arduino model with matching pin layout)
- 3 jumper wires - connect VCC, GND, and data between the board and sensor
- USB cable for your Arduino - power and programming
- Arduino IDE - used to install board support, libraries, and upload the example sketch
- Adafruit DHT Sensor Library (via Arduino Library Manager) - provides the DHT_Unified_Sensor example
Note: Most DHT22 sensors (including the ShillehTek DHT22 from Amazon) ship with wires, but you only need three connections for this tutorial.
Step-by-Step Guide
Step 1 - Make the physical connections
Goal: Wire the DHT22 to the Arduino Nano Every so the Arduino can read temperature and humidity data.
What to do: Follow the wiring diagram below. You only need 3 jumper wires to make the connection.
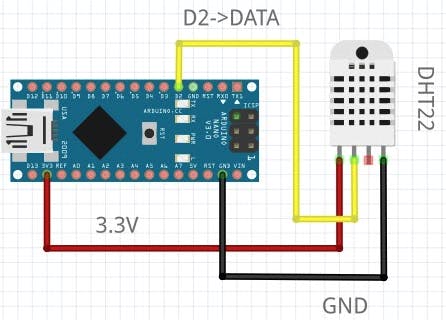
Expected result: The DHT22 is powered and its data pin is connected to the Arduino pin shown in the diagram.
Step 2 - Set up Arduino IDE for the Nano Every
Goal: Install the correct board package, select your board, and select the correct port so you can upload code.
What to do: Download the Arduino IDE. In the IDE, open the Board Manager from the left, search for nano every, and install the board package for the Nano Every (if you are using the Every).
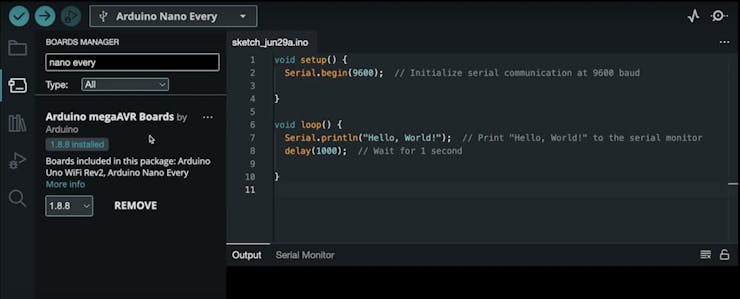
Then select the board and the port.
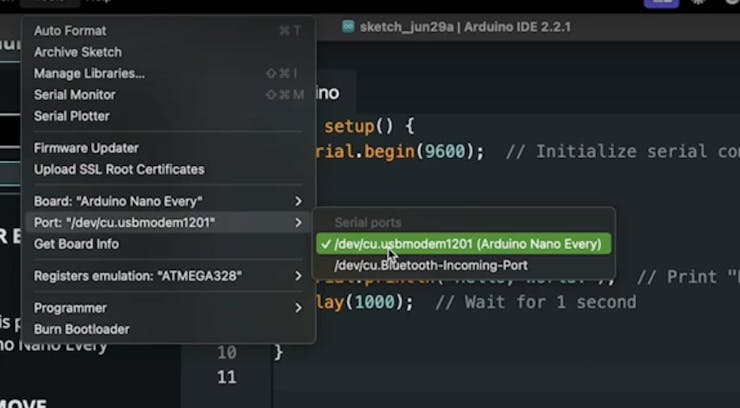
Expected result: The Arduino IDE shows the Nano Every selected and the correct port chosen for uploads.
Step 3 - Install the Adafruit DHT library and open the example
Goal: Use a proven example sketch to start reading DHT22 values quickly.
What to do: In the Arduino IDE Library Manager, install the DHT Adafruit Library.
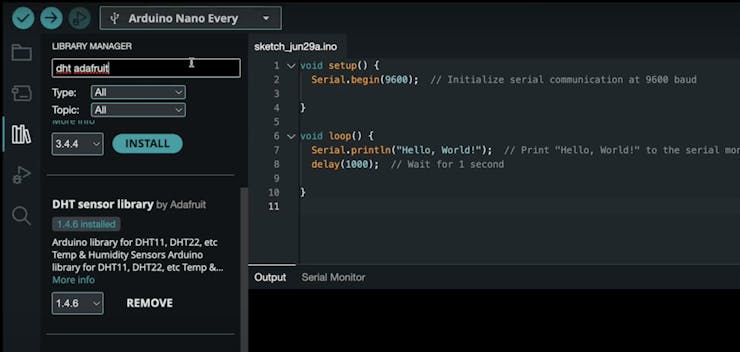
After it installs, go to File > Examples > DHT Sensor Library and select the DHT_Unified_Sensor example. This example is sufficient to start getting values from any DHT sensor.
By default, the example matches the wiring diagram above and uses the DHT22 model, so you do not need to change anything to start getting readings.
Expected result: The DHT_Unified_Sensor example sketch opens in the Arduino IDE.
Step 4 - Upload and view readings in Serial Monitor
Goal: Confirm the DHT22 is working by viewing live temperature and humidity values.
What to do: Upload the example to the Arduino. Open the Serial Monitor and set the baud rate to 9600.
Expected result: The Serial Monitor prints temperature and humidity values. Adjust the code as desired.
Conclusion
You connected a DHT22 temperature and humidity sensor to an Arduino Nano Every and used the Adafruit DHT library example to start reading values in the Serial Monitor.
Want the exact parts used in this build? Grab what you need from ShillehTek.com. If you want help customizing this project or building an IoT solution for your product, check out our IoT consulting services.


.png?v=25000753014097803521767701813)

.png?v=68677308723310773341767701813)


