
Video Tutorial (Optional)
Watch first if you want to see the MPU9250 wired to a Raspberry Pi and the Python data stream running in real time.
Project Overview
In this project, you connect a Raspberry Pi 4B to an MPU9250 9-axis IMU over I2C and use Python to continuously read accelerometer, gyroscope, and magnetometer data in the console.
Although this guide uses a Raspberry Pi 4B, the same approach applies to other Raspberry Pi models that support Python.
- Time: 20 to 40 minutes
- Skill level: Beginner
- What you will build: A working I2C setup that streams MPU9250 accelerometer, gyro, and magnetometer readings on your Raspberry Pi
Subscribe: Youtube
Support: https://www.buymeacoffee.com/mmshilleh
Hire me at UpWork to build your IoT projects: https://www.upwork.com/freelancers/~017060e77e9d8a1157
Parts List
From ShillehTek
- None linked in the original post
External
- Raspberry Pi (Raspberry Pi 4B used in this guide) - runs the Python script and provides the I2C bus
- MPU9250 9-axis sensor module - provides accelerometer, gyroscope, and magnetometer readings
- Jumper wires - four wires for I2C + power (3.3V, GND, SDA, SCL)
- Breadboard (recommended) - makes temporary wiring easier
Note: This is a simple 4-wire I2C connection plus power. Ensure your MPU9250 breakout is wired for the Raspberry Pi I2C pins and correct power for your module.
Step-by-Step Guide
Step 1 - Wire the MPU9250 to the Raspberry Pi (I2C)
Goal: Create the physical I2C and power connection so the Raspberry Pi can communicate with the MPU9250.
What to do: Connect your jumper wires to your Raspberry Pi as shown in the diagram.
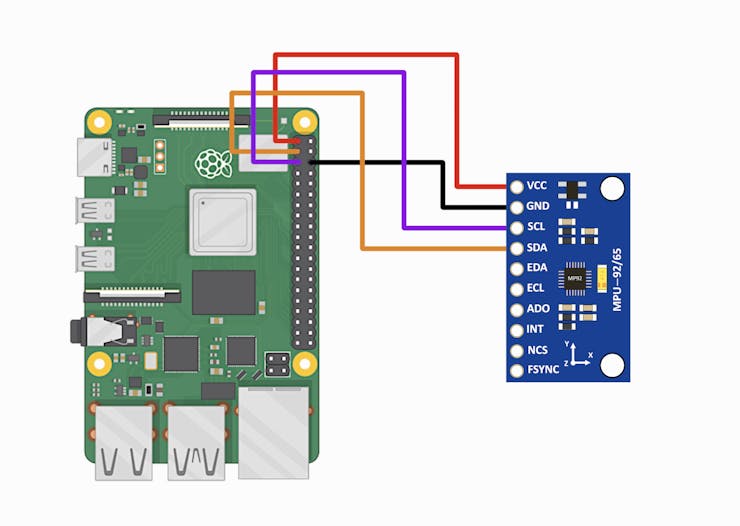
Expected result: The MPU9250 is powered and connected via I2C (four total wires).
Step 2 - Enable I2C on the Raspberry Pi
Goal: Enable the Raspberry Pi I2C interface so Python can access the bus.
What to do: Open the Raspberry Pi Configuration Tool from the Preferences menu in the desktop environment, or run the command below. Then go to Interface Options, select I2C, enable it, and reboot.
sudo raspi-configExpected result: After reboot, I2C is enabled and ready for use.
Step 3 - Install the required Python libraries
Goal: Install the I2C dependency and an MPU9250 library for Python.
What to do: Run the commands below to update packages, install pip (if needed), then install smbus2 and mpu9250-jmdev.
sudo apt-get update
sudo apt-get install python3-pip
sudo pip3 install smbus2
sudo pip3 install mpu9250-jmdev
Expected result: Your system has the dependencies needed to talk to the MPU9250 over I2C from Python.
Step 4 - Run the Python example to stream 9-axis data
Goal: Continuously read and print accelerometer, gyroscope, and magnetometer data from the MPU9250.
What to do: Use the example script provided here:
https://github.com/shillehbean/youtube-p2/blob/main/mpu9250_basic.py
This example creates an instance of the MPU9250 class and configures parameters such as gfs, afs, and mfs (full-scale ranges for the gyroscope, accelerometer, and magnetometer). Adjusting these settings changes sensitivity and range depending on your application.
Expected result: The console prints a continuous stream of accelerometer, gyroscope, and magnetometer readings.
Step 5 - Understand the output units
Goal: Interpret what you see in the console so the readings make sense.
What to do: Use these guidelines when reviewing the streamed values:
- Accelerometer values: Reported in G, where 1 G is approximately 9.81 m/s^2. If the sensor is lying flat and still, the Z-axis is typically near ±1 G (depending on orientation) and X/Y near 0 G.
- Gyroscope values: Reported in degrees per second (°/s). When the sensor is stationary, values should be near 0.
- Magnetometer values: Reported in microteslas (µT), measuring the strength and direction of magnetic fields (including the Earth’s field).
Expected result: You can explain what each sensor reading means and why values change as you move or rotate the MPU9250.
Step 6 - Note resting offsets and plan for calibration
Goal: Set expectations about accuracy before using the data in a real project.
What to do: If the resting values seem off, that is expected. The next tutorial covers a simple calibration process to correct inherent accelerometer inaccuracies (and improve overall sensor accuracy).
Expected result: You understand that raw sensor output can include offsets and that calibration is the next step for more accurate measurements.
Conclusion
You connected an MPU9250 9-axis sensor to a Raspberry Pi (Raspberry Pi 4B in this guide) over I2C, installed the required Python libraries, and streamed accelerometer, gyroscope, and magnetometer data to the console. You also learned how to interpret the output units and why calibration matters for better resting values.
Want the parts for your next Raspberry Pi sensor build? Shop components at ShillehTek.com. If you want help customizing this project or building an IoT solution for your product, check out our IoT consulting services.


.png?v=25000753014097803521767701813)

.png?v=68677308723310773341767701813)


