

Video Tutorial (Optional)
Watch first if you want to see the full AWS Lambda + Selenium + ChromeDriver container workflow end to end.
Project Overview
AWS Lambda + Selenium + ChromeDriver: In this tutorial, you run Selenium with ChromeDriver inside an AWS Lambda function (Python) by packaging everything into a Docker container, enabling scalable serverless browser automation.
This setup is useful for web scraping, web app testing, or other headless browser automation tasks in the cloud. The example Lambda searches for “OpenAI” on Google and returns the titles of the search results.
- Time: 45 to 90 minutes
- Skill level: Intermediate
- What you will build: A containerized AWS Lambda function that runs headless Chrome via Selenium and ChromeDriver
Parts List
From ShillehTek
- ShillehTek store - optional parts and project resources
External
- AWS account
- GitHub account
- Docker Desktop
- AWS CLI (configured)
- Python AWS Lambda base image:
amazon/aws-lambda-python:3.12 - Selenium (Python package)
- Headless Chrome and ChromeDriver (installed into the container by script)
- Linux dependencies and tools used in the image build:
dnf,curl,jq,unzip
Note: This project installs Chrome and ChromeDriver into /opt inside the container and configures Selenium to use those paths at runtime.
Step-by-Step Guide
Step 1 - Create the Lambda handler (main.py)
Goal: Create a Python Lambda function that launches headless Chrome with Selenium, performs a Google search for “OpenAI”, and returns the titles of results.
What to do: Create a file named main.py and paste in the code below.
Code:
import os
import time
from selenium import webdriver
from selenium.webdriver.common.by import By
from selenium.webdriver.common.keys import Keys
from selenium.webdriver.chrome.service import Service
from selenium.webdriver.chrome.options import Options as ChromeOptions
from tempfile import mkdtemp


def lambda_handler(event, context):
    chrome_options = ChromeOptions()
    chrome_options.add_argument("--headless=new")
    chrome_options.add_argument("--no-sandbox")
    chrome_options.add_argument("--disable-dev-shm-usage")
    chrome_options.add_argument("--disable-gpu")
    chrome_options.add_argument("--disable-dev-tools")
    chrome_options.add_argument("--no-zygote")
    chrome_options.add_argument("--single-process")
    chrome_options.add_argument(f"--user-data-dir={mkdtemp()}")
    chrome_options.add_argument(f"--data-path={mkdtemp()}")
    chrome_options.add_argument(f"--disk-cache-dir={mkdtemp()}")
    chrome_options.add_argument("--remote-debugging-pipe")
    chrome_options.add_argument("--verbose")
    chrome_options.add_argument("--log-path=/tmp")
    chrome_options.binary_location = "/opt/chrome/chrome-linux64/chrome"

    service = Service(
        executable_path="/opt/chrome-driver/chromedriver-linux64/chromedriver",
        service_log_path="/tmp/chromedriver.log",
    )

    driver = webdriver.Chrome(
        service=service,
        options=chrome_options,
    )

    # Open a webpage
    driver.get("https://www.google.com")

    # Find the search box
    search_box = driver.find_element(By.NAME, "q")

    # Enter a search query
    search_box.send_keys("OpenAI")

    # Submit the search query
    search_box.send_keys(Keys.RETURN)

    # Wait for the results to load
    time.sleep(2)

    # Get the results
    results = driver.find_elements(By.CSS_SELECTOR, "div.g")

    # Print the titles of the results
    titles = [result.find_element(By.TAG_NAME, "h3").text for result in results]

    # Close the WebDriver
    driver.quit()

    return {
        "statusCode": 200,
        "body": titles,
    }
Expected result: Your handler is ready and references Chrome at /opt/chrome/chrome-linux64/chrome and ChromeDriver at /opt/chrome-driver/chromedriver-linux64/chromedriver.
Step 2 - Create the Dockerfile for AWS Lambda
Goal: Build a Lambda-compatible container image that includes Chrome dependencies, installs Chrome and ChromeDriver, installs Selenium, and sets the Lambda entrypoint.
What to do: Create a file named Dockerfile and paste in the following.
Code:
FROM amazon/aws-lambda-python:3.12

# Install chrome dependencies
RUN dnf install -y atk cups-libs gtk3 libXcomposite alsa-lib \
    libXcursor libXdamage libXext libXi libXrandr libXScrnSaver \
    libXtst pango at-spi2-atk libXt xorg-x11-server-Xvfb \
    xorg-x11-xauth dbus-glib dbus-glib-devel nss mesa-libgbm jq unzip

# Copy and run the chrome installer script
COPY ./chrome-installer.sh ./chrome-installer.sh
RUN chmod +x ./chrome-installer.sh
RUN ./chrome-installer.sh
RUN rm ./chrome-installer.sh

# Install selenium
RUN pip install selenium

# Copy the main application code
COPY main.py ./

# Command to run the Lambda function
CMD [ "main.lambda_handler" ]
Expected result: The image will be able to run Selenium with headless Chrome in the Lambda runtime environment.
Step 3 - Add the Chrome and ChromeDriver installer script
Goal: Download and install the latest stable “Chrome for Testing” binaries (Chrome and ChromeDriver) into the container’s /opt directory.
What to do: Create a file named chrome-installer.sh and paste in the following.
Code:
#!/bin/bash
set -e

latest_stable_json="https://googlechromelabs.github.io/chrome-for-testing/last-known-good-versions-with-downloads.json"

# Retrieve the JSON data using curl
json_data=$(curl -s "$latest_stable_json")

latest_chrome_linux_download_url="$(echo "$json_data" | jq -r ".channels.Stable.downloads.chrome[0].url")"
latest_chrome_driver_linux_download_url="$(echo "$json_data" | jq -r ".channels.Stable.downloads.chromedriver[0].url")"

download_path_chrome_linux="/opt/chrome-headless-shell-linux.zip"
download_path_chrome_driver_linux="/opt/chrome-driver-linux.zip"

mkdir -p "/opt/chrome"

curl -Lo $download_path_chrome_linux $latest_chrome_linux_download_url
unzip -q $download_path_chrome_linux -d "/opt/chrome"
rm -rf $download_path_chrome_linux

mkdir -p "/opt/chrome-driver"

curl -Lo $download_path_chrome_driver_linux $latest_chrome_driver_linux_download_url
unzip -q $download_path_chrome_driver_linux -d "/opt/chrome-driver"
rm -rf $download_path_chrome_driver_linux
Expected result: The container image will include Chrome under /opt/chrome and ChromeDriver under /opt/chrome-driver.
Step 4 - Build the Docker image locally
Goal: Build the container that AWS Lambda will run.
What to do: From the folder containing main.py, Dockerfile, and chrome-installer.sh, run:
Code:
docker build -t selenium-chrome-driver .
Expected result: A local image named selenium-chrome-driver is created successfully.
Step 5 - Tag and push the image to AWS ECR
Goal: Upload your built image to Amazon ECR so Lambda can pull it.
What to do: Tag your image, authenticate Docker to ECR, then push.
Code:
docker tag selenium-chrome-driver <your amazon account id>.dkr.ecr.us-east-1.amazonaws.com/docker-images:v1.0.0

aws ecr get-login-password --region us-east-1 | docker login --username AWS --password-stdin <your amazon account id>.dkr.ecr.us-east-1.amazonaws.com/docker-images

docker push <your amazon account id>.dkr.ecr.us-east-1.amazonaws.com/docker-images:v1.0.0
Expected result: Your image version v1.0.0 is available in your ECR repository.
Step 6 - Deploy the container image as an AWS Lambda function
Goal: Create or update a Lambda function that uses your ECR image.
What to do: In AWS Lambda, choose the container image from ECR and deploy. Make sure to increase the configuration resources for the container so it does not time out or run out of memory.
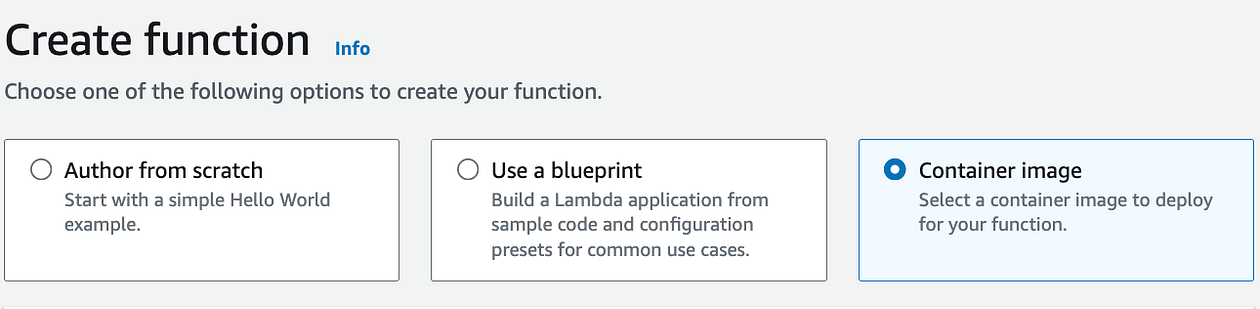
Expected result: The Lambda function is created (or updated) and configured to run your container image.
Step 7 - Run a test event and confirm output
Goal: Verify the function runs Selenium in headless Chrome and returns titles from Google results.
What to do: Run a test event in the Lambda console and confirm you get a successful response with a list of titles.
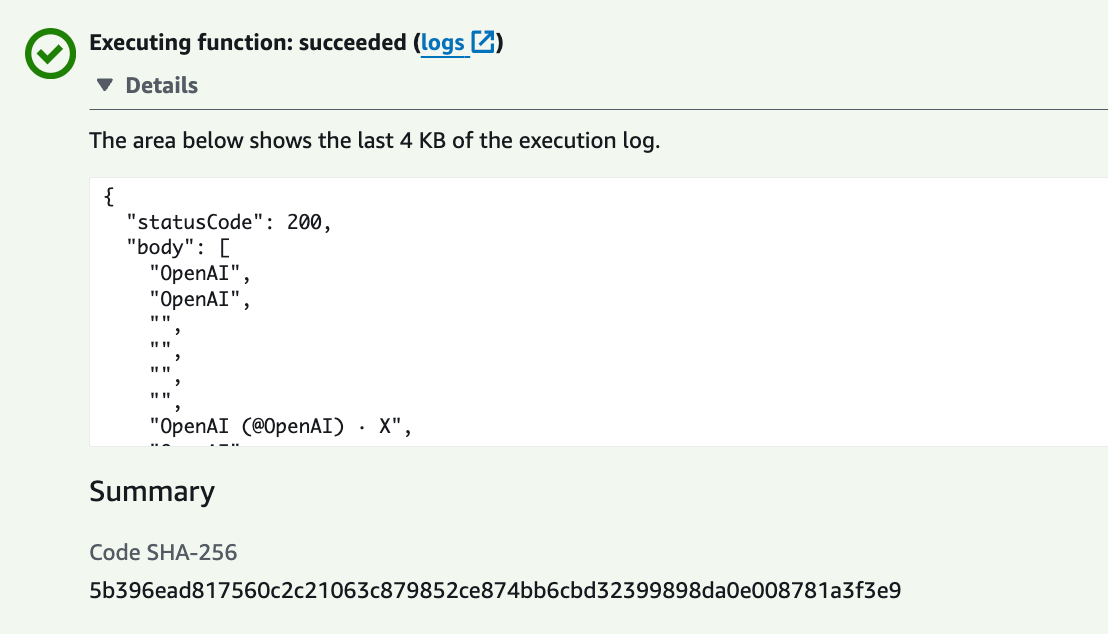
Expected result: You see a successful output returned from the Lambda invocation.
Conclusion
You just set up Selenium with ChromeDriver inside an AWS Lambda function by containerizing the runtime, browser, and dependencies into a Docker image. This approach brings serverless scalability to headless browser automation while keeping environment setup repeatable.
Want to support future tutorials and grab project resources? Visit ShillehTek.com. If you want help adapting this pattern for your own automation, scraping, or product workflow, check out our consulting: https://shillehtek.com/pages/iot-consulting.


.png?v=25000753014097803521779072085)

.png?v=68677308723310773341779072085)


