

Project Overview
Arduino Uno + NEO-M8N GPS + ST7789 IPS display clock: This build reads atomic-accurate GPS time and date, applies a timezone offset for local time, and shows it on a crisp 240x240 IPS screen.
No RTC drift, no WiFi, and no manual setting required. As long as the GPS can see satellites (or reacquire near a window), the clock stays accurate anywhere on Earth.
- Time: ~1 hour
- Skill level: Beginner-Intermediate
- What you will build: A self-setting desk clock with GPS time and date, driven by TinyGPS++.

Parts List
From ShillehTek
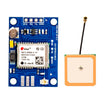
- NEO-M8N GPS Module with Antenna & Battery - provides UTC time/date from satellites; the M8N supports more constellations for faster, more reliable lock (the original build used NEO-6M, and M8N is a drop-in upgrade).
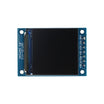
- 1.3" 240x240 IPS TFT Display (ST7789) - shows the time and date.
- Arduino Uno R3 - runs the GPS parsing and display code.
- 400-Point Breadboard - quick prototyping.
- Dupont Jumper Wires - connects the modules to the Uno.
External
- USB cable for programming
Note: GPS time arrives in UTC. One constant in the sketch shifts it to your timezone. Because the time comes from satellites, it does not drift like an RTC.
Step-by-Step Guide
Step 1 - Wire the GPS and Display
Goal: Connect both modules to one Arduino Uno.
What to do: Wire the GPS module: VCC→5V, GND→GND, TX→D4, RX→D3. This uses SoftwareSerial so the USB serial port stays free for uploading and debugging.
Wire the ST7789 display (SPI): SCL→D13, SDA→D11, RES→D9, DC→D8, VCC→3.3V, GND→GND. Place the GPS antenna near a window for the first fix.

Expected result: Hardware is ready, and the GPS LED starts blinking once it sees satellites.
Step 2 - Install the Libraries
Goal: Install the required Arduino libraries.
What to do: In the Arduino Library Manager, install TinyGPSPlus (parses the NMEA sentences from the GPS module), Adafruit ST7735 and ST7789, and Adafruit GFX.
Expected result: The libraries install successfully and are available to your sketch.
Step 3 - Upload the Clock Sketch
Goal: Read satellite time, convert to local time, and display it.
What to do: Set UTC_OFFSET to your timezone and upload the sketch below.
Code:
#include <TinyGPSPlus.h>
#include <SoftwareSerial.h>
#include <Adafruit_GFX.h>
#include <Adafruit_ST7789.h>
#include <SPI.h>

#define TFT_CS   -1   // 7-pin module: CS tied internally
#define TFT_DC    8
#define TFT_RST   9
#define UTC_OFFSET  -5      // your timezone (e.g. -5 = EST)

TinyGPSPlus gps;
SoftwareSerial gpsSerial(4, 3);   // GPS TX -> D4
Adafruit_ST7789 tft = Adafruit_ST7789(TFT_CS, TFT_DC, TFT_RST);

void setup() {
  gpsSerial.begin(9600);
  tft.init(240, 240);
  tft.setRotation(2);
  tft.fillScreen(ST77XX_BLACK);
  tft.setTextColor(ST77XX_CYAN, ST77XX_BLACK);
}

void loop() {
  while (gpsSerial.available()) gps.encode(gpsSerial.read());

  if (gps.time.isUpdated() && gps.date.isValid()) {
    int h = (gps.time.hour() + UTC_OFFSET + 24) % 24;

    char line[16];
    snprintf(line, sizeof(line), "%02d:%02d:%02d",
             h, gps.time.minute(), gps.time.second());
    tft.setTextSize(4);
    tft.setCursor(25, 90);
    tft.print(line);

    snprintf(line, sizeof(line), "%02d/%02d/%04d",
             gps.date.month(), gps.date.day(), gps.date.year());
    tft.setTextSize(2);
    tft.setCursor(55, 150);
    tft.print(line);
  }
}
Expected result: Within a minute or two of the first satellite fix, the display shows local time ticking accurately.
Step 4 - Handle Day Rollover and Extras
Goal: Polish the details and understand easy extensions.
What to do: The simple hour math works well for a clock display. If you also want the date to shift correctly across midnight in your timezone, add a day adjustment when the offset pushes hours below 0 or above 23.
From there, the same GPS data stream can provide extras such as satellite count (gps.satellites.value()), speed, and coordinates.
Expected result: Your clock is ready for correct local date handling and optional GPS status features.
Step 5 - Understand Why This Beats an RTC (Sometimes)
Goal: Know when GPS time is the right choice.
What to do: An RTC like the DS3231 can drift and needs to be set. NTP clocks need WiFi. GPS time needs neither, and works in places with no network access. The main requirement is occasional sky view. With the M8N battery-backed hot start, reacquiring can take only seconds after it has previously locked.
Expected result: You can choose GPS time when you need accurate time without a network.
Conclusion
This Arduino Uno clock uses a NEO-M8N GPS module and an ST7789 IPS display to show local time and date sourced from satellites. With TinyGPS++, it stays accurate without WiFi and without the long-term drift you get from many RTC-based builds.
Want the exact parts used in this build? Grab them from ShillehTek.com. If you want help customizing this project or building something for your product, check out our IoT consulting services.
Photo credit: Images in this tutorial are credited to ronfrtek on Hackster.io.





.png?v=25000753014097803521791168436)

.png?v=68677308723310773341791168436)


