Measure Altitude with BME280 and Raspberry Pi Pico

The BME280 is a sensor that can measure temperature, humidity, and air pressure. It can be used to estimate altitude using air pressure readings. The Adafruit BME280 library for CircuitPython comes with built-in altitude estimation, which will be shown how to set up in this tutorial.

Where to buy BME280:

Amazon Link

Step 1-) Install CircuitPython on Your Device

This can be done by holding the bootsel button on your Pico and plugging it into power. Once this is done you can go to Tools > Interpreter in Thonny, select CircuitPython from the dropdown, and click Install or Update CircuitPython. Select the volume and version you would like to download.

Step 2-) Get the Library Setup

The library can be found here https://learn.adafruit.com/circuitpython-libraries-on-micropython-using-the-raspberry-pi-pico/bme280-library-example

Click Download Project Bundle and unzip the contents. You want to add the two libraries, adafruit_bme280 and adafruit_bus_device, to the lib folder on the device so that you have access to them on your Pico. Simple as that.

Step 3-) Physical Setup

You will need to setup like the diagram shown here:
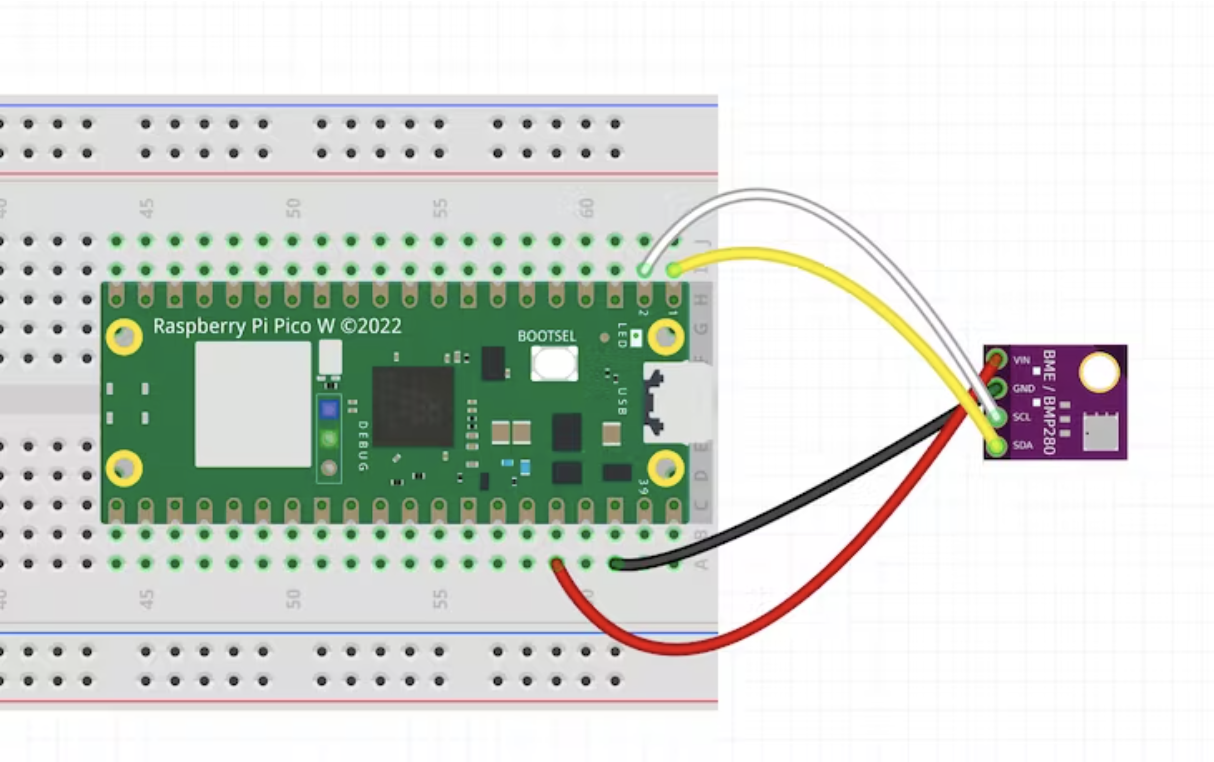
Step 4-) Run the code shown here

import time
import board
import busio
from adafruit_bme280 import basic as adafruit_bme280

# Create sensor object, using the board's default I2C bus.
i2c = busio.I2C(board.GP1, board.GP0)  # SCL, SDA
# address can change based on bme device
# if 0x76 does not work try 0x77 :)
bme280 = adafruit_bme280.Adafruit_BME280_I2C(i2c, address=0x76)
# change this to match the location's pressure (hPa) at sea level
bme280.sea_level_pressure = 1009.9

while True:
    print("\nTemperature: %0.1f C" % bme280.temperature)
    print("Humidity: %0.1f %%" % bme280.relative_humidity)
    print("Pressure: %0.1f hPa" % bme280.pressure)
    print("Altitude = %0.2f meters" % bme280.altitude)
    time.sleep(1)

You will need to adjust the sea_level_pressure according to your location. You can google sea level pressure in your area and substitute the value.

Once this is done, you should start getting values on par with your actual altitude, which you can confirm on Google Earth. You will notice changes in altitude quickly upon moving the sensor up and down a few meters. Congrats!

If you learned something do not forget to like, comment, and subscribe to the channel. Thanks for reading!

Create a free account to access full content.

All access to code and resources on ShillehTek.

Signup Now

Already a member? Sign In

Explore More on Our Blog

How to Connect and Use the HCSR501 PIR Sensor with a Raspberry Pi Pico/Pico W

How to Connect and Use the HCSR501 PIR Sensor with a Raspberry Pi Pico/Pico W

Learn how to set up the HCSR501 PIR sensor with a Raspberry Pi Pico to detect motion and trigger...

Powering the Raspberry Pi Pico W with the MB102 Power Supply

Powering the Raspberry Pi Pico W with the MB102 Power Supply

Learn how to power your Raspberry Pi Pico W projects easily and flexibly with the MB102 Power Supply Module...

How to Use L298N Motor Driver with Pico W

How to Use L298N Motor Driver with Pico W

Learn how to use the L298N motor driver to control DC motors with the Raspberry Pi Pico W in MicroPython.

Controlling an LED with a Snap Using the KY-037 Sound Sensor and Raspberry Pi

Controlling an LED with a Snap Using the KY-037 Sound Sensor and Raspberry Pi

Discover how to set up, code, and activate the LED based on detected sound with the Raspberry Pi...

Getting Started with the KY-037 Sound Sensor and Raspberry Pi: Detecting Sound Using Python

Getting Started with the KY-037 Sound Sensor and Raspberry Pi: Detecting Sound Using Python

In this tutorial, I’ll guide you through setting up the KY-037 sound sensor with a Raspberry Pi using...

How to Post to Reddit Using Python

How to Post to Reddit Using Python

Post to reddit automatically using a Python script.

How to Create a Time-Lapse Video with a Raspberry Pi Camera

How to Create a Time-Lapse Video with a Raspberry Pi Camera

Learn how to make a timelapse with your Raspberry Pi in Python.

How to Integrate the MPU6050 with the STM32 Blue Pill

How to Integrate the MPU6050 with the STM32 Blue Pill

Learn how to measure acceleration with the STM32 and the MPU6050 in the Arduino IDE.

Getting Started with STM32 Blue Pill in Arduino IDE Using a USB to TTL Converter — Write Your First Program

Getting Started with STM32 Blue Pill in Arduino IDE Using a USB to TTL Converter — Write Your First Program

This comprehensive tutorial will guide you through the process of setting up and programming the STM32 Blue Pill...

Automate Task Scheduling in AWS with Lambda, Step Functions, and CloudWatch

Automate Task Scheduling in AWS with Lambda, Step Functions, and CloudWatch

In this tutorial, I'll show you how to automatically schedule tasks in AWS at regular intervals using AWS...

Back to blog

Leave a comment

Please note, comments need to be approved before they are published.