
In this tutorial, I will quickly show you how to send an email with the Pi Pico W with your Gmail account. Sending email from a Raspberry Pi Pico can be useful for several reasons, such as:
- Remote Monitoring: You can configure your Pico to send you email notifications when certain events occur, such as when a sensor value exceeds a threshold or when an error occurs in a program. This way, you can remotely monitor your Pico without having to physically be present.
- Alerts: You can set up your Pico to send email alerts in case of any critical events, such as power outages or system failures. This can help you respond quickly to any problems and minimize downtime.
- Communication: You can use your Pico to send emails as a means of communication between devices or as a way to share data between different systems.
- Reporting: You can set up your Pico to send email reports periodically, such as daily or weekly reports, containing information about system performance, sensor readings, or any other relevant data.
In general, sending emails from a Raspberry Pi Pico can be a convenient and reliable way to keep track of events, monitor systems remotely, and communicate with other devices.
Step 1-) Enable Two Factor Authentication In Your Gmail Account
To do this go into the settings for the corresponding Gmail account you will be using.
https://myaccount.google.com/security
Find the steps for two-factor authentication and set it up accordingly. Once it is done it should look like the image below.

2-) Generate An App Password
Simply click the App Passwords link in the Security section of your profile settings:
https://myaccount.google.com/security
Eventually, this will lead you to a screen to generate an app password as shown below. I was using a Mac so I just selected Mac, but it does not necessarily matter.
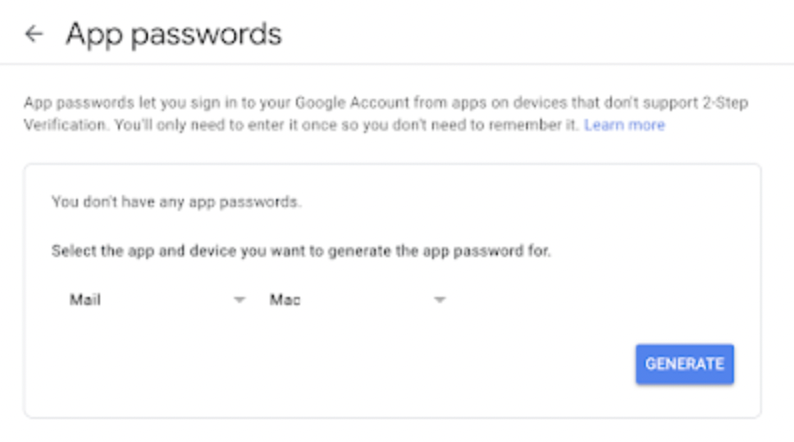
The app password will replace your password for when you use your Gmail auth in MicroPython, keep that in mind.
3-) Add the umail.py library to your directory
You can find the file here. Simply copy the contents into a file at the top-most directory as seen here.

4-) Use this script as a template to send email
import network
import time
import urequests

import umail

# Internal libs
import constants


# Email details
sender_email = <Your email>
sender_name = <Your name>
sender_app_password = <APP_PASSWORD>
recipient_email = <EMAIL>
email_subject ='Like, Comment, Subscribe'

def connect_to_internet(ssid, password):
    # Pass in string arguments for ssid and password

    # Just making our internet connection
    wlan = network.WLAN(network.STA_IF)
    wlan.active(True)
    wlan.connect(ssid, password)

    # Wait for connect or fail
    max_wait = 10
    while max_wait > 0:
      if wlan.status() < 0 or wlan.status() >= 3:
        break
      max_wait -= 1
      print('waiting for connection...')
      time.sleep(1)
    # Handle connection error
    if wlan.status() != 3:
       print(wlan.status())
       raise RuntimeError('network connection failed')
    else:
      print('connected')
      print(wlan.status())
      status = wlan.ifconfig()

connect_to_internet(<INTERNET_NAME>, <INTERNET_PASSWORD>)

# Send the email
# Connect to the Gmail's SSL port
smtp = umail.SMTP('smtp.gmail.com', 465, ssl=True)
# Login to the email account using the app password
smtp.login(sender_email, sender_app_password)
# Specify the recipient email address
smtp.to(recipient_email)
# Write the email header
smtp.write("From:" + sender_name + "<"+ sender_email+">\n")
smtp.write("Subject:" + email_subject + "\n")
# Write the body of the email
smtp.write("Test Email from Raspberry Pi Pico W")
# Send the email
smtp.send()
# Quit the email session
smtp.quit()

print('Email Sent')
Simply plug in your variables to the needed areas. I am connecting to the internet and then using the library to send an email with an SMTP object.
Hope it worked! Do not forget to like, comment, or subscribe to the channel for more useful information!