How to Install CircuitPython on Raspberry Pi Pico

This is a quick tutorial on how to get started on the Pico with CircuitPython which is a great wrapper around MicroPython to start using your sensors and help you more quickly integrate your IoT applications.

Step 1-) Setup Thonny:

Thonny is a great IDE for working with the Raspberry Pi Pico and CircuitPython, we will use it to get CircuitPython on the device.

You can download Thonny here.

Step 2-) Configure CircuitPython Interpreter:

Hold the BOOTSEL button as you plug your device into the MicroUSB from your computer.  You need this to mount the volume (storage) from the Pico so you can install the CircuitPython firmware. The button is shown below:
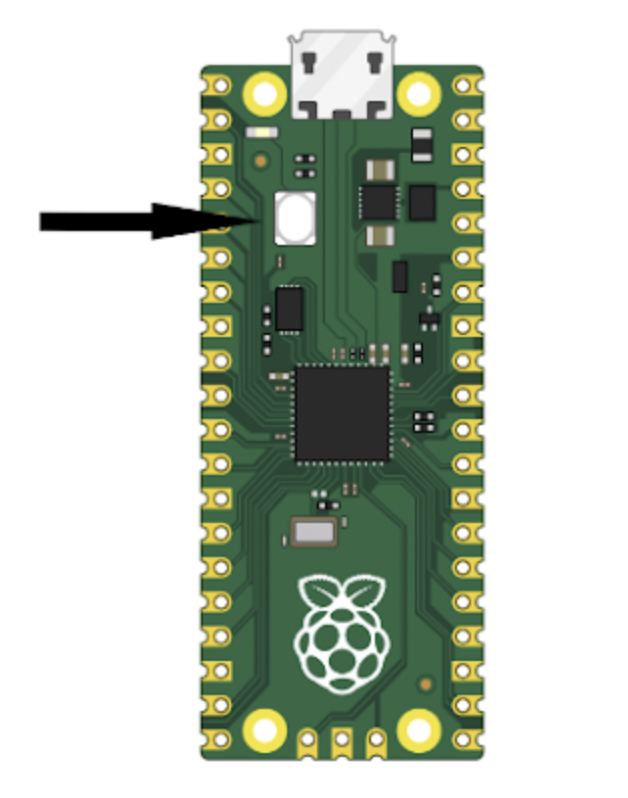
In Thonny navigate to Tools > Options and select CircuitPython (generic) from the interpreter dropdown and select the appropriate port, then select Install or update CircuitPython on the bottom right. Select the target volume. 

Select the CircuitPython variant as Raspberry Pi Pico W / Pico WH. You can also just select the regular Pico version if you are not using the Pico W version. 

Click install and wait...

Congrats now you can begin writing CircuitPython Code on your Pico/Pico W.

Step 3-) Test it:

Try a sample script that flashes the LED here. If you set up everything fine you should see the LED blink.

Conclusion:

If you found that useful please leave and comment and subscribe to my channel. Stay tuned for more content!

Create a free account to access full content.

All access to code and resources on ShillehTek.

Signup Now

Already a member? Sign In

Explore More on Our Blog

Implementing Google reCAPTCHA in a Simple React and Node.js App

Implementing Google reCAPTCHA in a Simple React and Node.js App

Learn how to protect your React applications from bots and spam with Google reCAPTCHA integration! This step-by-step tutorial...

AWS Lambda Tutorial: Using Selenium with Chromedriver in Python

AWS Lambda Tutorial: Using Selenium with Chromedriver in Python

In this tutorial, I will guide you through the process of running Selenium with ChromeDriver inside an AWS...

How to Connect MLX90614 Infrared Thermometer to Raspberry Pi Pico W: MicroPython Tutorial!

How to Connect MLX90614 Infrared Thermometer to Raspberry Pi Pico W: MicroPython Tutorial!

Learn how to use the MLX90614 with the Raspberry Pi Pico W and get infrared values in MicroPython.

Raspberry Pi Pico/Pico W Free Simulator

Raspberry Pi Pico/Pico W Free Simulator

Discover how to simulate Raspberry Pi Pico projects using Wokwi, a free online simulator for Arduino and MicroPython....

Interfacing the MPU6050 with Raspberry Pi Pico W in C++

Interfacing the MPU6050 with Raspberry Pi Pico W in C++

Interface with the MPU6050 using the Raspberry Pi Pico W in C++.

How to Write your First C++ Program on the Raspberry Pi Pico W

How to Write your First C++ Program on the Raspberry Pi Pico W

Write your first C++ Program on the Pico W in a few simple steps.

How to Use ThingSpeak with the Raspberry Pi Pico W

How to Use ThingSpeak with the Raspberry Pi Pico W

Learn how to create a real-time environmental monitoring system with the Raspberry Pi Pico W and ThingSpeak!

How to Use ADS1115 with the Raspberry Pi (Part 1)

How to Use ADS1115 with the Raspberry Pi (Part 1)

Discover how to expand your Raspberry Pi projects by integrating the ADS1115 ADC for precise analog signal reading....

How to Install Pip Packages in AWS Lambda Using Docker and ECR

How to Install Pip Packages in AWS Lambda Using Docker and ECR

Learn how to streamline AWS Lambda deployments by using Docker and Amazon Elastic Container Registry (ECR) to package...

Create Tabular Product Descriptions on Your Shopify Store

Create Tabular Product Descriptions on Your Shopify Store

Enhance your Shopify store's product pages with our comprehensive guide on implementing tabular descriptions. Learn how to add a...

Back to blog

Leave a comment

Please note, comments need to be approved before they are published.