Low-pass filters are electronic filters that allow you to filter out high-frequency data and keep lower-frequency data of interest. This can be useful in applications where you are not concerned with noise and have constant changes to your signal measurements that are consistent over time. It can be a very powerful method to increase performance in applications of lower frequencies. Luckily, in its most basic form, it is very simple to implement and I go through an example here of how to set up one from scratch in Python and demonstrate how it works.
Step 1-) Understanding the algorithm
The code I have in MicroPython (this is essentially equivalent to Python excluding some libraries) is shown here:
#Native libs
from machine import Pin, I2C
import math
import time
from time import sleep

from imu import MPU6050


i2c = I2C(0, sda=Pin(0), scl=Pin(1), freq=400000)
sensor = MPU6050(i2c)
filtered_ax = 0
alpha = 0.85 # must be between 0 and 1 inclusive


def low_pass_filter(prev_value, new_value):
    return alpha * prev_value + (1 - alpha) * new_value


while True:
    ax_new = sensor.accel.x
    filtered_ax = low_pass_filter(filtered_ax, ax_new)
    print("filtered_ax: ", filtered_ax, "raw ax", ax_new)
    time.sleep(1/10)
Breaking down this code…
- Initially I am creating a connection to my MPU6050 object, which is the sensor I am getting data from. You are probably not concerned with this if you are reading this tutorial.
- In the 2nd portion of the code I am initializing an alpha value and creating the lowpass filter function. The concept is simple, the higher the alpha value, the more we trust the previous data value, in this case, our acceleration in the x-direction. That means the higher the alpha value, the more filtering we will be doing and we will get a smoother signal. Be careful in that an alpha value that is too high can make your application too slow to respond to changes, it can be an empirical choice when deciding what alpha value to use.
- Finally, I run a while loop to get real sensor values and plug them into the filter to spit out the new filtered value. This cycle repeats every 1/10 of a second. You can increase the frequency of measurement if you like!
This code and filter can be applied to any stream of data or coding language, and this is low-pass filtering at its absolute simplest.
Step 2-) The Outcome
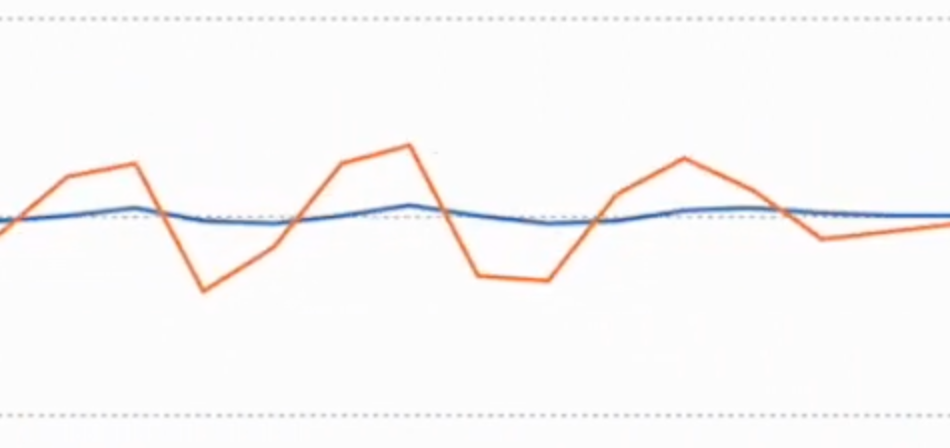
After running this on my acceleration data I get a graph resembling the following

Where the spikier signal is the raw signal and the smoother signal is after it is passed to the low pass filter. See more details of this in my YouTube video above.
Conclusion
That is it, you now know how to implement a low pass filter from scratch and understand at a high level what it does to the data stream. If you are more interested there are more sophisticated ways to create filters that may be better suited to your application. Additionally, be aware there are drawbacks to using such a filtering mechanism because it can induce lag and introduce biases to your application. Hope you enjoyed this content, consider following Shilleh on Youtube for more content! Till next time.


.png?v=25000753014097803521767701813)

.png?v=68677308723310773341767701813)


