How to Connect the BME280 Sensor to the Raspberry Pi Pico Using CircuitPython


Using the BME280 sensor in CircuitPython is a great way to start getting sensor readings easily. Adafruit makes it easy to port their library and start working with your Temperature, Pressure, and Humidity readings! In general, the BME280 is a powerful and low-cost sensor to start getting such readings. It is superior to its often confused counterpart, the BMP280... since the BMP280 cannot give humidity readings while the BME280 can. As we know, humidity is a vital part of any environmental system so I highly recommend this sensor if you are developing a DIY project! 

Where to Buy BME280 Pressure, Humidity, and Temperature Sensor for the Raspberry Pi Pico:

Amazon

    Step 1-) Connect the Sensor as Follows:
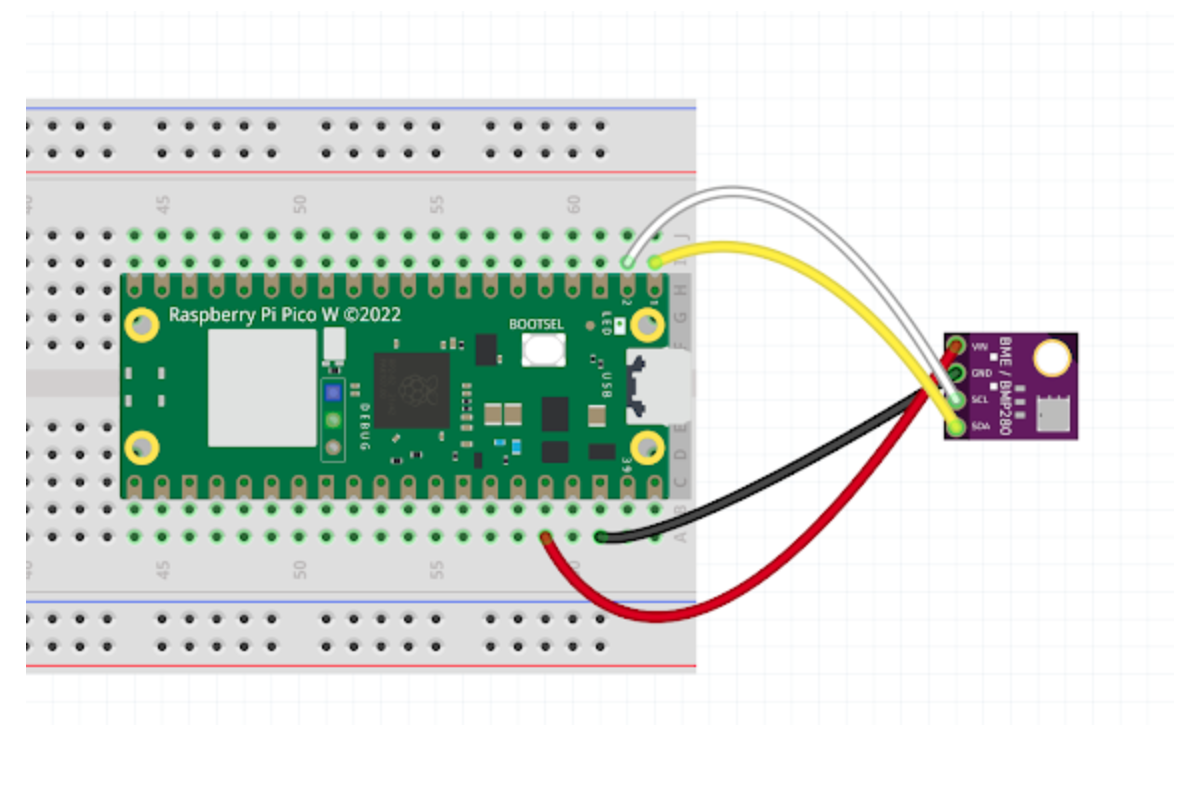
    Note that some BME280 sensors are designed differently, and some have extra connections. You only need to make the 4 connections shown above (VCC, GND, SCL, SDA), which all BME280 sensors explicitly have, to have the physical setup set to start retrieving sensor values. 

    Also, be sure to connect your device to power once you are ready to go!

    Step 2-) Download the Libraries from the AdaFruit Website:

    The library for CircuitPython for the BME280 is found here

    Click Download Project Bundle and it will download a zip file with the library contents, there are two folders you need to extract and port to your lib folder on your Raspberry Pi Pico. 

    Your directory/file structure for the library should resemble the following on your Pico file system:
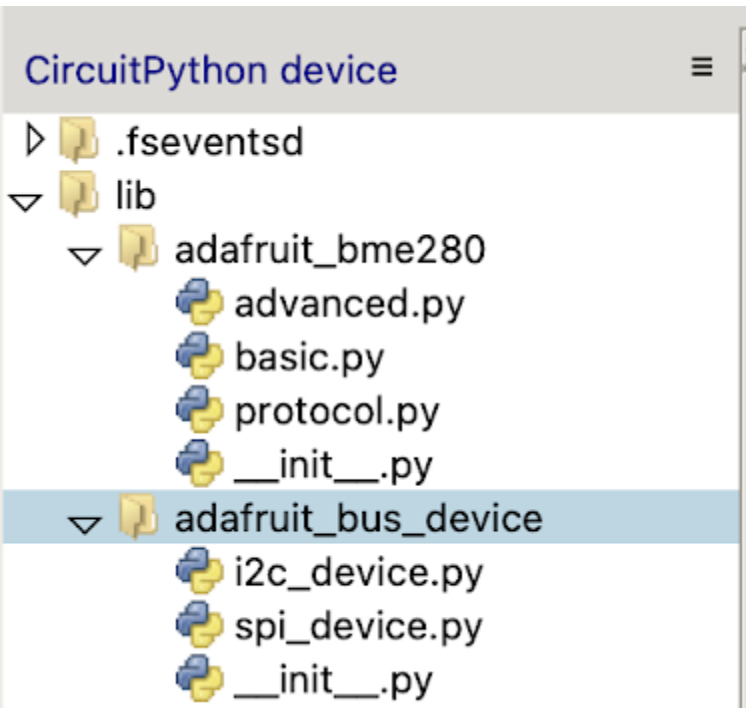
    If you cannot copy and paste the files over you have to manually create the directory and file names and copy the content sadly. Unfortunately, Thonny is not the most robust IDE...

    Step 3-) Run the sample Code:

    Create a Python file named by your choice and copy the contents from my GitHub page here. You may have to alter the I2C device address in the code to 77 as opposed to 76, depending on what version of the BME280 you are using. But once you have that down you are done!

    You can now run this code in Thonny if you add the libraries and make the proper physical connections! You can also alter the time.sleep() value if you want to get readings slower or faster. 

    Conclusion:

    You should be all set to get your sensor values in CircuitPython if you followed this tutorial. Please like comment and subscribe to the channel if you found this useful. Now go make a weather station or something!

    Create a free account to access full content.

    All access to code and resources on ShillehTek.

    Signup Now

    Already a member? Sign In

    Explore More on Our Blog

    How to Connect and Use the HCSR501 PIR Sensor with a Raspberry Pi Pico/Pico W

    How to Connect and Use the HCSR501 PIR Sensor with a Raspberry Pi Pico/Pico W

    Learn how to set up the HCSR501 PIR sensor with a Raspberry Pi Pico to detect motion and trigger...

    Powering the Raspberry Pi Pico W with the MB102 Power Supply

    Powering the Raspberry Pi Pico W with the MB102 Power Supply

    Learn how to power your Raspberry Pi Pico W projects easily and flexibly with the MB102 Power Supply Module...

    How to Use L298N Motor Driver with Pico W

    How to Use L298N Motor Driver with Pico W

    Learn how to use the L298N motor driver to control DC motors with the Raspberry Pi Pico W in MicroPython.

    Controlling an LED with a Snap Using the KY-037 Sound Sensor and Raspberry Pi

    Controlling an LED with a Snap Using the KY-037 Sound Sensor and Raspberry Pi

    Discover how to set up, code, and activate the LED based on detected sound with the Raspberry Pi...

    Getting Started with the KY-037 Sound Sensor and Raspberry Pi: Detecting Sound Using Python

    Getting Started with the KY-037 Sound Sensor and Raspberry Pi: Detecting Sound Using Python

    In this tutorial, I’ll guide you through setting up the KY-037 sound sensor with a Raspberry Pi using...

    How to Post to Reddit Using Python

    How to Post to Reddit Using Python

    Post to reddit automatically using a Python script.

    How to Create a Time-Lapse Video with a Raspberry Pi Camera

    How to Create a Time-Lapse Video with a Raspberry Pi Camera

    Learn how to make a timelapse with your Raspberry Pi in Python.

    How to Integrate the MPU6050 with the STM32 Blue Pill

    How to Integrate the MPU6050 with the STM32 Blue Pill

    Learn how to measure acceleration with the STM32 and the MPU6050 in the Arduino IDE.

    Getting Started with STM32 Blue Pill in Arduino IDE Using a USB to TTL Converter — Write Your First Program

    Getting Started with STM32 Blue Pill in Arduino IDE Using a USB to TTL Converter — Write Your First Program

    This comprehensive tutorial will guide you through the process of setting up and programming the STM32 Blue Pill...

    Automate Task Scheduling in AWS with Lambda, Step Functions, and CloudWatch

    Automate Task Scheduling in AWS with Lambda, Step Functions, and CloudWatch

    In this tutorial, I'll show you how to automatically schedule tasks in AWS at regular intervals using AWS...

    Back to blog

    Leave a comment

    Please note, comments need to be approved before they are published.