
Background:
The HC-SR04 5V Ultrasonic Sensor is one of the most popular robotic sensors used to measure distance in DIY applications for Raspberry Pi and Arduino. It is very easy to use and has just 4 pins.
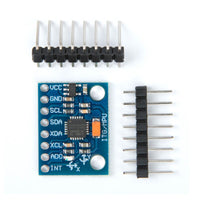
I found this new version of the sensor online that is essentially the same thing, except it has an RGB input that allows for a beautiful display of colors within the transmitter and receiver cylinders, containing a total of 6 LEDs (3 per cylinder). This is essentially the same sensor as the RUS-04 (which you can find with a google search).
Using the ultrasonic module was super easy as there are many examples online of how to use it with MicroPython and the Pico W because it works the same as the regular HC-SR04. However, in terms of the RGB module, it took me some digging to figure it out because nobody has used this sensor in MicroPython given that it is relatively new.
After some research, I realized that the only example of this sensor online was this gentleman who demonstrated how to use it with Arduino... but I needed it for MicroPython. I eventually found out it followed the WS2812 lighting standard so I eventually found a library I slightly modified for the Pico W which I link here:
Github Link For NeoPixel Library for Raspberry Pi Pico W
But do not be discouraged if you are not using the Pico or Arduino, WS2812 capable libraries are found all over the internet for different devices and coding languages. It is a pretty popular standard so you should not have issues if you are using other forms of the Raspberry Pi or any other controllers with GPIO capability. Even an amateur hobbyist like me could figure it out, and so could you ;)
I thought I would share the code I used and explain it, which will help people use this low-documented device in the future. I encourage hobbyists to get this sensor for a visual effect.
Other Important Notes:
Like the regular HC-SR04, this uses 5V logic, using the Pico or Pico W, which are 3.3 V devices is not recommended without a 5V power supply and voltage shifters. Otherwise, you can risk damaging your device and also having inconsistencies in your ultrasonic readings. I disregard that for the purpose of simplicity for this tutorial
If you do find this useful please like, comment, and subscribe:
Supplies:
1-) An HC-SR04 Module with RGB
2-) Jumper Wires
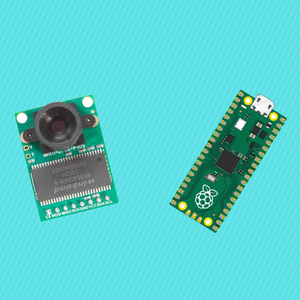
3-) Raspberry Pi Pico or other 5V devices (Raspberry Pis, Arduinos, etc)
Step 1-) Physical Setup for RGB Module
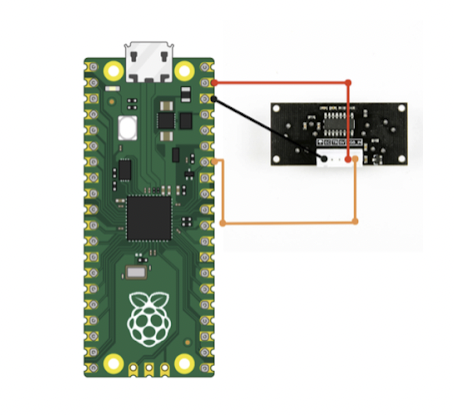
1-) Connect 3 pins as follows, this will be enough to get your RGB input powered. I use GPIO28 on the pico but the others should work as well.
2-) To setup the ultrasonic portion you can view this video or article:
https://www.youtube.com/watch?v=AwRwlCAQlH4
That is all you need in terms of the physical setup
Step 2-) Code Libraries
1-) Get the neopixel lib I used and add it to the directory in your device saved as neopixel.py
https://github.com/shillehbean/youtube-channel/blob/main/neopixel.py
Based on another example I found online with a small modification
2-) Add the following code to a file on your Pi:
https://github.com/shillehbean/youtube-channel/blob/main/rgb_sr04_2.py
Step 3-) How to Use Code

There are two primary functions you can call in this code, fun() or change_color_with_distance().
1-) fun()
For this, you do not need the trigger or echo pins to set up it just randomly changes the colors of any of the 6 LEDs onboard the device, so it can make for some fun colors to look at.
Also, this helps you get a better idea of how the lights are triggered. You just need to set the LED of your choice with an RGB value and that is the premise of how the whole thing works at a high level. I demonstrate this above in the photos, you can see the random assortment of colors. I only used 6 for this demonstration but you can play around with RGB values!
2-) change_color_with_distance()
This function is a cool way to combine the RGB with the Ultrasonic. If you have your trigger and echo pins set up properly, you can use if statements to change the color based on how far the object is. I demonstrate this in the clip attached.
It is a nice way to know the distance of an object and can have some practical use cases in terms of the visual aspect of a robot, or help in dark spaces.
Note that there are other things you can do with the library such as change the brightness and play around with an assortment of colors, and of course, you can create your functions as well. This is just to get you started.
Hope this was clear, this should be all you need to get started, once again you can get the sensor here if you are interested!
Let me know if you have any questions or concerns.