

Project Overview
ESP-NOW on ESP32 with a DHT11 sensor and SSD1306 OLED: In this project, two ESP32 boards exchange sensor data over ESP-NOW so you can send temperature and humidity without a router, Wi-Fi password, or IP networking. One ESP32 reads a DHT11 and broadcasts a small data packet every two seconds, and a second ESP32 receives it and displays the values on an I2C OLED.
ESP-NOW is Espressif's peer-to-peer radio protocol. The two boards talk directly to each other by MAC address, with a round trip of a few milliseconds, which works well for a remote sensor reporting to a display across the house, a wireless button, or a robot remote.
- Time: ~45 minutes
- Skill level: Intermediate
- What you will build: A sender/receiver pair exchanging a typed data struct over ESP-NOW, with a MAC-address lookup step and delivery feedback.

Parts List
From ShillehTek
- ESP32 38-Pin Dev Board (CP2102, USB-C) ×2 - one sender, one receiver
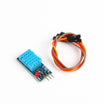
- DHT11 Temperature & Humidity Sensor - on the sender
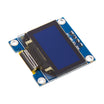
- SSD1306 0.96" I2C OLED - on the receiver
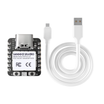
- XIAO ESP32-C6 - a tiny battery-friendly node; the whole ESP32 family speaks ESP-NOW
- 400-Point Breadboard ×2
- Dupont Jumper Wires
External
- Two USB-C cables (you will have both boards plugged in at once during setup)
Note: ESP-NOW packets are limited to 250 bytes and are sent as raw bytes, so both boards must agree on the exact same struct layout. Define the struct once, copy it verbatim into both sketches, and you can send numbers, flags, and short strings in a single packet.
Step-by-Step Guide
Step 1 - Wire Both Boards
Goal: A sensor on one board, a display on the other.
What to do: Wire the sender ESP32 to the DHT11: VCC to 3V3, GND to GND, DATA to GPIO 4. Wire the receiver ESP32 to the OLED: VCC to 3V3, GND to GND, SDA to GPIO 21, SCL to GPIO 22.
Label the boards "S" (sender) and "R" (receiver) with tape so you do not mix them up while uploading code and reading Serial output.
Expected result: Two ESP32 boards, each with one peripheral connected.
Step 2 - Find the Receiver's MAC Address
Goal: Get the receiver MAC address that the sender needs for ESP-NOW.
What to do: Upload the receiver sketch first (from Step 3). Open Serial Monitor at 115200 baud and copy the printed MAC address (for example: 24:6F:28:AA:BB:CC).
Convert the six bytes into hex values and paste them into the sender sketch RECEIVER_MAC array as 0x24, 0x6F, and so on.
Expected result: The receiver's MAC address is written into the sender code.
Step 3 - Upload the Sketches
Goal: Send DHT11 readings over ESP-NOW and show them on the SSD1306 OLED.
What to do: Upload the receiver code first and note its MAC address. Then edit the sender code with that MAC address and upload the sender.
Code:
// ================= SENDER (ESP32 + DHT11) =================
#include <WiFi.h>
#include <esp_now.h>
#include <DHT.h>

uint8_t RECEIVER_MAC[] = {0x24, 0x6F, 0x28, 0xAA, 0xBB, 0xCC};   // from Step 2
DHT dht(4, DHT11);

typedef struct { int id; float tempC; float hum; unsigned long count; } Packet;
Packet pkt;

void setup() {
  Serial.begin(115200);
  dht.begin();
  WiFi.mode(WIFI_STA);                              // ESP-NOW needs the radio in station mode
  if (esp_now_init() != ESP_OK) { Serial.println("ESP-NOW init failed"); while (true); }
  esp_now_peer_info_t peer = {};
  memcpy(peer.peer_addr, RECEIVER_MAC, 6);
  peer.channel = 0; peer.encrypt = false;
  esp_now_add_peer(&peer);
}

void loop() {
  pkt.id = 1;
  pkt.tempC = dht.readTemperature();
  pkt.hum   = dht.readHumidity();
  pkt.count++;
  esp_err_t r = esp_now_send(RECEIVER_MAC, (uint8_t*)&pkt, sizeof(pkt));
  Serial.printf("packet %lu: %.1f C  %.0f %%  -> %s\n", pkt.count, pkt.tempC, pkt.hum,
                r == ESP_OK ? "queued" : "send error");
  delay(2000);
}

// ================= RECEIVER (ESP32 + OLED) =================
#include <WiFi.h>
#include <esp_now.h>
#include <Wire.h>
#include <Adafruit_GFX.h>
#include <Adafruit_SSD1306.h>

Adafruit_SSD1306 oled(128, 64, &Wire, -1);
typedef struct { int id; float tempC; float hum; unsigned long count; } Packet;   // identical struct
Packet pkt;
volatile bool fresh = false;

// ESP32 Arduino core 3.x signature (core 2.x: const uint8_t *mac, const uint8_t *data, int len)
void onRecv(const esp_now_recv_info_t *info, const uint8_t *data, int len) {
  if (len == sizeof(pkt)) { memcpy(&pkt, data, sizeof(pkt)); fresh = true; }
}

void setup() {
  Serial.begin(115200);
  oled.begin(SSD1306_SWITCHCAPVCC, 0x3C);
  oled.setTextColor(SSD1306_WHITE);
  WiFi.mode(WIFI_STA);
  Serial.print("Receiver MAC: "); Serial.println(WiFi.macAddress());   // paste into the sender
  esp_now_init();
  esp_now_register_recv_cb(onRecv);
}

void loop() {
  if (!fresh) return;                               // draw in loop(), not inside the callback
  fresh = false;
  oled.clearDisplay();
  oled.setTextSize(1); oled.setCursor(0, 0);  oled.printf("node %d   pkt %lu", pkt.id, pkt.count);
  oled.setTextSize(2); oled.setCursor(0, 20); oled.printf("%.1f C", pkt.tempC);
  oled.setCursor(0, 44);                      oled.printf("%.0f %%", pkt.hum);
  oled.display();
}
Expected result: The sender prints queued every two seconds, and the OLED updates with temperature, humidity, and a packet counter that increments each update.
Step 4 - Test the Range
Goal: Understand reliable indoor and outdoor range for your environment.
What to do: Power the sender from a USB power bank and walk it away from the receiver. Indoors through a wall or two you will typically get 30-50 m; outdoors with line of sight, well over 100 m.
Watch the packet counter on the OLED. Gaps in numbering indicate dropped packets, which is a practical range indicator.
Expected result: A realistic sense of ESP-NOW reach based on your space.
Step 5 - Scale It Up
Goal: Extend the pattern to multiple nodes and low-power senders.
What to do: Give each sender a different pkt.id and add them as peers on the receiver (or let them send; the receiver accepts any peer that sends to its MAC). Use the broadcast address FF:FF:FF:FF:FF:FF to reach every board in range at once.
For battery-powered nodes, combine ESP-NOW with deep sleep: wake, read, send one packet (a few milliseconds of radio time), then sleep for ten minutes.
Expected result: A sensor network with no router, no cloud dependency, and no monthly bill.
Conclusion
You built an ESP-NOW link between two ESP32 boards where one reads a DHT11 sensor and the other updates an SSD1306 I2C OLED. The core workflow is consistent for most projects: define a shared struct, learn the receiver MAC address, and send raw bytes over ESP-NOW.
Want the exact parts used in this build? Grab them from ShillehTek.com. If you want help customizing this project or building something for your product, check out our IoT consulting services.
Credits
All photos and images in this tutorial are credited to Pradeep (CETECH) on Hackster.io. The original guide by Pradeep served as the reference for this ShillehTek version. We thank him for his excellent work in the maker community.





.png?v=25000753014097803521791168436)

.png?v=68677308723310773341791168436)


