

Project Overview
Arduino Nano + SSD1306 I2C OLED Morse Trainer: Tap a key, hear a sidetone buzzer, and watch the Arduino decode your dots and dashes into letters on an OLED display in real time. This is a timing project at heart: the sketch measures how long the key is held and how long the gaps are, classifies each as a dot, dash, letter break, or word break, then looks the pattern up in a table.
It is a practical way to learn Morse because the decoder gives instant feedback on every character you send.
- Time: ~1 hour
- Skill level: Intermediate
- What you will build: A self-contained Morse trainer with a sidetone buzzer, live decoding on an OLED, and a lookup table you can extend to punctuation and prosigns.

Parts List
From ShillehTek
- Arduino Nano V3.0 Pre-Soldered - runs the timing and decoding sketch.
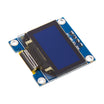
- SSD1306 0.96" I2C OLED - shows the current symbol and decoded text (the original build used an ST7565 graphic LCD; the OLED needs only SDA/SCL).
- KY-006 Passive Buzzer - provides the sidetone while you key.
- Tactile Button Kit - a tall 12 to 16 mm button makes a simple straight key.
- 400-Point Breadboard - quick wiring for prototyping.
- Dupont Jumper Wires - connects the key, buzzer, and OLED to the Nano.
External
- A real straight key or paddle if you have one - any switch that closes to ground works.
Note: Morse timing is all relative to one "unit" (a dot). A dash is 3 units, the gap between symbols is 1 unit, between letters 3 units, and between words 7 units. Pick a dot length that matches your speed; 150 ms is a comfortable beginner pace of roughly 8 words per minute.
Step-by-Step Guide
Step 1 - Wire the Key, Buzzer, and OLED
Goal: One input, two outputs.
What to do: Wire the key (button) between A0 and GND. The sketch uses the Arduino internal pull-up so no external resistor is needed.
Wire the buzzer signal to D8 and buzzer GND to GND.
Wire the OLED: VCC to 5V, GND to GND, SDA to A4, and SCL to A5.

Expected result: A key that reads LOW when pressed and an OLED ready to display text.
Step 2 - Measure Time, Not Presses
Goal: Understand the decoding logic.
What to do: Each time the key goes down, record millis(). When the key comes up, the time difference determines dot vs dash (shorter or longer than two units). Then watch the silence: after three units of no key activity, the letter is finished and gets decoded; after seven units, add a space.
The loop stays non-blocking and continuously compares timestamps.
Expected result: A clear mental model: presses build a symbol string, gaps close letters and words.
Step 3 - Upload the Sketch
Goal: Get live decoding on the OLED with a sidetone buzzer.
What to do: Install the Adafruit SSD1306 and Adafruit GFX libraries in the Arduino IDE, then upload the sketch below. Test by sending S-O-S: three short, three long, three short.
Code:
#include <Wire.h>
#include <Adafruit_GFX.h>
#include <Adafruit_SSD1306.h>

Adafruit_SSD1306 oled(128, 64, &Wire, -1);

const int KEY = A0, BUZZ = 8;
const unsigned long DOT = 150;          // one unit in ms (dash = 3 units)

String symbol = "", text = "";
unsigned long pressStart = 0, releaseAt = 0;
bool keyDown = false, letterDone = false, wordDone = false;

const char* LETTERS[] = {".-","-...","-.-.","-..",".","..-.","--.","....","..",".---",
                         "-.-",".-..","--","-.","---",".--.","--.-",".-.","...","-",
                         "..-","...-",".--","-..-","-.--","--.."};
const char* DIGITS[]  = {"-----",".----","..---","...--","....-",
                         ".....","-....","--...","---..","----."};

char decode(const String& s) {
  for (int i = 0; i < 26; i++) if (s == LETTERS[i]) return 'A' + i;
  for (int i = 0; i < 10; i++) if (s == DIGITS[i])  return '0' + i;
  return '?';
}

void show() {
  oled.clearDisplay();
  oled.setTextSize(1); oled.setCursor(0, 0);  oled.print(symbol);   // dots/dashes so far
  oled.setTextSize(2); oled.setCursor(0, 24); oled.print(text);     // decoded text
  oled.display();
}

void setup() {
  pinMode(KEY, INPUT_PULLUP);
  oled.begin(SSD1306_SWITCHCAPVCC, 0x3C);
  oled.setTextColor(SSD1306_WHITE);
  show();
}

void loop() {
  bool down = (digitalRead(KEY) == LOW);

  if (down && !keyDown) {                       // key just pressed
    keyDown = true; pressStart = millis();
    letterDone = wordDone = false;
    tone(BUZZ, 700);                              // sidetone
  }
  if (!down && keyDown) {                       // key just released
    keyDown = false; noTone(BUZZ);
    unsigned long held = millis() - pressStart;
    symbol += (held < DOT * 2) ? '.' : '-';
    releaseAt = millis();
    show();
  }
  // letter gap: 3 units of silence closes the symbol
  if (!keyDown && symbol.length() && !letterDone && millis() - releaseAt > DOT * 3) {
    text += decode(symbol); symbol = ""; letterDone = true;
    if (text.length() > 10) text = text.substring(1);   // scroll off the left
    show();
  }
  // word gap: 7 units of silence adds a space
  if (!keyDown && letterDone && !wordDone && millis() - releaseAt > DOT * 7) {
    text += ' '; wordDone = true; show();
  }
}
Expected result: The top line shows your current dots and dashes while you key, and the large line displays decoded letters (for SOS, you should see S O S).
Step 4 - Tune It to Your Fist
Goal: Make decoding more forgiving.
What to do: If your dashes read as dots, lower DOT. If letters merge, raise it. You can also make DOT adaptive by tracking a running average of your short presses and setting the dot/dash threshold to twice that average.
To extend the trainer, add punctuation to the lookup table (period is .-.-.-, question mark is ..--..) and add a Serial log so you can review a longer practice session.
Expected result: A decoder that keeps up as your speed improves.
Step 5 - Flip It into a Sender
Goal: Learn both directions.
What to do: Type a sentence into the Serial Monitor, then have the Arduino play it back on the buzzer using the same table in reverse: dot equals tone for DOT ms, dash equals 3 times DOT, with the correct symbol, letter, and word gaps.
Expected result: A complete practice station: send with the key, receive by listening to clean machine-sent code.
Conclusion
This Arduino Morse trainer demonstrates non-blocking timing: edges start timers, elapsed time classifies symbols, and silence drives state changes without using delay(). The same approach applies to remote-control pulse decoding, button gesture recognition, and any signal where duration carries meaning.
Photo and schematic credit: Mirko Pavleski on Hackster.io.
Want the exact parts used in this build? Grab them from ShillehTek.com. If you want help customizing this project or building something for your product, check out our IoT consulting services.







.png?v=25000753014097803521791168436)

.png?v=68677308723310773341791168436)


