

Video Tutorial (Optional)
Watch first if you want to follow the full Raspberry Pi to AWS S3 upload walkthrough in real time.
Project Overview
In this project, you use a Raspberry Pi 4B (or most Raspberry Pi models) and the AWS S3 cloud storage service to upload files (like images and videos) to an S3 bucket using simple Python code.
This is essential for many IoT applications, and it is free to get started as long as you have an AWS account. This guide uses a Raspberry Pi 4B, but you can use any Raspberry Pi model other than the Pico W.
Before you continue: Please subscribe and support the channel if you can.
- Subscribe: Youtube
- Support: https://www.buymeacoffee.com/mmshilleh
- Time: 30 to 60 minutes
- Skill level: Beginner
- What you will build: A Raspberry Pi Python script that uploads a local file (optionally captured from a Pi camera) into an AWS S3 bucket
Parts List
From ShillehTek
- Project parts from ShillehTek - grab commonly used Raspberry Pi and IoT accessories
- Raspberry Pi Pico 2W - the microcontroller board used in this build
External
- Raspberry Pi (example used: Raspberry Pi 4B) - runs the Python code
- AWS account - required to create the S3 bucket and IAM user credentials
- Internet connection - required for AWS Console setup and package installs
- Python 3 on Raspberry Pi - runs the upload script
- boto3 (Python AWS SDK) - used to upload objects to S3
- picamera (optional) - only if you want to capture an image using a Raspberry Pi camera
- Raspberry Pi camera (optional) - only if you want to take a photo/video from the Pi
Note: This workflow is for Raspberry Pi computers running Linux. The Raspberry Pi Pico W is not supported for this tutorial.
Step-by-Step Guide
Step 1 - Create your AWS account
Goal: Get access to the AWS Console so you can create and manage an S3 bucket.
What to do: Create an AWS account at aws.amazon.com. It is free to get started.
Expected result: You can log in to the AWS Console.
Step 2 - Create an S3 bucket
Goal: Create a cloud storage bucket where your Raspberry Pi will upload files.
What to do: In the AWS Console, search for S3 and open the S3 panel. Create a new bucket using the default settings, and name the bucket however you like.

Expected result: You have an empty S3 bucket created in your AWS account.
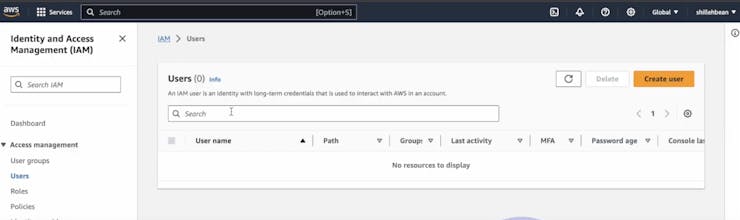
Step 3 - Create an IAM user and assign admin privileges for uploads
Goal: Create credentials that your Python script can use to put objects into the bucket.
What to do: In the AWS Console, search for Users and open the Users panel. Click Create New User.
Then select the user and create a group under the Groups tab. Make sure the group has administrative privileges, or you will get an error when trying to place an item into the bucket.
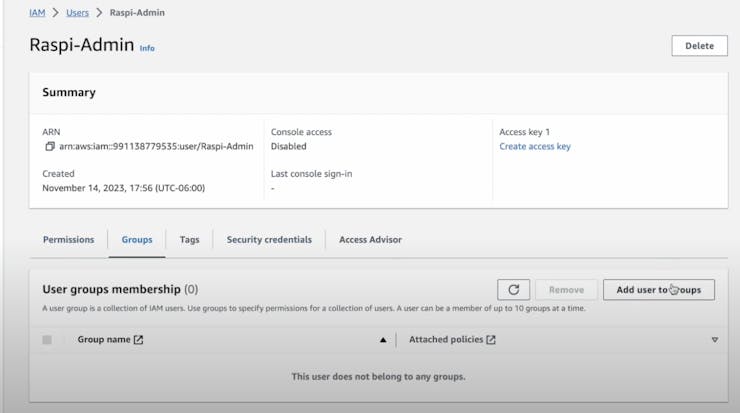
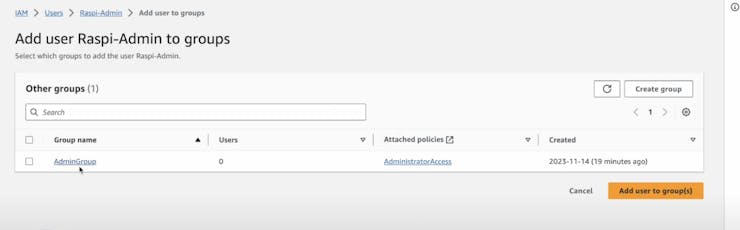
Expected result: Your IAM user belongs to a group with permissions that allow uploading objects to S3.
Step 4 - Create and save your access key and secret key
Goal: Generate the key pair your Raspberry Pi script will use for authentication.
What to do: Create an Access Key and Secret Key pair for your IAM user, and save the values somewhere safe. These keys can allow access to your bucket, so treat them like passwords.

Expected result: You have an access key and secret key saved securely and ready to use in your Python code.
Step 5 - Create the Python file on your Raspberry Pi
Goal: Get a runnable script that uploads a file to S3.
What to do: Open any editor you like on your Raspberry Pi and create a Python file with the code from the project downloads.
Important: Replace the respective values for your keys and your bucket name. There are a total of 3 values in the code you need to replace.
Expected result: You have a Python file ready to run, with your AWS keys and bucket name filled in.
Step 6 - Install required Python packages
Goal: Install the AWS SDK (and optionally the camera library) so the script can upload to S3.
What to do: Install boto3. If you choose to use a camera to take an image, also install picamera.
Code:
pip install boto3pip install picameraExpected result: Your Raspberry Pi environment has the required packages installed for S3 uploads (and camera capture if you are using it).
Step 7 - Run the script and verify the upload in S3
Goal: Confirm the Raspberry Pi successfully uploads an object to your S3 bucket.
What to do: Run your Python script on the Raspberry Pi. If it ran successfully, go back to the AWS website, open your bucket, and look for the newly uploaded object(s). Select an object, then use the top-right options to Open or Download it.
Expected result: You can see the uploaded file in your S3 bucket and open or download it from the AWS Console.
Conclusion
You just set up AWS S3 and used a Raspberry Pi 4B (or another Raspberry Pi model) to upload a file to an S3 bucket using Python and boto3. This approach works for images, videos, and many other data types, which makes it a powerful building block for IoT applications.
Want the parts and accessories used in your next Raspberry Pi build? Grab them from ShillehTek.com. If you want help designing a secure IoT upload pipeline or customizing this workflow for your product, check out our IoT consulting services.


.png?v=25000753014097803521779072085)

.png?v=68677308723310773341779072085)


