Drawing in a React Native application can be useful for cases where you want to take signatures, draw, or create collaborative experiences in your React Native Expo Apps. Thankfully it can easily be done with the use of the react-native-svg library. You may be wondering what is SVG?
SVG stands for Scalable Vector Graphics. It is a widely-used XML-based file format for describing two-dimensional vector graphics. Unlike raster graphics (e.g., JPEG or PNG images), which are composed of pixels and can lose quality when scaled, SVG graphics are based on mathematical equations that define shapes and paths, allowing them to be scaled to any size without losing quality.
SVG graphics are highly versatile and commonly used for web graphics, data visualization, logos, icons, and other scalable graphics.
React Native SVG is a library that enables you to use SVG files and render vector graphics in your React Native applications. It allows you to incorporate SVG graphics into your mobile app UI, just like any other React Native component. The library bridges the gap between React Native's native components and SVG elements, making it possible to display and manipulate scalable vector graphics within the app.
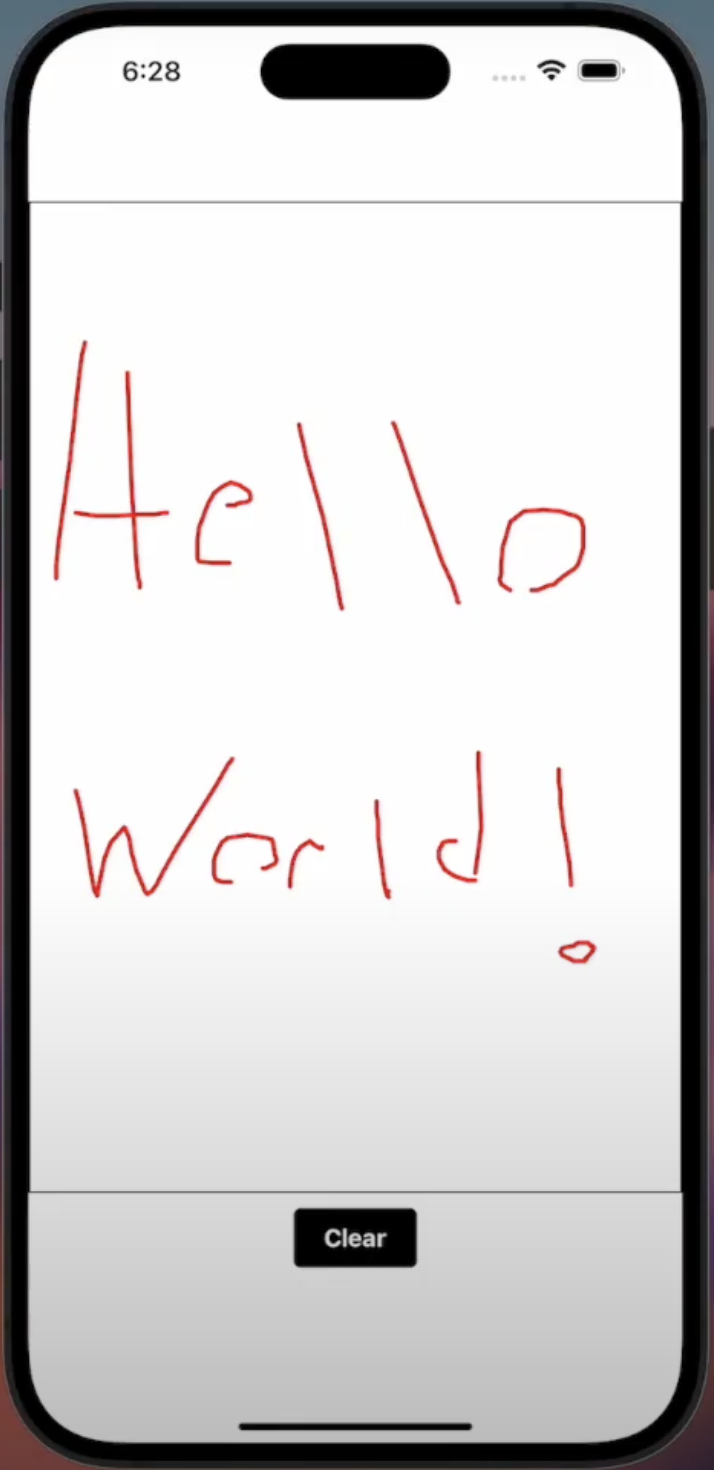
React Native SVG provides a set of components that correspond to SVG elements, such as <Svg>, <Circle>, <Rect>, <Path>, etc. In this tutorial, we will be showing how to use the Path component but in reality, once you learn how to do this you should be easily able to modify the code to your liking. The example we will create in this tutorial will look as follows.
Before we get started, be sure to subscribe and support the channel if you have not!
Subscribe:
Support:
https://www.buymeacoffee.com/mmshilleh
Step 1-) Create an Expo Application
To do this, you need to have an expo as a prerequisite and run “expo init”.
Step 2-) NPM Install react-native-svg
This is the only library you will need to run the code. npm i react-native-svg
STEP 3-) Code Walkthrough
The code for the component is as follows
import React, { useState } from 'react';
import { View, StyleSheet, Dimensions, TouchableOpacity, Text } from 'react-native';
import { Svg, Path } from 'react-native-svg';

const { height, width } = Dimensions.get('window');

export default () => {
  const [paths, setPaths] = useState([]);
  const [currentPath, setCurrentPath] = useState([]);
  const [isClearButtonClicked, setClearButtonClicked] = useState(false);

  const onTouchEnd = () => {
    paths.push(currentPath);
    setCurrentPath([]);
    setClearButtonClicked(false);
  };

  const onTouchMove = (event) => {
    const newPath = [...currentPath];
    const locationX = event.nativeEvent.locationX;
    const locationY = event.nativeEvent.locationY;
    const newPoint = `${newPath.length === 0 ? 'M' : ''}${locationX.toFixed(0)},${locationY.toFixed(0)} `;
    newPath.push(newPoint);
    setCurrentPath(newPath);
  };

  const handleClearButtonClick = () => {
    setPaths([]);
    setCurrentPath([]);
    setClearButtonClicked(true);
  };

  return (
    <View style={styles.container}>
      <View style={styles.svgContainer} onTouchMove={onTouchMove} onTouchEnd={onTouchEnd}>
        <Svg height={height * 0.7} width={width}>
          <Path
            d={paths.join('')}
            stroke={isClearButtonClicked ? 'transparent' : 'red'}
            fill={'transparent'}
            strokeWidth={3}
            strokeLinejoin={'round'}
            strokeLinecap={'round'}
          />
          {paths.length > 0 &&
            paths.map((item, index) => (
              <Path
                key={`path-${index}`}
                d={currentPath.join('')}
                stroke={isClearButtonClicked ? 'transparent' : 'red'}
                fill={'transparent'}
                strokeWidth={2}
                strokeLinejoin={'round'}
                strokeLinecap={'round'}
              />
            ))}
        </Svg>
      </View>
      <TouchableOpacity style={styles.clearButton} onPress={handleClearButtonClick}>
        <Text style={styles.clearButtonText}>Clear</Text>
      </TouchableOpacity>
    </View>
  );
};

const styles = StyleSheet.create({
  container: {
    flex: 1,
    justifyContent: 'center',
    alignItems: 'center',
  },
  svgContainer: {
    height: height * 0.7,
    width,
    borderColor: 'black',
    backgroundColor: 'white',
    borderWidth: 1,
  },
  clearButton: {
    marginTop: 10,
    backgroundColor: 'black',
    paddingVertical: 10,
    paddingHorizontal: 20,
    borderRadius: 5,
  },
  clearButtonText: {
    color: 'white',
    fontSize: 16,
    fontWeight: 'bold',
  },
});
Code Breakdown:
Import Statements:
- The code imports required modules from
react,react-native, andreact-native-svg. - These modules are needed to create the drawing canvas and handle touch events.
- Dimensions:
- The
Dimensionsobject is used to get the height and width of the device's window. You do not necessarily need this but it helps us size our drawing canvas easily. - State Variables:
- The code defines three state variables using the
useStatehook:paths,currentPath, andisClearButtonClicked. -
paths: An array that stores all the completed drawing paths as strings. You will need to record these so that you can draw more than one line/path. -
currentPath: An array that stores the current drawing path as it's being drawn, which eventually becomes added to the paths variable. -
isClearButtonClicked: A boolean flag to track whether the "Clear" button has been clicked. - onTouchEnd() Function:
- This function is called when the touch event ends on the drawing canvas.
- It pushes the
currentPath(the completed drawing path) into thepathsarray. - It resets the
currentPathto an empty array and setsisClearButtonClickedtofalse. - onTouchMove(event) Function:
- This function is called when the user moves their finger on the drawing canvas (during touch events).
- It calculates the
locationXandlocationYcoordinates of the touch event. - It creates a new point in the
currentPatharray as a string in the format"Mx,y ", wherexandyare the coordinates. This is how the SVG interprets coordinates and displays them connected in a smooth manner. - It updates the
currentPathwith the new point. - handleClearButtonClick() Function:
- This function is called when the "Clear" button is clicked.
- It clears the
pathsarray and thecurrentPatharray, effectively resetting the drawing canvas. - It sets
isClearButtonClickedtotrue. - Return Statement:
- The main component is returned, and it renders a
Viewcontaining two elements: the drawing canvas and a "Clear" button. - Drawing Canvas (
<Svg>and<Path>): - The drawing canvas is created using the
<Svg>component fromreact-native-svg. - The
<Svg>component sets the height to 70% of the device window height and the width to the device window width. - A
<Path>component is used to draw the current path (currentPath) and all completed paths (paths) on the canvas. Be aware there are other types of components you can use depending on your applicaiton. - The color and styling of the paths are determined by the
strokeandstrokeWidthprops, which you can adjust. - "Clear" Button (
<TouchableOpacity>): - The "Clear" button is created using the
<TouchableOpacity>component fromreact-native. - When clicked, it calls the
handleClearButtonClick()function to reset the drawing canvas. - Styles:
- The code includes some styling using the
StyleSheet.create()function to define the appearance of the drawing canvas and the "Clear" button. You will probably have to style as you need be.
Overall, this code creates a simple drawing app in React Native. Users can draw on the canvas using their finger, and the drawing paths are stored and displayed using SVG <Path> components. The "Clear" button allows users to reset the canvas and start drawing again.
Conclusion
Hope you learned how to create your canvas in React Native. If you have any questions let me know. Do not forget to subscribe and support the channel above, thanks!