Learn how to create your own WiFi network using the ESP32 AP Mode. Connect and send information with WiFi without the Internet! This can be used to host web servers that devices can access as long as the network is running, and can later be used to send information between Arduino-based controllers without access to the global Internet!
Before reading the remainder, be sure to subscribe and support the channel if you have not!
Subscribe:
Support:
https://www.buymeacoffee.com/mmshilleh
Step 1-) Upload Code to ESP32 in Arduino IDE
In today’s example we will write a simple script that simply generates an HTTP response when we connect to the ESP32 and type in the IP address in our browser. The code below handles incoming HTTP requests and returns a Hello World response.

#include <WiFi.h>

// Replace with your network credentials
const char* ssid     = "ESP32-Access-Point";
const char* password = "123456789";

// Set web server port number to 80
WiFiServer server(80);

void setup() {
  Serial.begin(115200);

  // Connect to Wi-Fi network with SSID and password
  Serial.print("Setting AP (Access Point)…");
  // Remove the password parameter, if you want the AP (Access Point) to be open
  WiFi.softAP(ssid, password);

  IPAddress IP = WiFi.softAPIP();
  Serial.print("AP IP address: ");
  Serial.println(IP);

  server.begin();
}

void loop(){
  WiFiClient client = server.available();   // Listen for incoming clients

  if (client) {                             // If a new client connects,
    Serial.println("New Client.");          // print a message out in the serial port
    String currentLine = "";                // make a String to hold incoming data from the client
    while (client.connected()) {            // loop while the client's connected
      if (client.available()) {             // if there's bytes to read from the client,
        char c = client.read();             // read a byte, then
        Serial.write(c);                    // print it out the serial monitor
        currentLine += c;
        if (c == '\n') {                    // if the byte is a newline character
          // if the current line is blank, you got two newline characters in a row.
          // that's the end of the client HTTP request, so send a response:
          if (currentLine.length() == 2) {
            // HTTP headers always start with a response code (e.g. HTTP/1.1 200 OK)
            // and a content-type so the client knows what's coming, then a blank line:
            client.println("HTTP/1.1 200 OK");
            client.println("Content-type:text/html");
            client.println("Connection: close");
            client.println();

            // Send your "Hello World" HTML response
            client.println("<html><head><meta name=\"viewport\" content=\"width=device-width, initial-scale=1\"></head>");
            client.println("<body><h1>Hello World</h1></body></html>");

            // The HTTP response ends with another blank line
            client.println();
            // Break out of the while loop
            break;
          } else { // if you got a newline, then clear currentLine
            currentLine = "";
          }
        } else if (c != '\r') {  // if you got anything else but a carriage return character,
          currentLine += c;      // add it to the end of the currentLine
        }
      }
    }
    // Close the connection
    client.stop();
    Serial.println("Client disconnected.");
    Serial.println("");
  }
}
- The code begins by including the necessary header file,
WiFi.h, for working with Wi-Fi connections on the ESP32. - It sets up variables for the Wi-Fi network credentials, including the SSID (network name) and password.
- The code defines a web server that listens on port 80 using the
WiFiServerclass. - In the
setup()function: - Serial communication is initialized for debugging purposes at a baud rate of 115200.
- The ESP32 is configured to create an Access Point (AP) with the specified SSID and password using
WiFi.softAP(ssid, password). - The IP address of the Access Point is obtained and printed to the serial monitor.
- The web server is started with
server.begin(). - In the
loop()function: - It checks for incoming client connections using
server.available(). - If a client connects, it prints a message to the serial monitor.
- It initializes a
StringvariablecurrentLineto store incoming data from the client. -
Inside a
whileloop that runs as long as the client is connected: - It checks if there is data available to read from the client using
client.available(). - If data is available, it reads a byte and prints it to the serial monitor.
- It appends the received byte to the
currentLinestring. -
If the received byte is a newline character (
\n), it checks the length ofcurrentLine.- If the length is 2, it indicates two consecutive newline characters, meaning the end of the client's HTTP request.
- In response, it sends HTTP headers indicating a successful response (
HTTP/1.1 200 OK), sets the content type to HTML, and includes a basic "Hello World" HTML page. - It then sends an additional blank line to signal the end of the HTTP response.
- Finally, it breaks out of the
whileloop. - Otherwise, if it received a single newline character, it clears the
currentLinestring for the next part of the HTTP request.
- After handling the client's request, it closes the client connection using
client.stop()and prints a message indicating that the client has disconnected. - The code repeats this process in the
loop()function, continuously listening for and handling incoming client connections.
This code essentially turns the ESP32 into a simple web server that responds with a "Hello World" HTML page when accessed through a web browser or other HTTP client. It is set up to handle HTTP requests one at a time, and it provides basic debugging information through the serial monitor.
Step 2-) Connect to Device Network
Once the code is uploaded, you will see the WiFi network available to connect to as shown here.
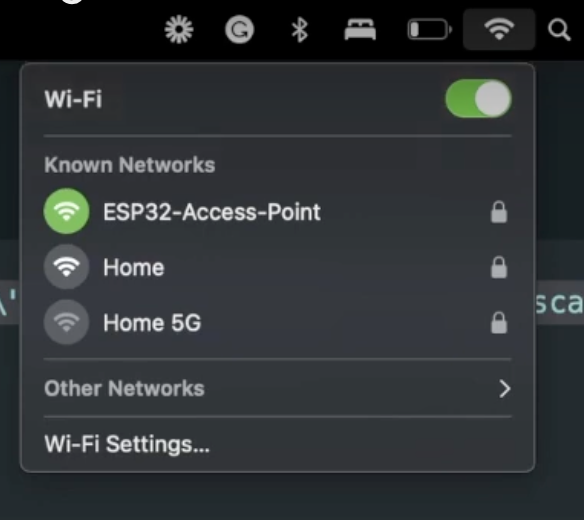
Type in your password as needed.
Now enter the IP Address of your device into your internet browser using the http protocol. You can get the IP address of the ESP32 from the Serial Monitor in Arduino IDE. I used the following: http://192.168.4.1/
If you did everything right you should see the Hello World message!
Conclusion
This should give the basics to start using AP Mode with the ESP32 for more advanced use cases! If you have any questions let me know in the comment section on Youtube! Do not forget to subscribe for more useful content.